
Attention! When the engine is running, do not put your hands too close to the fan and do not stand in the plane of rotation of the fan
Turn off the ignition and disconnect the wire «masses» from the battery.
Disconnect the electrical connector from the radiator fan motor.
On pre-2001 vehicles, the air conditioning condenser fan shroud is attached to the radiator with one bolt at the top and two at the bottom. The main radiator fan shroud is secured with two bolts at the top and two bolts at the bottom.
On vehicles manufactured since 2001, the air conditioning condenser fan shroud is attached to the radiator with two bolts at the top and two at the bottom. The main radiator fan shroud is secured with two bolts at the top and two latches at the base.
Apply the parking brake and chock the rear wheels.
Raise the front of the car and place it on stands. Remove the mudguard from the engine compartment.
On cars manufactured before 2001, remove the lower bolts of the fan casing from the bottom of the car.
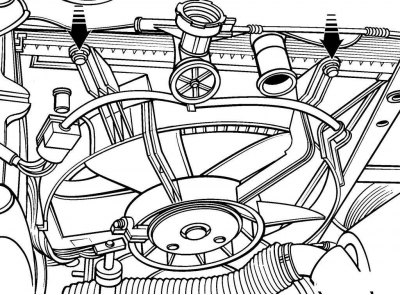
Pic. 4.6. The location of the upper bolts of the radiator fan shroud
From the top of the engine compartment, unscrew the upper bolts securing the fan shroud and remove it (pic. 4.6). On vehicles manufactured since 2001, release the fan shroud from the latches at the base by pulling it up.
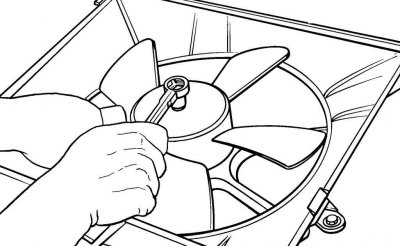
Pic. 4.7. Removing the screw securing the fan to the motor shaft
While holding the fan blades from turning, unscrew the screw securing the fan to the motor shaft and remove it (pic. 4.7). The condenser fan is attached to the motor shaft with three screws.
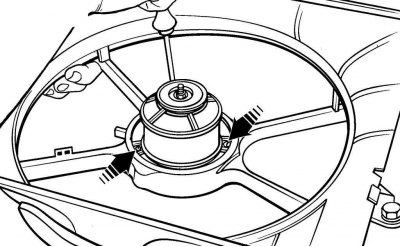
Pic. 4.8. The location of the screws securing the motor to the fan casing
Loosen the screws securing the motor to the fan shroud and remove the motor (pic. 4.8).
Install in the reverse order of removal.