
Attention! Be careful when opening the radiator cap while the engine is hot, as escaping vapors can cause severe burns. Close the radiator cap with a thick layer of cloth and slowly unscrew the cap until a hissing sound is heard. After the hiss stops, slowly unscrew and remove the cap from the radiator.
Checking the thermostat installed on the car
Before checking the thermostat, check the coolant level, the tension of the water pump drive belt and the operation of the temperature sensor.
If it takes a very long time to warm up after starting a cold engine, the thermostat may be constantly open and the coolant circulates in a large circle. In this case, replace the thermostat.
If the engine overheats, check the temperature of the lower radiator hose by hand. If the hose is cold, the thermostat may be permanently closed and the coolant is constantly circulating in a small circle. In this case, also replace the thermostat.
If the lower radiator hose is hot, this indicates that the thermostat is open and coolant is flowing through the radiator. In this case, it is necessary to contact a service station to find and eliminate the cause of engine overheating.
Test with thermostat removal
Remove the thermostat.
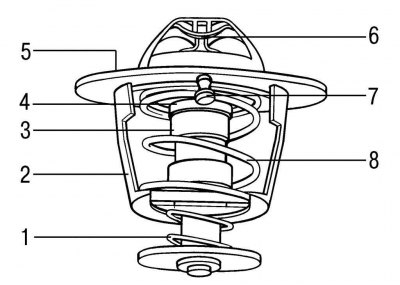
Pic. 4.1. Thermostat: 1 - secondary spring; 2 - frame; 3 - valve; 4 - valve seat; 5 - flange; 6 - plunger; 7 - locating pin; 8 - main spring
The appearance of the thermostat is shown in fig. 4.1.
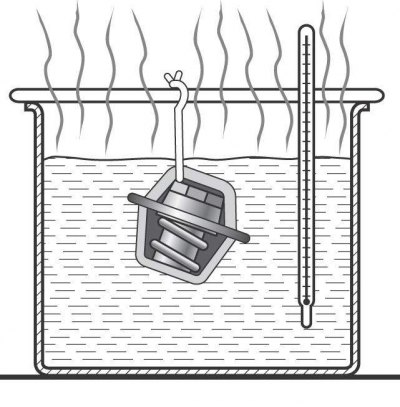
Pic. 4.2. Checking the opening of the thermostat valve in a vessel with hot water
You can pre-test the thermostat as follows: hang it on a thread in a glass vessel filled with water and heat the water to a boil (pic. 4.2). When the water boils, the thermostat valve should open. Otherwise, replace it.
The opening temperature of the thermostat valve is written on its body.
The thermostat, the valve of which does not close when the water cools, is also faulty and must be replaced.
Thermostat replacement
Turn off the ignition and disconnect the wire «masses» from the battery.
Drain the coolant from the radiator. Disconnect the radiator hose from the thermostat housing.
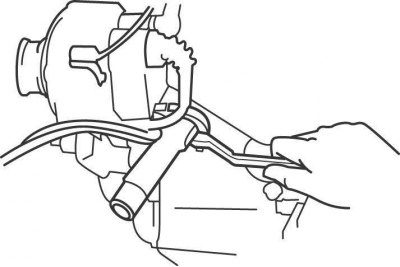
Pic. 4.3. Unscrewing the thermostat housing mounting nuts on cars produced before 2001
On pre-2001 vehicles, remove the thermostat housing from the rear of the water pump housing (pic. 4.3). To facilitate access to the lower nut of the thermostat housing, it is recommended to remove the oil filter.

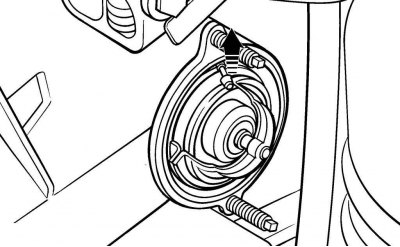
Pic. 4.4. The location of the thermostat housing mounting nuts on cars manufactured since 2001
On cars manufactured since 2001, remove the alternator and unscrew the nuts securing the thermostat housing (pic. 4.4).
Remove the thermostat, remembering the position in which it was installed.
Fit a new O-ring to the thermostat and clean the mating surfaces of the thermostat housing.
On cars manufactured before 2001, install the thermostat in the thermostat housing. Then install the thermostat housing into the back of the water pump with the dowel pin on top.
Pic. 4.5. When installing the thermostat, the dowel pin must be at the top
On vehicles manufactured since 2001, install the thermostat in the cylinder block socket so that the dowel pin is on top (pic. 4.5).
Fasten the thermostat housing with nuts and install the remaining elements removed earlier.
Fill with coolant.
Start the engine and check for leaks.