
Warning! Cars are equipped with security systems (SRS) including airbags and seat belt tensioners. Before carrying out work near the shock sensors, the instrument panel and the steering column, first disconnect the negative and then the positive terminals from the battery and wait 2 minutes. This will prevent the airbags from deploying unintentionally and the seat belt pretensioners from deploying, which could cause injury.
Attention! Do not allow coolant to come into contact with clothing or body paintwork. Otherwise, rinse the surface with plenty of water.
Attention! Collect and dispose of the drained coolant.
Attention! The air conditioning system is under pressure, so do not open the air conditioning circuit until the refrigerant has been pumped out.
Attention! Replace the heater core when the engine is completely cold.
Note. Replacing the heater core on vehicles produced since 2001 is a very time-consuming operation for self-fulfillment, as it requires the removal of the instrument panel and center console and is associated with the disconnection of a large number of electrical connectors.
Removing the heater core
Removal on all models. If the vehicle is equipped with an air conditioning system, have the refrigerant removed from the air conditioning circuit at a workshop.
Turn the interior air temperature control knob to the HOT position (hot).
Drain the coolant.
Turn off the ignition and disconnect the wire «masses» from the battery.
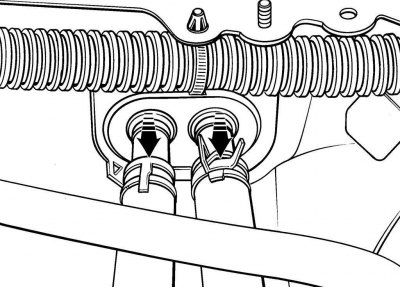
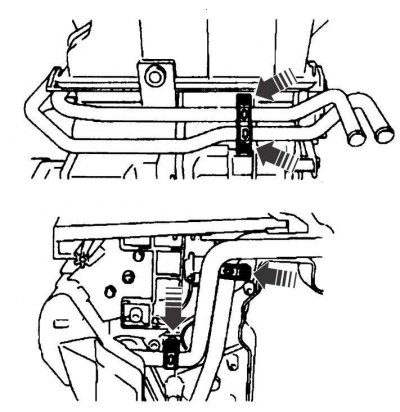
Pic. 4.24. Places for connecting the hoses for supplying coolant to the heater radiator to the tubes on the bulkhead of the engine compartment
In the engine compartment, loosen the clamps and disconnect the coolant supply hoses to the heater radiator from the pipes on the bulkhead of the engine compartment (pic. 4.24).
Remove the o-rings from the tubes passing through the bulkhead of the engine compartment to the heater core.
Disconnect the A/C lines from the evaporator and remove the O-rings. Close the ends of the pipelines with plastic plugs to prevent moisture from entering them from the air.
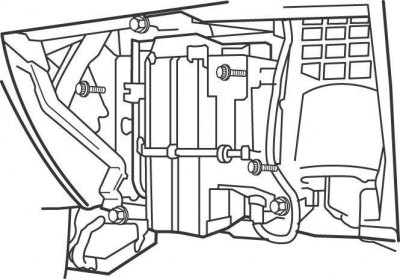
Pic. 4.25. Location of screws securing the evaporator casing on vehicles produced before 2001
For cars produced before 2001. Remove a ware box from the panel of devices. Loosen the screws and remove the evaporator cover (pic. 4.25).
Disconnect the air duct supplying air to the feet of the rear passengers from the heater unit.
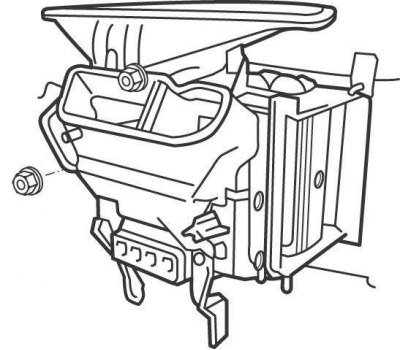
Pic. 4.26. The location of the nuts for fastening the heater block on cars manufactured before 2001
Remove 2 nuts and slide the heater block to the right (pic. 4.26).
Remove the bolts securing the heater piping to the top of the heater block, then release the clip and remove the heater core.
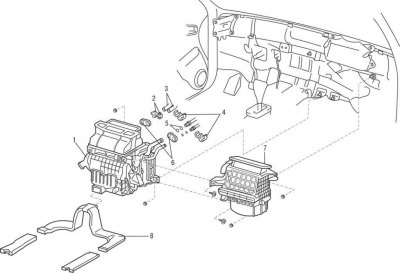
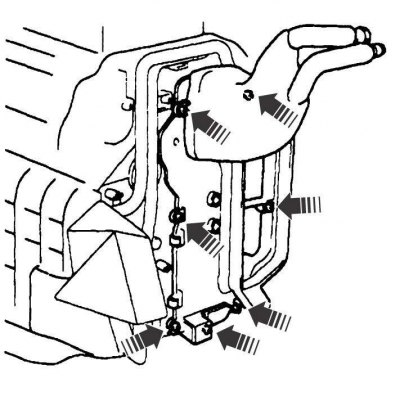
Pic. 4.27. The block of a heater and air conditioning system on cars of release since 2001: 1 - block of the air conditioning system; 2 - clamps; 3 - hoses for supplying coolant to the heater radiator; 4 - clamps for connecting the pipelines of the conditioning circuit to the evaporator (Quick Joint); 5 - sealing rings; 6 - seal; 7 - heater fan block; 8 - air duct for supplying air to the legs of the rear passengers
On cars produced since 2001. Remove the instrument panel and reinforcement beam. Disconnect the electrical connectors from the fan motor and fan resistor and remove the heater fan assembly (pic. 4.27).
Remove the air duct supplying air to the legs of the rear passengers.
Remove the 2 nuts and remove the air conditioning unit.
Release the clips and remove the thermistor and wiring harness from the air conditioning unit.
Pic. 4.28. The location of the screws that secure the evaporator to the air conditioning unit on cars manufactured since 2001
Remove the screws and remove the evaporator from the air conditioning unit (pic. 4.28).
Pic. 4.29. The location of the screws for fastening the heater radiator to the air conditioning system unit on cars manufactured since 2001
Remove the screws and remove the heater core from the air conditioning unit (pic. 4.29).
Heater Radiator Installation
Installation on vehicles up to 2001. Install in the reverse order of removal. Fill with coolant.
Charge the air conditioning circuit with refrigerant.
Start the engine and check the functioning of the heating and air conditioning systems.
Installation on cars since 2001. Install in the reverse order of removal, taking into account the following.
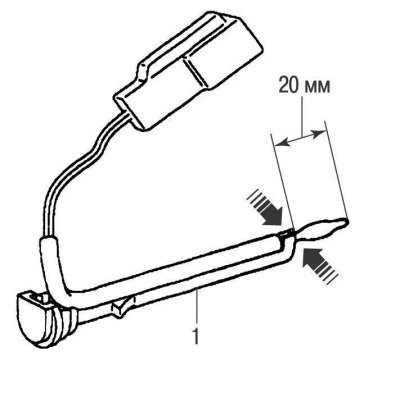
Pic. 4.30. Mounting the thermistor on the bracket (1)
Check that the thermistor mounted on the bracket protrudes 20 mm (pic. 4.30).
Fill with coolant.
Charge the air conditioning circuit with refrigerant.
Start the engine and check the operation of the heating and air conditioning systems.