
Attention! Remove the water pump on a cold engine.
Attention! Do not allow coolant to come into contact with clothing or body paintwork. Otherwise, rinse the surface with plenty of water.
Attention! Collect and dispose of the drained coolant.
Water pump check
A faulty water pump can cause serious engine damage.
Start the engine and warm up to operating temperature. While the engine is running, squeeze the upper radiator hose. If the water pump is working properly, pressure will be felt in the hose from the pump.
Attention! When the motor is running, do not put your hands too close to the fan and stay away from the fan rotation plane
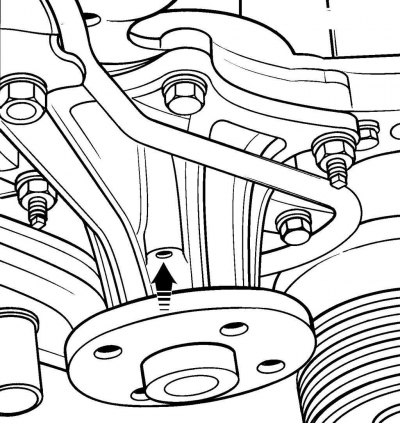
Pic. 4.12. The location of the hole for draining the coolant from the water pump housing
The water pump has a drain hole to drain the coolant from the pump housing if the sealing ring is damaged. The hole is located under the pump drive shaft on the pulley side (pic. 4.12). If there is a gray coating near the hole from dried coolant, this is normal. If there are dark brown spots, then the pump needs to be replaced or repaired.
To check for wear on the pump bearings, shake the pump pulley. If there is play, the pump must be replaced or repaired.
Replacing the water pump on cars manufactured before 2001
Turn off the ignition and disconnect the wire «masses» from the battery.
Drain the coolant.
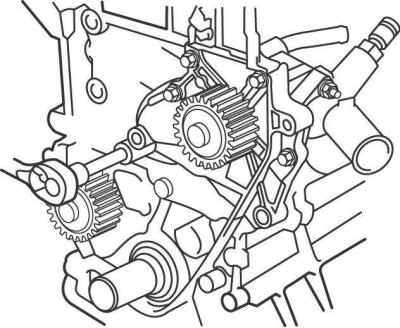
Remove the toothed belt, guide and tension rollers.
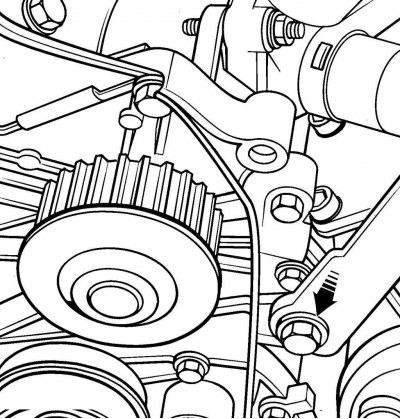
Pic. 4.13. Arrangement of a bolt of fastening of an adjusting support of the generator
Turn out a bolt and remove an adjusting support of the generator (pic. 4.13).
On vehicles with an air conditioning system, remove the A/C compressor mounting bolts. Move the air conditioning compressor, together with the wires and tubes attached to it, to the side and secure it to the body with a soft wire.
Attention! Do not open the air conditioning circuit.
Disconnect the bottom hose from the radiator.
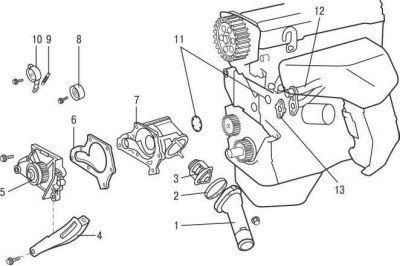
Pic. 4.14. Water pump on cars produced before 2001: 1 - thermostat housing; 2 - sealing ring; 3 - thermostat; 4 - adjusting support of the generator; 5 - water pump; 6 - gasket; 7 - water pump cover; 8 – the directing roller of a gear belt; 9 - spring; 10 – a tension roller of a gear belt; 11 - sealing rings; 12 - bypass pipe of the cooling system; 13 - gasket
Turn out the water pump mounting bolts, while marking the position of the bolts, as they have different lengths. Remove pump and gasket (pic. 4.14). If the pump cannot be removed by hand, knock it down with a mallet.
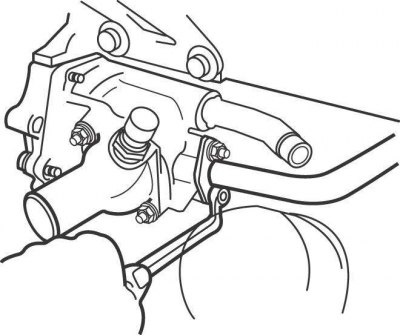
Pic. 4.15. Unscrewing the nuts securing the heater pipe to the water pump
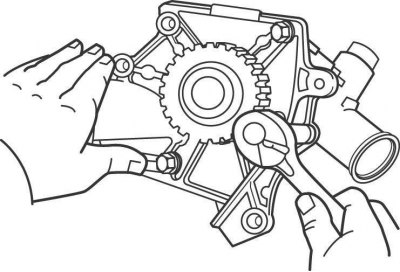
Disconnect the bypass pipe of the cooling system from the pump, then unscrew the 2 nuts and disconnect the heater pipe from the pump (pic. 4.15). Remove the water pump cover.
Clean the mating surfaces of the pump from the remnants of the sealant, gasket and o-rings.
Install new O-rings between pump cover and cylinder block. Install a new gasket under the heater pipe.
Pic. 4.16. The location of the water pump mounting bolts, which are tightened first of all on cars manufactured before 2001
Pic. 4.17. The sequence of tightening the remaining bolts of the water pump on cars manufactured before 2001
Install the pump with a new gasket and secure with bolts, first tightening the bolts shown in figure 4.16, then tighten the remaining bolts in the sequence shown in figure 4.17.
Further installation is carried out in the reverse order of removal.
Fill with coolant.
Start the engine and check for leaks.
Replacing the water pump on vehicles manufactured since 2001
Turn off the ignition and disconnect the wire «masses» from the battery.
Drain the coolant.
Loosen the water pump pulley bolts, then remove the drive belt.
Release the wiring harness from the clamp and move it away from the water pump.
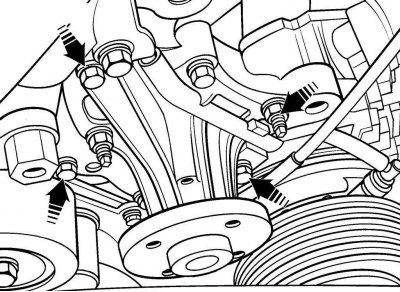
Pic. 4.18. The location of the water pump mounting bolts on vehicles manufactured since 2001
Turn out bolts and remove the water pump (pic. 4.18).
Clean the mating surfaces of the pump from sealant and gasket residues.
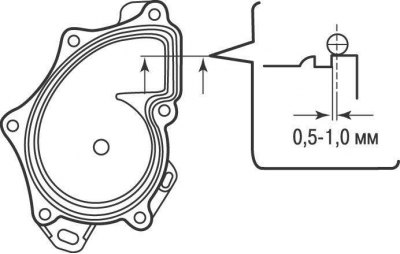
Pic. 4.19. Application area of RTV sealant on the mating surface of the water pump
Apply a 3mm bead of RTV sealant to the outside of the groove on the water pump mating surface (pic. 4.19).
Install the water pump and secure it with bolts.
Further installation is carried out in the reverse order of removal.
Fill with coolant.
Start the engine and check for leaks.