
Removing
Turn off the ignition and disconnect the wire «masses» from the battery.
Remove the air filter housing.
Remove the expansion tank of the cooling system.
With the vehicle on wheels, loosen the nuts securing the drive shafts to the hubs.
Remove the clutch slave cylinder along with the fluid supply tube.
Attention! Do not depress the clutch pedal with the clutch slave cylinder removed.
Disconnect the electrical connectors from the reversing light switch and vehicle speed sensor.
Turn out a bolt and disconnect a wire of connection with «weight» from the gearbox.
Disconnect control cables from gearbox.
Release the clamps securing the wiring harnesses to the engine and transmission and move the wires to the side.
Remove the starter.
Secure the gearbox to the engine by hooking one hook of the chain to the lug on the end of the gearbox, and the second hook to the hole in the end of the cylinder head.

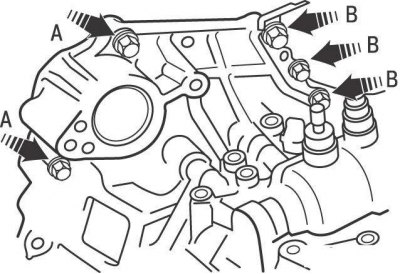
Pic. 9.4. Top bolt location (A) mounting the gearbox to the engine on models up to 2001

Pic. 9.5. Top bolt location (A and B) mounting the gearbox to the engine on models from 2001
Remove the upper bolts securing the gearbox to the engine (pic. 9.4, 9.5). Mark the location of the brackets that are attached with these bolts.
Turn out a bolt of fastening of the left support of the power unit to a transmission.
Raise the car on a lift. Remove the front wheels and lower engine compartment guard.
Drain the gearbox oil.
Remove drive shafts.
Remove the exhaust pipe.
If equipped, disconnect the oil cooler hoses from the transmission. Close the ends of the hoses with plastic plugs.
Turn out a bolt of fastening of the steering mechanism to the lower cross beam. Using soft wire, secure the steering gear to a beam installed across the engine compartment.
Remove the lower transverse and longitudinal beams.
On release models up to 2001, remove the stiffening plate and the plate from the rear end of the engine.
Support the transmission with a transmission jack.
Remove the left transmission support and its bracket.
Pic. 9.6. Location of bottom bolts (C, D, E, F, G) fastening the gearbox to the engine on vehicles with one drive axle manufactured before 2001
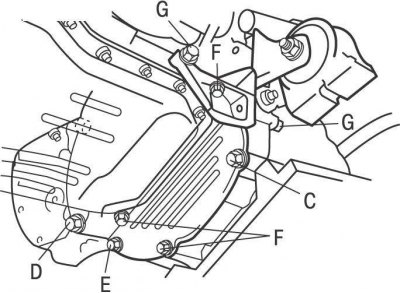
Pic. 9.7. Location of bottom bolts (A and B) fixing the gearbox to the engine on cars with one drive axle manufactured since 2001
Remove the lower bolts securing the gearbox to the engine (pic. 9.6, 9.7).
Make sure all hoses and wires are disconnected from the gearbox.
Lower the left side of the engine along with the gearbox, then move the gearbox away from the engine and after the input shaft has come out of the clutch disc hub, lower and remove the gearbox.
Check the condition of the clutch parts, replace worn parts. It is recommended to replace the clutch disc every time the gearbox is removed.
Installation
Install in the reverse order of removal, taking into account the following.
Clean the spline of the transmission input shaft and lubricate with a thin coat of high temperature grease. The lubricant layer must be thin and even, otherwise, during clutch operation, excess lubricant will be thrown onto the working surfaces of the clutch, which may disrupt its operation.
Move the gearbox towards the engine so that the input shaft of the gearbox enters the splines of the clutch disc. It may be necessary to rotate the engine crankshaft slightly to align the splines of the input shaft of the gearbox with the splines of the clutch driven disk. When installing the gearbox, do not let the gearbox rest on the clutch disc with the input shaft.
With the transmission moving forward, install the clutch housing on the guide bushings of the cylinder block.
Tighten the gearbox mounting bolts to the required torque.
Pour oil into the gearbox.