
- Disconnect the ground wire from the battery.
- Open the lower valve and drain the coolant to a level below the upper water hose.
- Disconnect the wires from the starter interlock.
- Unscrew the union nut of the oil cooler pipe. At the same time, hold the second nut with a wrench.
- Remove the coolant inlet fitting.
- Remove the housings from the beams and drain the automatic transmission fluid. Pour the liquid into a 3.0 liter container.
- Remove the covers from the suspension consoles and remove the front and rear box suspensions. The fastening is similar to that shown in Figure 170.
- Remove the engine mount center beam. It is attached as shown in Figure 171.
- Disconnect the drive shafts from the gearbox as described in Chapter 11.1.
- Remove the steering knuckle as described in the relevant chapter and move the steering knuckle to the side.
- Disconnect the wires from the starter and remove the starter.
- Disconnect the speedometer shaft from the box (Unscrew the knurled nut and pull out the roller).
- Disconnect the shift cable from the box. To do this, remove the bracket and stopper and wrap the cable support away from the box.
- On a gasoline engine, unscrew the 3 bolts securing the torque converter housing and remove the housing. On a diesel engine, remove the plug to expose a hole that provides access to the torque converter drive plate bolts.
- Remove the torque converter bolts. To do this, rotate the crankshaft until six bolts alternately appear on the underside of the box or, on a diesel engine, in the hole. Then unscrew the bolts from the bottom, as shown in Figure 173. At the same time, hold the crankshaft by the pulley, that is, an assistant is required for this work.
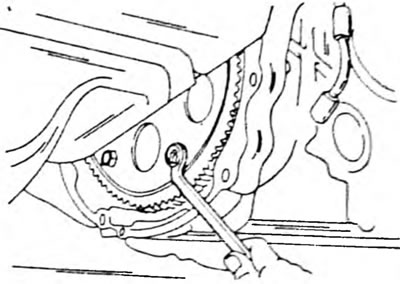
Pic. 173. Unscrewing the bolts between the torque converters and the driven disk when removing the automatic transmission
- Place a jack under the box and lift it up a little. To avoid damaging the box, place a wooden block between the box and the jack.
- Remove the left engine mount.
- Unscrew the bolts securing the box to the engine.
- Take a threaded pin of the same diameter as the drive disk bolts, cut a slot at the end of the pin and screw the threaded pin in the place indicated in Figure 174. After this, use a powerful screwdriver to rest against the pin, as shown in the figure, and press the box away from the engine.
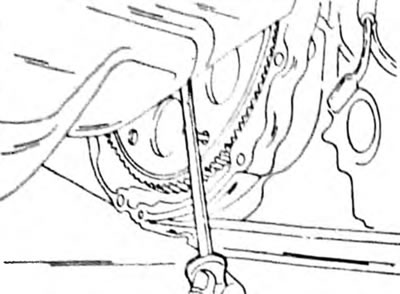
Pic. 174. Pressing the automatic transmission away from the engine using a grub screw and screwdriver
- Pull out the box.
Installation of the automatic transmission is carried out in reverse order, taking into account the following points:
- Lightly lubricate the torque converter hub and drive plate guide hole with multi-purpose grease.
- Screw the grub screw into the threaded hole of the transducer so that it can be used as a guide. Position the box so that the grub screw fits into the hole in the drive disk, similar to that shown in Figure 174.
- Press the box against the engine so that the converter journal engages with the crankshaft intake hole.
- Unscrew the guide pin and temporarily secure the transducer with 2 hand-tightened bolts, 10 mm long.
- Insert the bolts securing the box to the engine and tighten them to 65 Nm (M12) and 35 Nm (M10).
- Sequentially insert and tighten the converter bolts to a torque of 27 Nm. At the same time, keep the crankshaft from turning.
- Install the converter housing or insert the plug (diesel engine).
- Tighten the oil cooler pipes.
- Install drive shafts and steering knuckles.
- Install the engine center beam and the front and rear suspension.
- Pour about 2.5 liters of automatic transmission fluid into the box. The capacity of the box is about 5.5 liters, but not all the liquid was drained.
- Start the engine, engage all gears sequentially and then check the fluid level.