
Attention! The fuel system is under constant pressure, so depressurize the fuel system before disconnecting the lines.
Attention! The air conditioning system is under high pressure, so do not open the cooling circuit of the air conditioning system until the refrigerant has been recovered.
Attention! The air conditioning system must be serviced by technical personnel trained in safe work practices, using special equipment and in compliance with safety regulations for the collection and storage of automotive refrigerant.
Note. Removing the gearbox on all-wheel drive models is a very laborious job. The manufacturer recommends removing the power unit assembly and then disconnecting the gearbox from the engine.
Removing
Turn off the ignition and disconnect the wire «masses» from the battery.
Relieve the pressure in the fuel system.
Remove the hood. Remove the ventilation chamber cover located at the base of the windshield.
Protect the fenders with capes so as not to damage the paintwork.
Remove the air filter housing.
Disconnect the accelerator cable and move it to the side along with the bracket.
Remove the battery and its support.
Loosen the nuts securing the front wheels and drive shafts to the hubs.
Drain the engine oil and coolant.
Remove the expansion tank.
Remove the accessory drive belts.
Mark and disconnect from the engine vacuum hoses and hoses of the cooling system, electrical connectors, wires connecting to «weight» and fuel pipes.
Release clips and disconnect from the engine plaits of wires. Also disconnect the wires from the engine control unit (PCM) inside the car and pull the wires from inside the car into the engine compartment.
Remove the generator and starter.
Remove the radiator fan, fan shroud, and radiator. This operation is optional, but it will prevent damage to them when the engine is removed. If the radiator remains installed in the vehicle, disconnect the transmission oil cooler tubes from the radiator.
On models with an air conditioning system, remove the A/C compressor mounting bolts.
Move the air conditioning compressor, together with the wires and tubes attached to it, to the side and secure it to the body with a soft wire.
Attention! Do not open the air conditioning circuit.
Separate the exhaust pipe from the exhaust manifold.
Disconnect the transmission control rods. Also disconnect all electrical connectors from the transmission.
If the vehicle is equipped with a manual transmission, remove the clutch slave cylinder from the transmission housing.
Loosen the nuts securing the drive shafts to the hubs.
Disconnect control cables from gearbox.
Raise the car on a lift. Remove the front wheels and lower engine compartment protection.
Drain the gearbox oil.
Remove drive shafts.
Remove the cardan shaft.
On models prior to 2001, remove the power steering pump.
Remove the exhaust pipe.
Remove the lower transverse and longitudinal beams.
Lower the vehicle and secure the lift arms to the power unit lugs.
Turn out bolts of fastening of the right and left supports of the power unit.
Lower the power unit to the floor, then disengage the lift arms.
Raise the vehicle and move the power unit out from under the vehicle.
Remove the starter.
Mark and disconnect from a transmission all electric sockets and hoses.
On models up to 2001, remove the bolts and remove the three stiffening plates from the gearbox housing.
On models since 2001, unscrew the bolts and remove one stiffening plate.
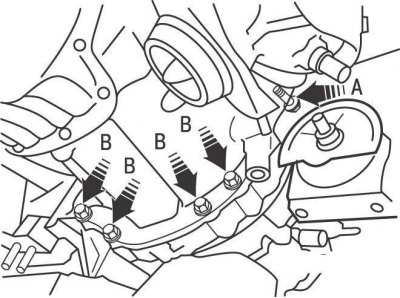
Pic. 9.8. Bolt location (A, B, C, D, E, F) transmission to engine mountings on 4WD models prior to 2001
Pic. 9.9. Bolt location (A, B, C) gearbox-to-engine mounts on 4WD models since 2001
Remove the bolts securing the gearbox to the engine (pic. 9.8, 9.9). Note the location of the bolts, as they will need to be installed in the same places later.
Separate the gearbox from the engine. On pre-2001 models, move the gearbox 5-7 cm away from the engine, then tilt the left end of the gearbox back and separate the gearbox.
Installation
Install in the reverse order of removal, taking into account the following.
Clean the spline of the transmission input shaft and lubricate with a thin coat of high temperature grease. The lubricant layer must be thin and even, otherwise, during clutch operation, excess lubricant will be thrown onto the working surfaces of the clutch, which may disrupt its operation.
Move the gearbox towards the engine so that the input shaft of the gearbox enters the splines of the clutch disc. It may be necessary to rotate the engine crankshaft slightly to align the splines of the input shaft of the gearbox with the splines of the clutch driven disk. When installing the gearbox, do not let the gearbox rest on the clutch disc with the input shaft.
With the transmission moving forward, install the clutch housing on the guide bushings of the cylinder block.
Tighten the gearbox mounting bolts to the required torque.
Pour oil into the gearbox.