
Attention! Wait until the engine has completely cooled down before starting work.
Removing
1. Disconnect the negative cable from the battery.
Attention! If the stereo system installed in the car is equipped with a security code, before disconnecting the battery, make sure that you have the correct combination to activate the audio system!
2. Empty the cooling system, including the engine block (see chapter Vehicle settings and routine maintenance).
3. Remove the air path pressure chamber, fuel lines and injectors (see chapter Power supply and exhaust systems).
4. Remove exhaust manifolds (see Section Removal and installation of exhaust manifolds).
5. Remove generator (see chapter Engine electrical equipment).
6. Remove the inlet pipeline (see Section Removal and installation of the inlet pipeline).
7. Remove the timing belt, gears and upper intermediate roller (see Section Removing, checking the condition and installing the gas distribution belt and timing gears). Remove the CMP sensor.
8. Remove the top (№ 3) timing cover.
9. Remove the camshafts from the corresponding head (see Section Replacing the front oil seal (ov) crankshaft/ camshafts).
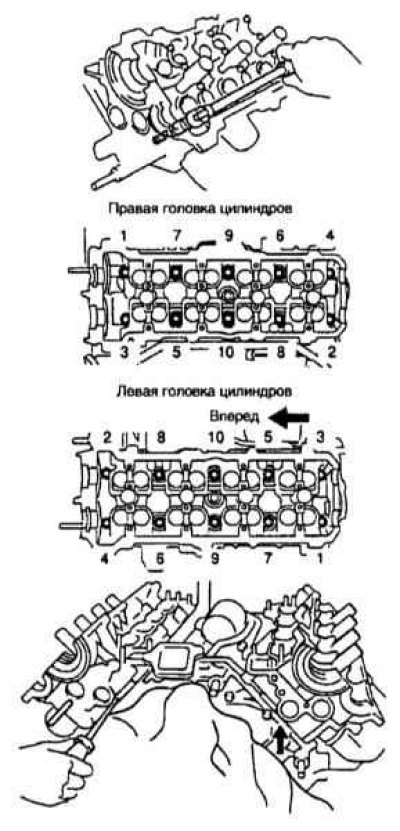
10. Acting in a strictly defined order (refer to accompanying illustration), in several steps (1/4 turn per approach) Loosen the 10 cylinder head bolts just enough to allow them to be removed by hand. Then carry out the same operation on the other head. Remove 20 bolts along with washers, being careful not to drop them.
11. Remove the cylinder heads along with the exhaust manifolds from the guide bushings of the engine block and lay them on wooden blocks on a workbench. If necessary, tap it to separate it with a hammer through a wooden block or pry the head with a lever in the indicated place (refer to the illustration of paragraph 10).
Attention! Do not under any circumstances «stuck» head with a lever under the mating surface!
Installation
1. Thoroughly clean mating surfaces. After scraping off the remnants of the gasket material and carbon deposits, wipe the surfaces with a rag soaked in acetone. The presence of traces of oil on the mating surfaces at the time of installation of the head can lead to a violation of the tightness of the gasket fit and, as a result, the development of leaks. When processing the block, plug the cylinder bores with rags to prevent small debris and various foreign objects from getting into them (as a last resort, vacuum the cylinders thoroughly).

2. Check the mating surfaces of the heads and block for deep scratches, nicks and other damage. Any defects are eliminated by turning, do not try to restore the surface with a file or sandpaper. Using a steel ruler and a set of flat feeler gauges, check the flatness of the cylinder head surface (refer to accompanying illustration).
3. With a tap of a suitable size, drive the threaded holes for the head mounting bolts. When finished, blow out the holes with compressed air.
Note. Remember to wear protective goggles when working with compressed air!
In order to clean the threads from corrosion and restore damaged turns, clamp the fixing bolts by the heads in a vice with soft jaws, drive them with a lerk of the appropriate size.
4. Install new gaskets by sliding them over the drive pins in the block. There are labels on the back of the gaskets to identify them: 2UL (left) or 2UR (right).
Note. Lay the gaskets with the markings up, do not confuse the front head gasket with the rear head gasket.
5. Measure the diameter of the cylinder head bolts at a distance of 75 - 85 mm from their head and compare it with the requirements Specifications. Use new bolts if necessary. Lubricate the threads and bottom surfaces of the mounting bolt heads with clean engine oil. Put washers on the bolts.
6. Screw the bolts back into place and tighten them by hand. Acting strictly in the reverse order shown in the illustration to paragraph 10 (Withdrawal), tighten the cylinder head bolts to the required torque in three stages: first with a force of 32 Nm, then tighten all the bolts by 90°, and finally by another 90°.
7. Install the remaining components in the reverse order of their dismantling.
8. Fill the cooling system and change the oil filter (see chapter Vehicle settings and routine maintenance).
9. Start the engine and check for signs of leaks (see chapter Vehicle settings and routine maintenance).