
Company Honda Company Ford Company Skoda Company Kia Company Mazda Company Mercedes Company Renault
English Русский
Български
Беларускі
Український
Српски
Hrvatski
Română
Polski
Slovenský
Magyar
Bookmark Articles Sitemap Contacts
ToyotaMan.ru


Camry Corolla Corona Carina Land Cruiser Highlander 4Runner RAV4 Others
4Runner N120 (1989-1995)

Clutch parts — removal, inspection and installation [Toyota 4Runner N120]

  • Main
  • 4Runner
  • N120 (1989-1995)
  • Transmission
  • Clutch
  • Clutch parts — removal, inspection and installation
0
Contents: Removal ↓ Examination ↓ Installation ↓

Pressure plate surface
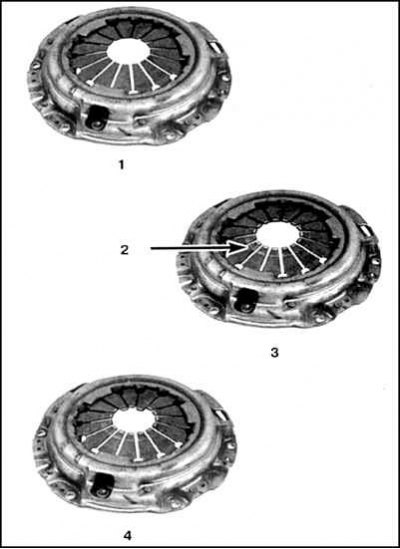


1. Normal wear and tear; 2. Increased wear; 3. Increased wear on fingers; 4. Breakage or deformation of spring pins


Attention! Remove dust from wear of linings with a special cleaner. Do not use gasoline or solvent.


The procedures described assume that the work is performed without removing the engine and the transmission is removed.

Removal


1. Raise the front of the car.

2. Remove the master cylinder.

3. Hang up the engine and remove the transmission. If the engine is supported from below, keep in mind that the oil receiver is located near the pan and can be easily damaged if the pan is deformed.

4. The fork and release bearing do not need to be removed yet.
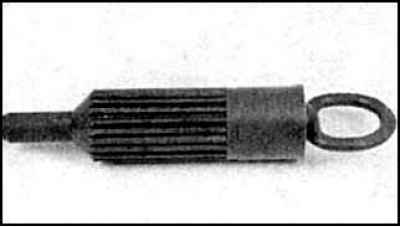


5. To secure the clutch, use a drift.
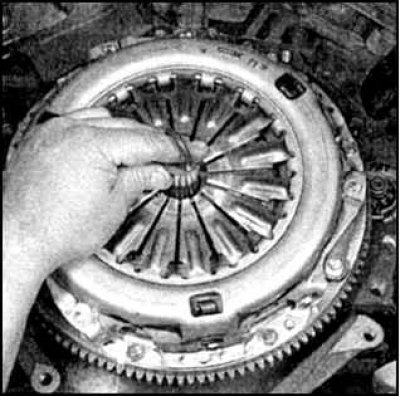


6. Lock the clutch.
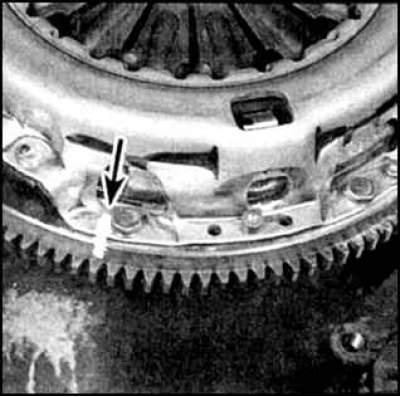


7. Find the alignment marks (letters X or O), if they are absent, mark the position of the clutch on the flywheel.

8. Gradually and evenly loosen the 6 bolts, unscrew the bolts and remove the clutch.

Examination


1. As a rule, only the friction disk requires replacement. However, if the disk is found to be oiled, the cause must be found and eliminated.
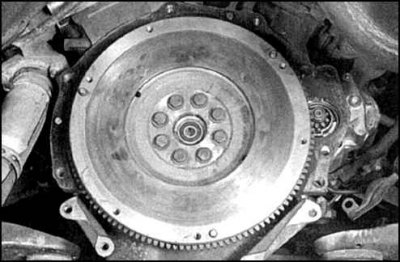


2. Check the flywheel surface for signs of wear, metal chipping, or deep wear. It is recommended to remove the flywheel and grind it regardless of the surface condition.


3. Check the condition of the guide bearing.
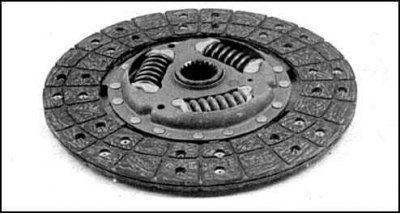


4. Check the condition of the friction disc surface, springs, and loose rivets.

5. The release bearing is also changed along with the friction disc.

6. Check the condition of the surface of the pressure plate, diaphragm spring and spring pins (see Fig. Pressure plate surface). Minor defects of the disc can be sanded with sandpaper; in case of significant defects, replace the clutch.

Installation


1. Clean the flywheel and clutch thoroughly. Install the clutch by aligning the marks and tighten the bolts by hand.
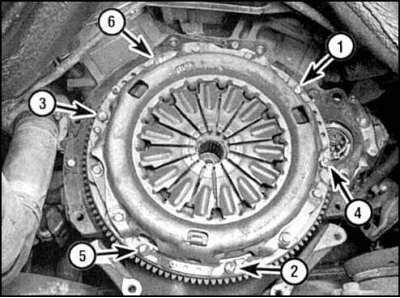


2. Center the disc using a drift that should fit into the pilot bearing and gradually and evenly tighten the clutch bolts in the order shown in the photo.

3. Lubricate the release bearing groove, the friction surfaces of the fork and the splines of the gearbox input shaft with high-melting grease. Install the bearing. Install the transmission.
This article is available at: russian, bulgarian, belarusian, ukrainian, serbian, croatian, romanian, polish, slovak, hungarian
The article material has been checked: Gribkov Vladimir
Share information:
◀ Previous
4Runner N120: Clutch
Next ▶

Clutch slave cylinder — removal and installation
Clutch Master Cylinder — Removal and Installation
Description of the clutch design
Release bearing — removal, inspection and installation
Guide Bearing — Checking and Replacing
Bleeding the Clutch Hydraulic Drive
Clutch pedal — checking and adjustment
Clutch Lock Switch — Checking, Adjusting and Replacing
Similar articles on other Toyota models

➥ Clutch parts — removal, inspection and installation Toyota Cruiser 60/80 (1980-1997, petrol)
➥ Clutch — removal, inspection of parts and installation Toyota Dyna Y50/Y60 (1984-1995)
➥ Height and free travel of clutch and brake pedals Toyota Camry XV20 (1996-2001)
➥ Checking the clutch fluid level Toyota Corolla E80 (1983-1990)
➥ Checking, cleaning and repairing cylinder head parts Toyota Corona T190 (1992-1997)
➥ Checking, cleaning and repairing cylinder head parts Toyota Carina T190 (1992-1996)
Link in different formats to this article
Comments and feedback from visitors
No comments yet


Add two numbers 10 + 34


4Runner N120 (1989-1995) 
  • General information
  • User manual
  • Maintenance
  • Power unit
  • 4-cylinder engines
  • 6-cylinder engines
  • Engine overhaul
  • Cooling and heating
  • Fuel system
  • Transmission
  • Mechanical gearbox
  • Automatic gearbox
  • Transfer case
  • Clutch
  • Transmission line
  • Chassis, running gear
  • Brake system
  • Car suspension
  • Steering
  • Body and interior
  • Exterior (external elements)
  • Interior (internal elements)
  • Doors, locks and windows
  • Electrical equipment
  • Equipment and devices
  • Ignition system
  • Power devices
  • Electrical circuits
ToyotaMan.ru © 2018–2026 • Mobile version • Interesting about Toyota • Administration • Sitemap: EN BG BY UA RS HR RO PL SK HU • Search system • Bookmark
Camry Vista-V40 • Camry XV10 • Camry XV20 • Camry XV30 • Corolla Verso-AR10 • Corolla E80 • Corona T190 • Carina T170 • Carina T190 • Land Cruiser J70 (diesel) • Land Cruiser J60 (petrol) • Land Cruiser J100 • Highlander XU20 (petrol) • 4Runner N120 • RAV4 XA10 • RAV4 XA20 • Duet M100 • Dyna Y50 •
We require cookies to enable some interactive features. Is that ok with you?