
Company Honda Company Ford Company Skoda Company Kia Company Mazda Company Mercedes Company Renault
English Русский
Български
Беларускі
Український
Српски
Hrvatski
Română
Polski
Slovenský
Magyar
Bookmark Articles Sitemap Contacts
ToyotaMan.ru


Camry Corolla Corona Carina Land Cruiser Highlander 4Runner RAV4 Others
RAV 4 XA20 (2000-2005) RAV 4 XA10 (1994-2000)

Checking, servicing and charging the battery [Toyota RAV4 XA10]

  • Main
  • RAV4
  • XA10 (1994-2000)
  • General information
  • Maintenance
  • Checking, servicing and charging the battery
0
Contents: Checking the battery status ↓ Charging the battery ↓
Note: Recommended frequency: every 12,000 km or 6 months.


Warning! Charging batteries produces an explosive gas mixture.


Warning! When working with wires and electrical devices, smoking, using open flames, sparking devices, or open fire-hazardous lighting devices is prohibited. Avoid creating sparks when handling wires and electrical devices.


Warning! Never directly connect battery terminals—there is a high risk of injury due to strong sparking.


Caution! When disconnecting the battery from the vehicle's electrical system, disconnect the negative cable first, then the positive cable. Do not disconnect the battery while the engine is running, as this will damage the electrical system's electronic components.


Checking the battery status


Only regular battery maintenance ensures fast and reliable engine starting.

Before servicing the battery, turn off the engine and all electrical consumers, then disconnect the negative cable from the negative battery terminal.

Check the external condition of the battery case and terminals. Check the condition of the rubber boots covering the battery terminals. Check that the wire end and terminal connections are free from oxidation and are securely tightened. Also check the entire length of the wires connected to the battery for cracks or damage to the insulation.

(The original publication can be found on the website ToyotaMan.ru)

If there are signs of corrosion in the form of white flakes on the terminals, remove and clean the battery.


Disconnect the negative cable from the battery first, then the positive cable.
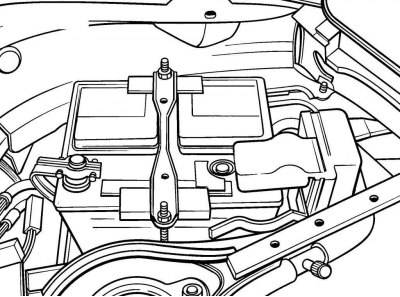


Figure 2.11. Location of the battery cross clamp mounting nuts


Remove the nuts, lift the cross clamp and remove the battery from the vehicle (figure 2.11).
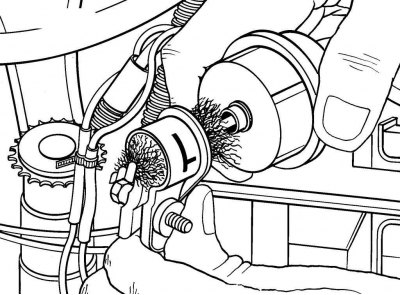


Figure 2.12. Using a wire brush to clean the inside of a battery cable terminal


Using a wire brush, clean the outside and inside of the terminals on the wires, then rinse them with a warm solution of baking soda (figure 2.12).

Clean the battery terminals in the same manner, being careful not to let water or baking soda get into the battery cells.

Check the condition of the battery support bracket.

Charging the battery


Caution: When connecting or disconnecting the charger terminals from the battery, the charger must be turned off.


Periodic charging of the battery is the easiest way to maintain the battery capacity, especially when using the vehicle on short trips with frequent engine starts.

Keeping your battery charged is especially important during the winter when it is under heavy load. At low temperatures, the battery delivers less current when starting the engine than it could at positive temperatures. Therefore, it is recommended to check the battery before the start of the winter season and charge it if necessary.

Remove the battery from the vehicle before charging.

For charging, use a charger or a charger-starter. Charge the battery with a current equal to 0.05–0.1 of the battery capacity until the electrolyte density stops increasing over 4 hours.

It is not recommended to use high current to quickly charge the battery, as this may cause the plates to warp due to overheating.

During battery charging, the electrolyte temperature should not exceed 37.8°C.
This article is available at: russian, bulgarian, belarusian, ukrainian, serbian, croatian, romanian, polish, slovak, hungarian
The article material has been checked: Kolokoltsev Grigory
Share information:
◀ Previous
RAV 4 XA10: Maintenance
Next ▶

Checking and adjusting the clutch pedal free play
Checking and replacing the rubber bands of the windshield wipers
Changing engine oil and oil filter
Inspection of tires and checking air pressure
Checking the levels of operating fluids
Checking, adjusting and replacing the poly V-belt for the drive of…
Checking and replacing hoses in the engine compartment
Wheel rotation
Checking the condition of seat belts
Brake condition check (every 24,000 km or 12 months)
Similar articles on other Toyota models

➥ Checking, servicing and charging the battery Toyota Camry XV20 (1996-2001)
➥ Checking, servicing and charging the battery Toyota Cruiser 100 (1998-2007)
➥ Checking the battery charging system Toyota 4Runner N120 (1989-1995)
➥ Checking the battery Toyota Corolla E80 (1983-1990)
➥ Checking the battery status Toyota Corona T190 (1992-1997)
➥ Checking the battery status Toyota Carina T190 (1992-1996)
Link in different formats to this article
Comments and feedback from visitors
No comments yet


Add two numbers 21 + 10


RAV 4 XA20 (2000-2005) 
  • General information
  • Introduction to manual
  • User manual
  • Daily care
  • Maintenance (petrol)
  • Maintenance (diesel)
  • Troubleshooting
  • Power unit
  • Gasoline engines (before 2000)
  • Petrol engines (since 2001)
  • Diesel engines
  • Engine overhaul
  • Cooling and heating
  • Fuel system (petrol)
  • Fuel system (diesel)
  • Engine electrical equipment
  • Control system (petrol)
  • Control system (diesel)
  • Transmission
  • Manual gearbox
  • Automatic gearbox
  • Clutch and drive shafts
  • Chassis, running gear
  • Brake system
  • Front suspension
  • Rear suspension
  • Steering system
  • Body and interior
  • Exterior (external elements)
  • Interior (internal elements)
  • Doors, locks and windows
  • Electrical equipment
  • Equipment and devices
  • Electrical circuits
RAV 4 XA10 (1994-2000) 
  • General information
  • User manual
  • Maintenance
  • Power unit
  • Petrol engine 3S-FE
  • Petrol engine 1AZ-FE
  • Engine overhaul
  • Cooling and air conditioning
  • Fuel and exhaust system
  • Ignition system
  • Toxicity reduction system
  • Transmission
  • Clutch
  • Mechanical gearbox
  • Automatic gearbox
  • Cardan and drive shafts
  • Chassis, running gear
  • Brake system
  • Car suspension
  • Steering
  • Body and interior
  • Exterior (external elements)
  • Interior (internal elements)
  • Doors, locks and windows
  • Electrical equipment
  • Equipment and devices
  • Power devices
  • Electrical circuits
ToyotaMan.ru © 2018–2026 • Mobile version • Interesting about Toyota • Administration • Sitemap: EN BG BY UA RS HR RO PL SK HU • Search system • Bookmark
Camry Vista-V40 • Camry XV10 • Camry XV20 • Camry XV30 • Corolla Verso-AR10 • Corolla E80 • Corona T190 • Carina T170 • Carina T190 • Land Cruiser J70 (diesel) • Land Cruiser J60 (petrol) • Land Cruiser J100 • Highlander XU20 (petrol) • 4Runner N120 • RAV4 XA10 • RAV4 XA20 • Duet M100 • Dyna Y50 •
We require cookies to enable some interactive features. Is that ok with you?