
Note. Recommended interval: every 12,000 km or 6 months.
Belt tension check
The drive of the generator, power steering pump and air conditioning compressor is carried out by V-ribbed belts.
Models prior to 2001 use one belt to drive the alternator and a second belt to drive the A/C compressor and power steering pump, while models from 2001 use one longer belt.
Place the shift lever in neutral position.
Mark the belt with chalk.
For the pulley mounting bolt, turn the crankshaft clockwise until the mark appears, while visually checking the condition of the belt.
The following defects can be found on the V-ribbed belt:
- traces of oil and grease;
- wear of the edges of the wedge protrusions;
- hardening of the edges of the wedge protrusions;
- transverse cracks on the reverse side of the belt;
- detachment of individual ribs;
- loosening of the end edges of the belt;
- transverse cracks in some ribs;
- destruction of individual ribs.
If any of the defects are present, replace the belt.
On cars produced before 2001, the tension of the V-ribbed belts is adjusted manually, and starting from 2001 - automatically.
Belt tension is checked with Nippondenso or Burroughs gauges. Measure the belt tension according to the Nippondenso or Burroughs factory instructions and compare the measured value with the tension values for a new or used belt.
Note. Term «second-hand» in this manual refers to a belt that has been used for more than 5 minutes.
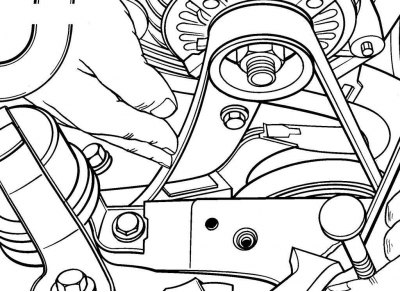
Pic. 2.13. Measuring the tension of the V-ribbed belt on cars produced before 2001 by pressing the thumb on the belt branch
In the absence of measuring instruments, a simple method can be used that provides acceptable belt tension accuracy. With your thumb, with moderate force, press the belt branch at a point equidistant from the centers of the pulleys (pic. 2.13). Measure the deflection of the belt, which should be 6-6.5 mm with a pulley center distance of 180-280 mm and 12.5-13 mm with a pulley center distance of 305-405 mm.
Belt tension adjustment
Cars manufactured before 2001
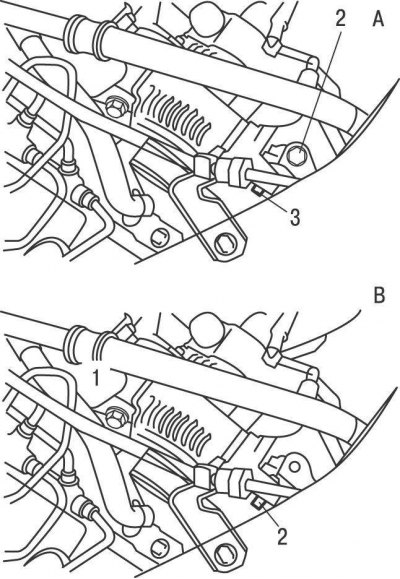
Pic. 2.14. The location of the bolts for adjusting the tension of the V-ribbed belt on vehicles up to 2001: A - models with air conditioning; B - models without air conditioning; 1 - hinged bolt for fastening the generator; 2 - adjusting bolt; 3 - fixing bolt
To adjust the tension of the alternator drive belt or the air conditioning compressor, loosen the alternator mounting pivot bolt and the fixing bolt (on models with air conditioning) or adjusting bolt (on models without air conditioning) generator bracket (pic. 2.14).
On models with air conditioning, turn the adjusting bolt and measure the belt tension using one of the above methods. On models without air conditioning, pry the generator away from the bracket, adjust the belt tension and tighten the hinge and fixing bolts.
To adjust the tension of the power steering pump drive belt, loosen the pivot and fixing bolts securing the pump to the bracket. When moving the pump in or out of the bracket, adjust the belt tension and tighten the hinge and fixing bolts.
Production vehicles since 2001
The tension of the V-ribbed belt is automatically adjusted by the spring-loaded tensioner.
Belt replacement
Turn off the ignition and disconnect the wire «masses» from the battery.
Attention! Chalk, marker or paint, mark the direction of rotation of the V-ribbed belt. If the V-ribbed belt rotates in the opposite direction during installation, this can lead to its destruction.
Cars manufactured before 2001
Release the tension and remove the belt from the pulleys, starting with the crankshaft pulley. When replacing the power steering pump drive belt, you will first need to remove the A/C compressor drive belt.
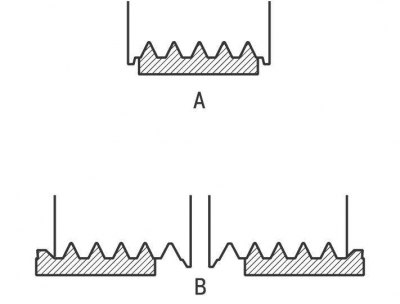
Pic. 2.15. The location of the V-ribbed belt on the engine pulleys: A is correct; B is wrong
After replacing the belt, check that the belt is correctly positioned on the motor pulleys (pic. 2.15).
Adjust belt tension.
Production vehicles since 2001

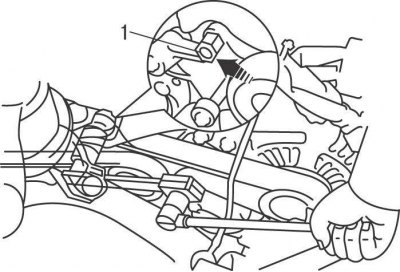
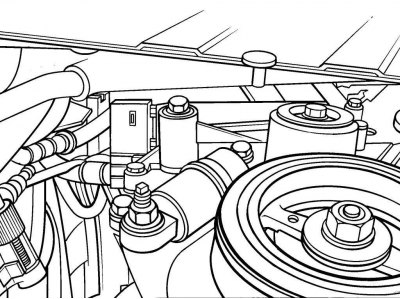
Pic. 2.16. The weakening of the poly-V-belt tension on cars since 2001: 1 - hexagon of the tension mechanism
Install the spanner wrench on the hex of the tensioner, turn it clockwise to loosen the belt tension, and remove the belt from the pulleys (pic. 2.16). Slowly release the belt tensioner.
Turn the tensioner clockwise again with a wrench and install a new belt on the engine pulleys, then slowly release the tensioner.
Check that the belt is correctly positioned on the motor pulleys (pic. 2.15).
Connect wire «masses» to the battery.
Replacing the poly V-belt tensioner on cars since 2001
If the tensioner does not provide the necessary belt tension or the bearing or idler pulley is worn, replace the V-ribbed belt tensioner.
Turn off the ignition and disconnect the wire «masses» from the battery.
Pic. 2.16. The weakening of the poly-V-belt tension on cars since 2001: 1 - hexagon of the tension mechanism
Install the spanner wrench on the hex of the tensioner, turn it clockwise to loosen the belt tension and remove the belt from the pulleys (pic. 2.16). Slowly release the belt tensioner.
Pic. 2.17. The location of the bolt and nut for fastening the poly-V-belt tensioner on cars since 2001
Unscrew the bolt and nut and remove the V-ribbed belt tensioner (pic. 2.17).
Install a new V-ribbed belt tensioner and secure it with a bolt and nut, tightening them to the required torque.
Install poly V-belt.