
Note. Check the fluid level with the vehicle in a horizontal position.
Note. Recommended frequency: every 400 km or weekly.
Operating fluids play an important role in the operation of lubrication, cooling, braking, clutch and other systems. Since these fluids gradually lose their properties, become contaminated, evaporate and/or are used up during the operation of the vehicle, their timely replacement and level control is an integral part of maintenance.
Engine oil
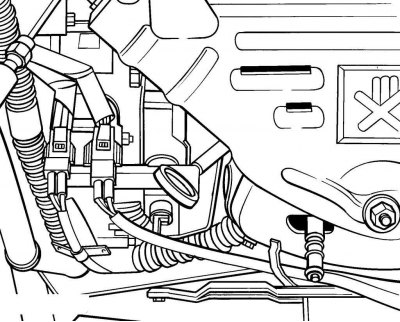
Pic. 2.1. Oil gauge location (probe) on the engine
The engine oil level is checked with an oil level gauge (probe), located on the front side of the engine (pic. 2.1). The oil level indicator passes through the guide tube into the oil pan, into which oil flows after lubrication of the engine components.
Check the oil level before starting the engine or not earlier than 5 minutes after turning off the engine. If the check is carried out immediately after turning off the engine, part of the oil will remain in the upper part of the engine and will not have time to drain into the sump, as a result of which the measurement result will not be correct.
Remove the oil level gauge from the guide tube and wipe it with a clean cloth or tissue.
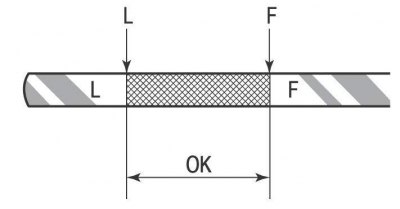
Pic. 2.2. Oil level and location of marks on the dipstick of the oil level indicator on cars before 2001: L is the minimum; OK - normal; F - maximum
Insert a clean oil dipstick into the guide tube as far as it will go and remove it again. Check the oil level, which should be between the L and F marks on vehicles up to 2001 (pic. 2.2), or between two notches on vehicles manufactured since 2001.
If the oil level is at the lower mark, it will rise to the maximum value when adding about 1.1 more liters of oil.
Attention! Do not operate the vehicle with the engine oil level below the L mark or lower notch on the oil level gauge. In this case, due to lack of lubrication, increased wear of engine parts occurs and even jamming may occur.
Conversely, an engine oil level above the F mark or the upper notch on the oil level gauge results in heavy oil splashing, fouling of the spark plugs, and leakage from the crankshaft seals.
To add oil, remove the oil filler cap located on the cylinder head cover. Add the required amount of oil and replace the cap.
Start the engine and let it run for a few minutes. Check for oil leaks around the filter and drain plug on the pan.
Stop the engine and wait a few minutes for the oil to drain into the sump. Check the oil level and top up if necessary. Check the tightness of the plug.
Checking the engine oil level is an important element of engine maintenance. A rapid drop in oil level indicates leakage through the crankshaft seals, oil pan gasket, worn piston rings or valve guides.
If the color of the engine oil has changed to milky or there are drops of water in it, then the cylinder head gasket is broken, or a crack has formed in the head or cylinder block. It is necessary to immediately check the condition of the engine and eliminate the malfunction.
Also, when checking the level, check the condition of the oil.
Attention! To check the quality of the oil, before wiping the oil level indicator, run your finger over it. If small solid particles remain on the finger, change the engine oil and oil filter immediately.
Coolant
Attention! Do not allow coolant to come into contact with clothing or body paintwork. Otherwise, rinse the surface with plenty of water.
Attention! Collect and dispose of the drained coolant.
The liquid cooling system of the engine is closed, it has an expansion tank as a compensation element, located in the front left in the engine compartment. The expansion tank is connected by a hose to the base of the radiator filler neck. When the engine is running, the coolant expands due to heating, and part of the liquid enters the expansion tank through the hose. As the engine cools, the volume of the coolant decreases, and it returns from the expansion tank to the cooling system, providing the optimum level.
Check the coolant level regularly. It should be between the FULL and LOW marks on the expansion tank. The fluid level changes with engine temperature. With a cold engine, the level should be near the LOW mark or slightly above it. After the engine warms up, the level should be near the FULL mark or slightly below it. Otherwise, remove the plug from the expansion tank and add coolant. Use only coolant based on ethylene glycol and distilled water. Do not use additional inhibitors or other additives. If only a small amount of coolant is required, clean distilled water can be added.
Do not fill the coolant above the FULL mark: excess coolant will flow out of the cooling system through the safety valve located in the plug as it expands.
A rapid drop in the coolant level indicates a leak and needs to be repaired. Check the condition of the radiator, water pump, hoses, connections and drain plugs for signs of leakage. If no leaks are found, have a service station check the opening pressure of the valve in the radiator cap.
In case of a large loss of coolant, add it only after the engine has cooled down in order to avoid its failure due to sudden cooling.
Attention! Be careful when opening the radiator cap while the engine is hot, as escaping vapors can cause severe burns. Close the radiator cap with a thick layer of cloth and slowly unscrew the cap until a hissing sound is heard. After the hiss stops, slowly unscrew and remove the cap from the radiator.
When checking the coolant level, check its condition. The liquid must be clean and clear. If the coolant is brown or rusty, drain the coolant, flush the cooling system, and refill with fresh coolant.
It is mandatory to change the coolant after carrying out any work on the elements of the cooling system with draining the coolant. If the cylinder head, head gaskets, radiator or oil heat exchanger were replaced during the repair, fill the cooling system with fresh coolant. This is due to the fact that the anti-corrosion additive in the coolant is deposited during engine operation and creates anti-corrosion protection. In used coolant, anti-corrosion additives are not active enough to form a protective layer on newly installed parts.
Windshield washer fluid
The windshield washer fluid is located in a plastic reservoir located on the right side of the engine compartment.
In temperate climates, water can be used, but in this case, fill the tank only to 2/3 of the volume to allow for the expansion that can occur when the water freezes.
Note. On cars until 2001, the fluid level in the tank is checked with a dipstick, which is located next to the filler neck of the tank.
In cold climates, use a specially formulated windshield washer fluid. Mix the liquid with water in accordance with the recommendations of the liquid manufacturer, depending on the outside temperature.
It is not recommended to use antifreeze as a washer fluid, as it damages the car's paintwork.
Electrolyte in the battery
Warning! It is necessary to work with the rechargeable battery in goggles. Do not allow droplets of acid and particles containing lead compounds to come into contact with eyes, skin or clothing.
Warning! The electrolyte is very aggressive. Use protective gloves and goggles. Do not tilt the battery as electrolyte may spill out of the vents. If electrolyte gets into your eyes, immediately flush your eyes with clean water for several minutes. After that, be sure to consult a doctor. If electrolyte comes into contact with skin or clothing, immediately neutralize the acid with alkaline soap and rinse with plenty of clean water.
The battery is virtually maintenance-free under normal vehicle operating conditions. At high ambient temperatures, it is recommended to check the electrolyte level in the battery from time to time, if the design of the battery allows it. Check the electrolyte level also when charging the battery. It must always be between the MIN and MAX marks on the longitudinal sides of the battery.
When the electrolyte level drops, add distilled water to the appropriate jars up to the MAX mark. This must be done before the electrolyte level drops below the MIN·mark.
Do not fill water above the required level, as the electrolyte will flow out through the ventilation holes. This can damage the paintwork and corrode the bodywork.
After topping up the water, close the battery jars tightly with stoppers.
Brake fluid
The brake fluid reservoir is located in the engine compartment. The tank cap has a vent hole that must not be blocked.
The reservoir has a transparent body, and therefore the level of the brake fluid can be controlled from the outside.
The brake fluid level should always be closer to the MAX mark.
If the brake fluid level is too low, before removing the cap from the expansion tank, wipe the cap and the area around the cap from dirt with a clean rag to prevent it from entering the hydraulic circuit of the brakes and clutch.
Add the recommended brand of brake fluid to the reservoir. Mixing different types of brake fluid can damage the hydraulic system.
Fill the reservoir with brake fluid only up to the dotted mark. This will ensure that the level is correct when the float plug is installed on the reservoir to control the level.
Warning! The brake fluid used in the hydraulic brake system is poisonous, so if it comes into contact with the skin, immediately wash it off with plenty of water.
Attention! If the liquid accidentally gets into the eyes or into the body, immediately consult a doctor.
Attention! Brake fluid dissolves paint and plastic, so if fluid comes into contact with your vehicle's paintwork, wash it with plenty of water.
Attention! Brake fluid is hygroscopic, that is, it absorbs moisture from the air, so it is not recommended to use fluid that has been stored for a long time in an open container.
Attention! Brake fluid must not come into contact with mineral oils. Even a small amount of mineral oil degrades the properties of the brake fluid and can damage the brake system.
With the cover removed, inspect the internal surfaces of the expansion tank. If there are deposits or water droplets on the reservoir walls, change the brake fluid.
After filling the reservoir, check that the lid is securely attached to the reservoir.
The brake fluid level may drop slightly during vehicle operation due to worn brake pads and automatic brake pad adjustment. This is quite normal.
If the level of the brake fluid has dropped noticeably in a short time or has fallen below the MIN·mark, the tightness of the brake system is most likely broken. Too low level of a brake liquid in a tank is signaled by the control lamp.
Oil in the power steering
The power steering oil reservoir is located in the engine compartment on the passenger side.
To check the level, put the front wheels in the straight ahead position with the engine off.
Use a clean rag to wipe the reservoir cap and the area around the cap to prevent dirt from entering the power steering hydraulic circuit.
Unscrew the plug and determine the temperature of the oil in the tank.
Through the translucent body of the tank, determine the oil level, which must be at least the upper mark for each temperature value.
Add oil of the brand recommended by the manufacturer to the reservoir.
If frequent topping up of oil is required, check the condition of all power steering hoses, their connections, pump and steering gear for leaks.
Oil in automatic transmission
The oil level in an automatic transmission must be maintained strictly at a certain value.
A low oil level can cause slippage or loss of torque transmission, while an overflow can cause foaming and damage to the transmission.
The oil level in an automatic transmission depends on the oil temperature.
When checking, the oil temperature should be 70–80°C, which is achieved after a trip of 15–20 km.
Note. If the vehicle has been driven at high speed for an extended period of time, or has been driven in a hot city environment, or has towed a trailer, the oil level in the automatic transmission cannot be accurately determined. Stop the engine and wait 30 minutes for the oil to cool down to the correct temperature.
Check the oil level with the vehicle in a horizontal position, with the transmission warmed up and the selector lever in the «Park». Before checking, with the engine running, depress the brake pedal and move the selector lever through all positions, starting and ending with the position «Park».
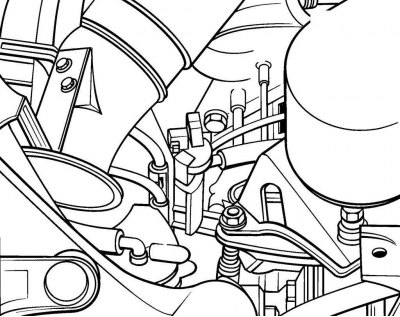
Pic. 2.3. The location of the oil level indicator in an automatic transmission
With the engine running at idling speed, remove the level gauge from the guide tube (pic. 2.3). Using the marks on the level indicator, check the oil level and its condition (pic. 2.4).
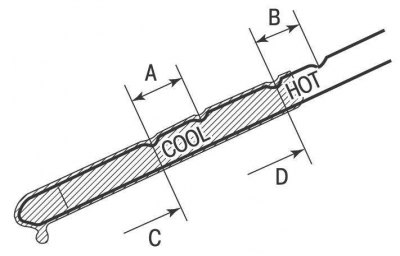
Pic. 2.4. Oil level gauge in automatic transmission: A - cold oil level zone; B - hot oil level zone; C - area of low oil level on a cold gearbox; D - area of low oil level on a hot gearbox
Wipe the oil level indicator with a clean rag, insert it into the gearbox guide tube and remove it. Check the oil level. If the gearbox is hot, the level should be in the HOT zone (B in fig. 2.4). If the gearbox is cold, the level should be in the COOL zone (And in fig. 2.4).
If the level is in the lower part of the zone, it is necessary to add oil to the automatic transmission through the guide tube for the level indicator.
If the oil level is at the lower mark, then it will rise to the maximum value when adding another 0.55 liters.
When checking the oil level in an automatic transmission, also check the condition of the oil. Compare it for color, smell and viscosity with new oil.
If the gearbox oil is dark or black with a burnt smell, the gearbox friction linings are worn out.
If the oil in the gearbox is milky, it means that water has got into it. This can occur due to condensation of atmospheric moisture during continuous use of the vehicle in short trip mode. If the color of the oil does not change after a long drive, the oil needs to be changed.
If the gearbox overheats or the oil level is too high, the oil becomes dark brown and sticky to the touch. If the oil change does not work, contact a specialized workshop for the repair of automatic transmissions.
If, when checking the oil level or changing the oil in the automatic transmission, dirt particles or metal chips are found in the oil, it is necessary to have the automatic transmission repaired in a specialized workshop.