
Company Honda Company Ford Company Skoda Company Kia Company Mazda Company Mercedes Company Renault
English Русский
Български
Беларускі
Український
Српски
Hrvatski
Română
Polski
Slovenský
Magyar
Bookmark Articles Sitemap Contacts
ToyotaMan.ru


Camry Corolla Corona Carina Land Cruiser Highlander 4Runner RAV4 Others
RAV 4 XA20 (2000-2005) RAV 4 XA10 (1994-2000)

Replacing the coolant and flushing the cooling system [Toyota RAV4 XA10]

  • Main
  • RAV4
  • XA10 (1994-2000)
  • General information
  • Maintenance
  • Replacing the coolant and flushing the cooling system
0
Contents: Draining the coolant ↓ Flushing ↓ Filling ↓
Note: Recommended frequency: every 50,000 km or 24 months.


Caution! Avoid contact with coolant on clothing or vehicle paintwork. Otherwise, rinse the surface with plenty of water. Collect and dispose of drained coolant.


Replace the coolant at the recommended intervals and after any work on the cooling system components that involves draining the coolant. If the cylinder head, head gasket, radiator, or oil heat exchanger were replaced during repair, fill the cooling system with fresh coolant. This is due to the fact that the anti-corrosion additive in the coolant settles during engine operation and creates anti-corrosion protection. In used coolant, the anti-corrosion additives are not active enough to form a protective layer on newly installed parts.

Draining the coolant


Drain the coolant on a cold engine.

Remove the radiator cap.
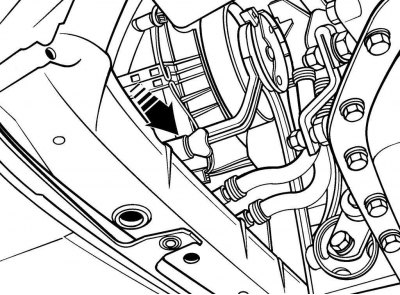


Figure 2.36. Location of the radiator coolant drain pipe


The full article is posted on the website ToyotaMan.ru

Place a container to collect the coolant under the radiator drain pipe. Attach a 9.5mm ID hose to the drain outlet to direct the coolant into the container. On some models the hose is installed at the time of vehicle production. Open the drain plug and drain the coolant from the radiator (figure 2.36).
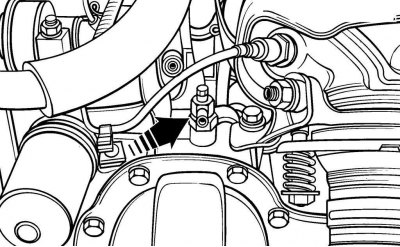


Figure 2.37. Location of the tap and coolant drain pipe from the cylinder block on vehicles produced since 2001


Place a container under the coolant drain pipe from the cylinder block (figure 2.37). Attach a 9.5mm ID hose to the drain outlet to direct the coolant into the container. Using a wrench, open the tap and drain the coolant from the cylinder block.

Check the condition of the radiator and heater hoses, as well as the reliability of their fastening with clamps. Replace damaged hoses and clamps.

Flushing


After draining the coolant, remove the thermostat and reinstall the thermostat housing. This will allow you to flush the cooling system faster.

Close the radiator drain plug. Set the heater control knob to the maximum heat position so that the radiator and heater hoses are also flushed.
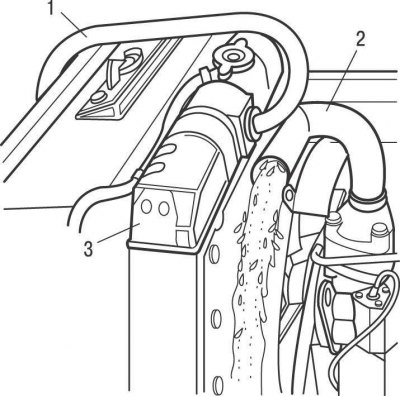


Figure 2.38. Flushing the cooling system: 1 – garden hose; 2 – upper radiator hose; 3 – radiator


Disconnect the upper radiator hose from the radiator, then insert a garden hose into the radiator hose and flush the system with clean water until clear water comes out of the upper radiator hose (figure 2.38).

If the radiator is seriously contaminated, remove the radiator and wash it with a special agent, following the instructions for use.

Place a garden hose into the expansion tank and flush the system with clean water until clear water comes out of the top radiator hose.

Connect the upper radiator hose to the radiator.

Filling


Close the coolant drain plug from the radiator and the drain valve from the cylinder block. Reinstall the thermostat.

Set the heater control knob to the maximum heat position.

Slowly pour fresh coolant into the radiator until it appears from the radiator filler neck. Add coolant to the expansion tank up to the minimum mark.

Close the radiator cap. Start the engine and warm it up until the thermostat opens, at which point the coolant begins to flow through the radiator. The radiator and upper radiator hose will begin to heat up.

Turn off the engine and wait until it cools down. Add coolant until it appears from the radiator filler neck.

Squeeze the upper radiator hose several times to remove air from the cooling system and add coolant if necessary. Install the radiator cap.

Start the engine, warm it up to operating temperature and check the cooling system for leaks.
This article is available at: russian, bulgarian, belarusian, ukrainian, serbian, croatian, romanian, polish, slovak, hungarian
The article material has been checked: Kolokoltsev Grigory
Share information:
◀ Previous
RAV 4 XA10: Maintenance
Next ▶

Checking and replacing the distributor cap and rotor
Checking and replacing spark plugs
Replacing the fuel filter on vehicles manufactured before 2001
Replacing brake fluid
Replacing the cabin ventilation filter on cars since 2001
Checking the fuel vapor recovery system
Checking the exhaust system
Automatic transmission oil and filter change
Changing the oil in a manual transmission
Changing the transfer case oil on all-wheel drive vehicles with an…
Similar articles on other Toyota models

➥ Replacing the coolant and flushing the cooling system Toyota Camry XV20 (1996-2001)
➥ Replacing the liquid in the cooling system (1ZZ-FE / 3ZZ-FE) Toyota Corolla Verso 3 (2004-2009)
➥ Checking and replacing coolant Toyota Corona T190 (1992-1997)
➥ Checking and replacing coolant Toyota Carina T190 (1992-1996)
➥ Checking the cooling system Toyota Cruiser 60/80 (1980-1997, petrol)
➥ Checking the cooling system (every 8000 km or 6 months) Toyota Highlander 1 (2000-2007, petrol)
Link in different formats to this article
Comments and feedback from visitors
No comments yet


Add two numbers 49 + 30


RAV 4 XA20 (2000-2005) 
  • General information
  • Introduction to manual
  • User manual
  • Daily care
  • Maintenance (petrol)
  • Maintenance (diesel)
  • Troubleshooting
  • Power unit
  • Gasoline engines (before 2000)
  • Petrol engines (since 2001)
  • Diesel engines
  • Engine overhaul
  • Cooling and heating
  • Fuel system (petrol)
  • Fuel system (diesel)
  • Engine electrical equipment
  • Control system (petrol)
  • Control system (diesel)
  • Transmission
  • Manual gearbox
  • Automatic gearbox
  • Clutch and drive shafts
  • Chassis, running gear
  • Brake system
  • Front suspension
  • Rear suspension
  • Steering system
  • Body and interior
  • Exterior (external elements)
  • Interior (internal elements)
  • Doors, locks and windows
  • Electrical equipment
  • Equipment and devices
  • Electrical circuits
RAV 4 XA10 (1994-2000) 
  • General information
  • User manual
  • Maintenance
  • Power unit
  • Petrol engine 3S-FE
  • Petrol engine 1AZ-FE
  • Engine overhaul
  • Cooling and air conditioning
  • Fuel and exhaust system
  • Ignition system
  • Toxicity reduction system
  • Transmission
  • Clutch
  • Mechanical gearbox
  • Automatic gearbox
  • Cardan and drive shafts
  • Chassis, running gear
  • Brake system
  • Car suspension
  • Steering
  • Body and interior
  • Exterior (external elements)
  • Interior (internal elements)
  • Doors, locks and windows
  • Electrical equipment
  • Equipment and devices
  • Power devices
  • Electrical circuits
ToyotaMan.ru © 2018–2026 • Mobile version • Interesting about Toyota • Administration • Sitemap: EN BG BY UA RS HR RO PL SK HU • Search system • Bookmark
Camry Vista-V40 • Camry XV10 • Camry XV20 • Camry XV30 • Corolla Verso-AR10 • Corolla E80 • Corona T190 • Carina T170 • Carina T190 • Land Cruiser J70 (diesel) • Land Cruiser J60 (petrol) • Land Cruiser J100 • Highlander XU20 (petrol) • 4Runner N120 • RAV4 XA10 • RAV4 XA20 • Duet M100 • Dyna Y50 •
We require cookies to enable some interactive features. Is that ok with you?