



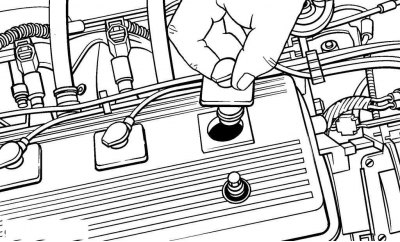
Figure 2.30. Removing the tip with the high-voltage wire from the spark plug on vehicles before 2001
On vehicles prior to 2001, remove the spark plug connector from the spark plug by pulling up and twisting at the same time (figure 2.30). To avoid mixing up the spark plug wires, replace the spark plugs one by one.
On vehicles from 2001 onwards, remove the ignition coils.
Use a jet of compressed air to clean the area around the spark plug, which will prevent dirt from getting into the engine cylinder after the spark plug is removed.
Remove the spark plug.
If spark plug replacement is necessary, use only spark plugs recommended for your engine.
Inspect the spark plugs. The condition of the engine can be determined by their appearance. A clean, white, plaque-free spark plug insulator indicates a too lean fuel-air mixture. This may also indicate that the spark plug is too "hot" (heat is removed from the central electrode slowly). It is necessary to adjust the composition of the fuel-air mixture or install a spark plug that is suitable for the characteristics of a given engine.
Dry black soot deposits indicate a mixture that is too rich.
If the coating is black and oily, it means the engine is worn out and needs to be checked and repaired.
If the insulator is covered with a light brown coating, then the mixture composition is optimal and the engine is in good condition.
Please note: Vehicles produced since 2001 use spark plugs with iridium-coated electrodes. On such spark plugs the interelectrode gap is not adjustable.
An interelectrode gap that is too large or too small, at which the spark power changes, leads to a decrease in engine efficiency. The gap must always comply with technical requirements.
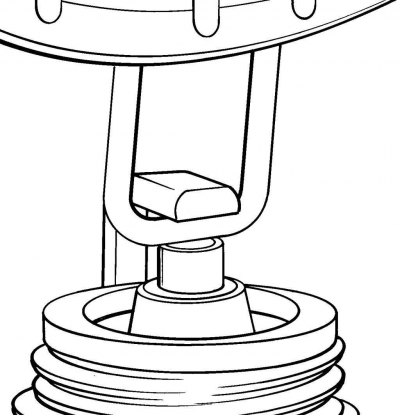
Figure 2.31. Checking the gap between the spark plug electrodes
Check the gap with a wire gauge or feeler gauge (figure 2.31). The gap can be adjusted by bending the side electrode with a special tool (figure 2.32).
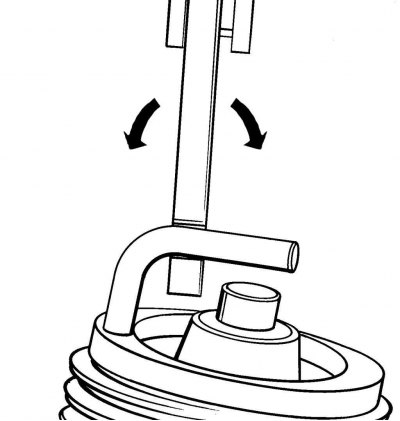
Figure 2.32. Adjusting the spark plug gap by bending the side electrode with a special tool
Before installing the spark plug into the engine, check that the threads are clean and undamaged. Clean the threads if necessary. Apply a special non-stick compound to the spark plug threads.
Inspect the spark plugs for defects. If there are cracks in the insulator, replace the spark plug.
To tighten the spark plug for the first few turns, use a piece of rubber hose, into which you insert the spark plug insulator on one end. The hose acts as a universal joint to align the spark plug with the threaded hole. If the spark plug is screwed in at an angle, the hose will rotate on the spark plug insulator, preventing damage to the threads. Screw the spark plug in a few turns of thread, remove the hose and then screw it in and tighten the spark plug with a wrench.
On vehicles prior to 2001, install the high-voltage wire connector by pressing it down and turning it until it locks firmly into place.
Note: Recommended frequency: every 50,000 km or 24 months.
Note: Only vehicles produced before 1997 are equipped with a distributor cap and rotor. Cars produced from 1988 to 2000 are equipped with a contactless ignition system.
Note: Cars produced before 2001 have high-voltage wires, and since 2001, the ignition coils are mounted directly on the spark plugs.
On vehicles from 2001, install ignition coils.
Replace the remaining spark plugs in the same manner, one by one.