



Note: Recommended frequency: every 50,000 km or 24 months.
Note: Only vehicles produced before 1997 are equipped with a distributor cap and rotor. Cars produced from 1988 to 2000 are equipped with a contactless ignition system.
Note: Cars produced before 2001 have high-voltage wires, and since 2001, the ignition coils are mounted directly on the spark plugs.
Check the spark plug wires every time you install the spark plugs. Begin a visual inspection with the engine running. In a darkened garage, start the engine and observe each wire. If there is an internal break in the wire, an electric arc or spark will be visible at the location of the damage. In this case, replace the wire.
Turn off and cool the engine, then check the distributor cap and rotor.
To avoid confusion, remove and inspect the high-voltage wires one by one.
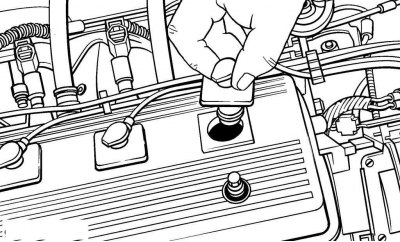
Figure 2.30. Removing the tip with the high-voltage wire from the spark plug on vehicles before 2001
Remove the spark plug tip with the high-voltage wire from the spark plug by pulling it up and turning it at the same time (figure 2.30). Do not pull directly on the high voltage wire.
Check the tip for signs of corrosion in the form of a white solid powder.
Install the tip with the high-voltage wire in place by pressing it and simultaneously turning it until it is firmly fixed.
Using a clean cloth, wipe the high-voltage wire along its entire length, removing any dirt and grease. Check the wire for melting, cracks or other damage. Avoid making sharp bends in the wire as this may cause the inner conductor to break.
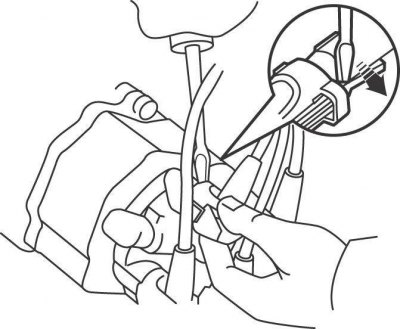
Figure 2.33. Using a screwdriver blade to remove the protective boot with the high-voltage wire from the distributor cap
Using a screwdriver blade, remove the protective boot with the high-voltage wire from the distributor cap on vehicles manufactured before 1998, or from the ignition coil on vehicles manufactured from 1998 to 2000 (figure 2.33).
Check the inside of the protective cover for signs of corrosion. Connect the high voltage wire.
Check the condition of the remaining high-voltage wires in a similar manner.
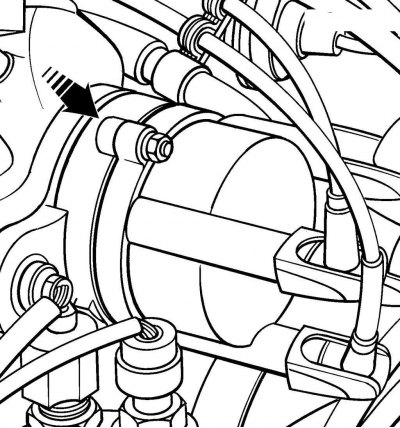
Figure 2.34. Location of the distributor cap mounting screw on vehicles manufactured before 1998
On vehicles manufactured before 1998, remove the screws and the distributor cap (figure 2.34). Check the inside of the lid for cracks, carbon "tracks", melting, burning, and loose contacts.
(Publication Reprinted from a web portal toyotaman.ru)
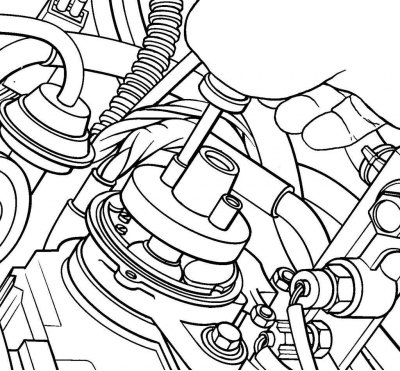
Figure 2.35. Removing the distributor rotor mounting screws on vehicles manufactured before 1998
Remove the two screws and the distributor rotor (figure 2.35). Check the rotor for cracks, carbon "tracks", and burns on the side and central electrodes.
If any damage is present, replace the distributor cap and rotor. When replacing high-voltage wires, it is recommended to also replace the distributor cap and rotor.
If the vehicle is equipped with an old distributor cap with high-voltage wires, use an ohmmeter to measure the resistance between the free ends of the wires and the internal electrodes in the cap; it should not exceed 25,000 ohms.