
Examination
Drive belts play an important role in the functioning of the engine and many other vehicle systems. Belts wear out over time and should be regularly inspected in accordance with the vehicle's routine maintenance schedule to avoid serious engine failures, the consequences of which can cost the car owner a lot of money to fix.
The number of drive belts used on a particular car model depends on the vehicle's accessories. The belts are used to drive the alternator, steering and water pumps, and the air conditioning compressor. Depending on the nature of the location of the pulleys, more than one unit can be driven by one belt.
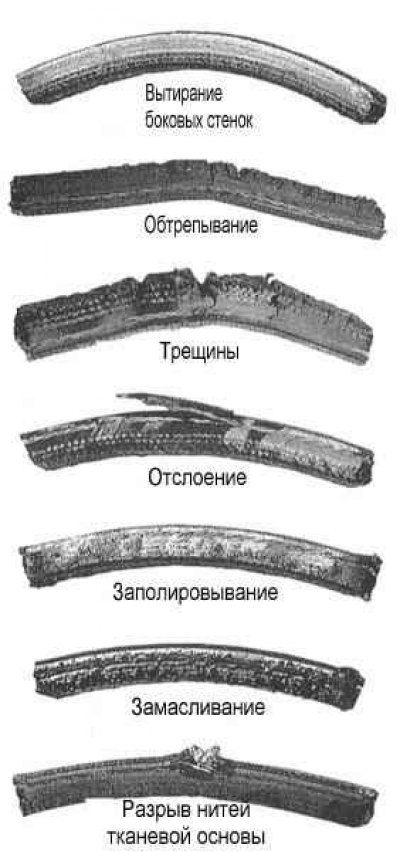
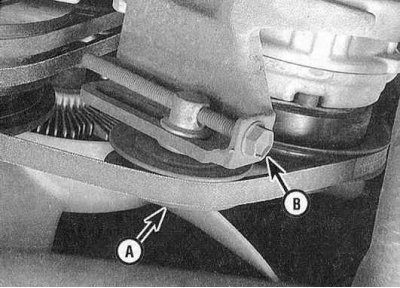
1a. Stop the engine, open the hood and look for the drive belts. Lighting yourself with a flashlight, feel the belts along their entire length with your fingers, checking for cracks and delaminations. The presence of scuffs, polished areas and other obvious defects on the belt is also unacceptable (refer to accompanying illustrations).
1b. Inspect the belts on both sides, for which twist them. Defective belts must be replaced without fail.
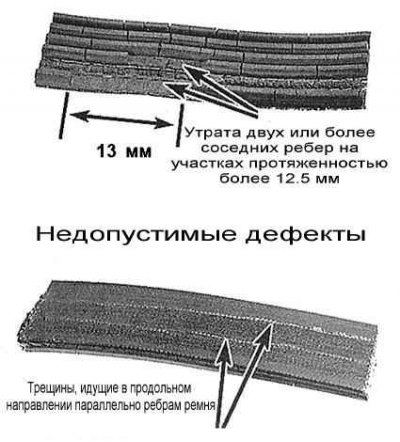
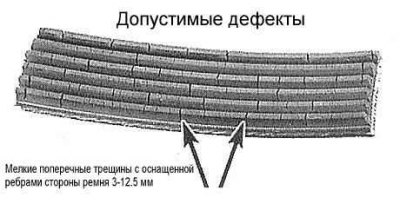
1c. Check the condition of the ribs on the underside of the belts, they should have the same depth and no signs of deformation.
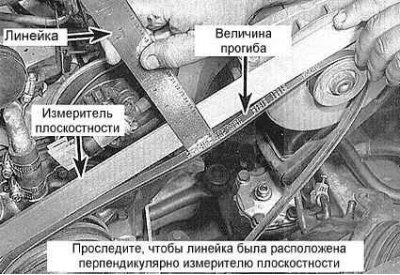
2. Evaluation of the tension force of the belt can be made by pressing it with your thumb in the area in the middle between two adjacent pulleys. The pressure must be firm enough. The parameter characterizing the belt tension force is the value of its deflection when pressed (refer to accompanying illustration). As a general rule, if the pulleys are spaced 180 to 280 mm apart, the deflection should be 6.4 mm, a pulley spacing of 305 to 405 mm corresponds to a deflection of 12.5 mm for a V-belt, and 6.4 mm for a multi-ribbed one.
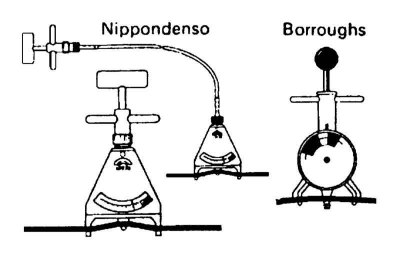
Toyota experts measure the belt tension with a special dynamometer (refer to accompanying illustration).
Dynamometer testers from Nippondenso and Borroughs are available from dealers in the parts and tooling departments. The tester is mounted on the short arm of the drive belt and, when tensioned, a reading is read from the dynamometer scale. This method is the most accurate.
Adjustment
Diesel engines
1. As a rule, the adjustment of the belt tension (weakening / strengthening) is carried out by shifting in the appropriate direction the mounted auxiliary unit driven by the belt.
2. Typically, there is one component for each drive belt used on an engine, which is secured with an axle/lock bolt and an adjuster bolt. The axial / locking bolt is released, then the adjusting screw is rotated in the corresponding direction (refer to accompanying illustration).
3. To loosen the belt tension force, the component should be moved towards the engine and vice versa. After completing the adjustment, follow the reliability of tightening the bolts.
Engine 2UZ-FE
If an automatic drive belt tensioner is installed, manual adjustment is not required. However, to make sure the tensioner is working properly, the belt tension can be checked as follows.
1. Make sure that when you press the belt with a force of about 98 N, the tensioner moves down (refer to accompanying illustration).
2. Check the alignment of the tensioner pulley marks to make sure that the belt does not slip on it. If necessary, replace the tensioner.
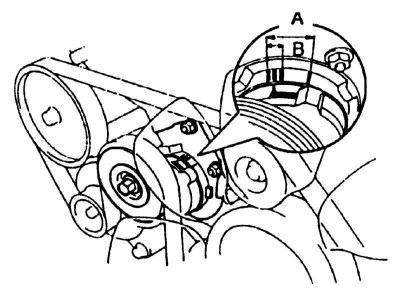
3. Make sure the arrow mark is inside the zone «A» scales (refer to accompanying illustration). If the label is outside the zone «A», the belt needs to be replaced. When installing a new belt, the mark must be inside the zone «IN».
Replacement
Diesel engines
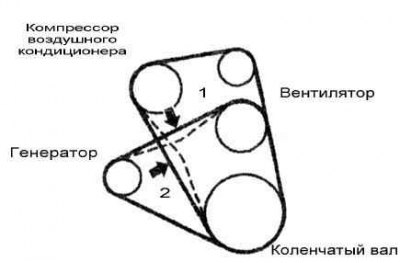
1. To replace, loosen the belt tension (see above) and get it off your pulleys. It would be wise to replace all belts at the same time due to their approximately equal wear rate. On most models, a label with a drive belt routing diagram is glued to the bottom of the hood (refer to accompanying illustration).
2. When buying new belts, take the old ones with you as samples - replacement belts must strictly match those removed from the car in size. Make sure the belts fit correctly on the pulleys.
3. After replacement, adjust the tension of the new belts (see above).
Engines 2UZ-FE
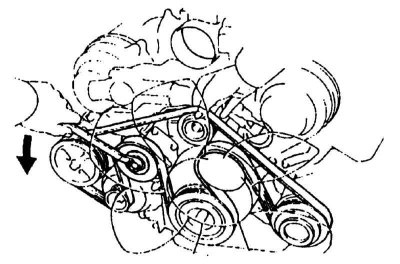
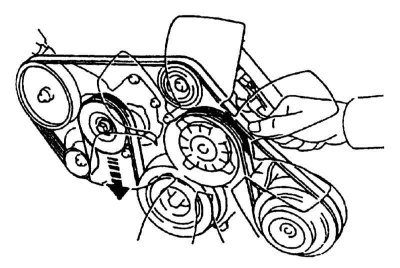
1. To remove the drive belt on this engine, grasp the tensioner bolt with a wrench or ratchet head, turn the tensioner counterclockwise to release tension, then remove the belt (refer to accompanying illustration). The tensioner pulley bolt has a left-hand thread.
2. When installing the belt, make sure that all of its wedges are laid in the pulley grooves and that the belt does not come off the groove at the bottom of the pulley.