
Company Honda Company Ford Company Skoda Company Kia Company Mazda Company Mercedes Company Renault
English Русский
Български
Беларускі
Український
Српски
Hrvatski
Română
Polski
Slovenský
Magyar
Bookmark Articles Sitemap Contacts
ToyotaMan.ru


Camry Corolla Corona Carina Land Cruiser Highlander 4Runner RAV4 Others
RAV 4 XA20 (2000-2005) RAV 4 XA10 (1994-2000)

Air filter housing — removal and installation [Toyota RAV4 XA20]

  • Main
  • RAV4
  • XA20 (2000-2005)
  • Power unit
  • Fuel system (petrol)
  • Air filter housing — removal and installation
0

Air filter housing


Removal


1. Disconnect the latches, remove the air filter housing cover and take out the filter element (see Chapter 1A). On pre-2000 models, disconnect the wiring harness connector from the traction control relay on the side of the air cleaner housing.

2. On 2001 and later models, disconnect the air inlet hose from the air cleaner housing cover (see Figure 10.2, a, b).
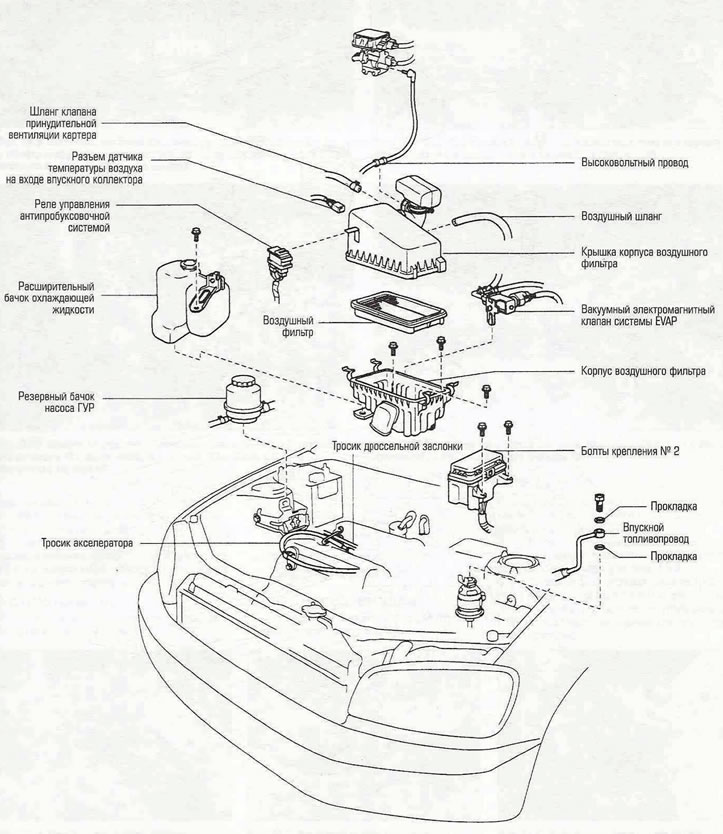


Figure 10.2a. Air filter housing and surrounding components - models before 2000.


The article is taken from a web resource toyotaman.ru
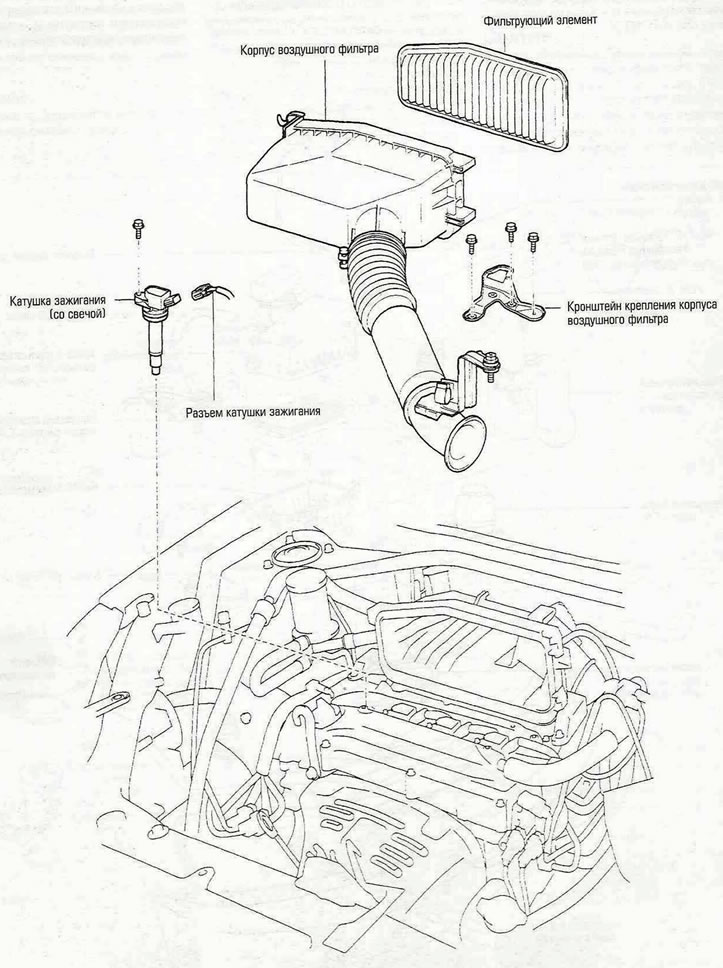


Figure 10.2.6. Exploded view of the air cleaner housing and surrounding components - models produced since 2001.


3. Loosen the three mounting bolts and remove the air filter assembly from the engine compartment (see Figure 10.3).
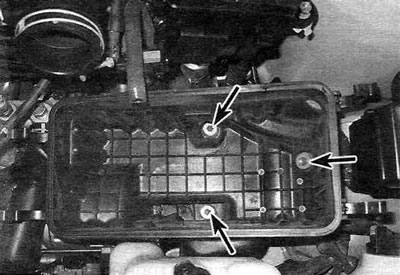


Figure 10.3. Unscrew the three mounting bolts (shown by arrows) and remove the air filter housing from the engine compartment - shown on models up to 2000.


4. On 2001 and later models, release the air cleaner housing cover retaining clips and remove the intake air duct bracket retaining bolt. Remove the housing cover together with the air intake duct assembly.
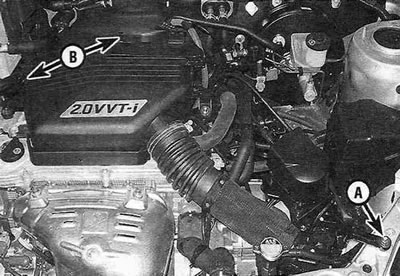


Figure 10.4. Bolt for fastening the intake air duct bracket to the housing (A) and the air filter cover fastening latch (B).


5. Disconnect the fuel vapor removal system hoses from the vacuum solenoid valve, disconnect the wiring connector of this valve, disconnect the canister purge valve hose from the air cleaner housing and the PCV hose from the valve cover, as shown in the figure 10.5 (see Chapter 6A).
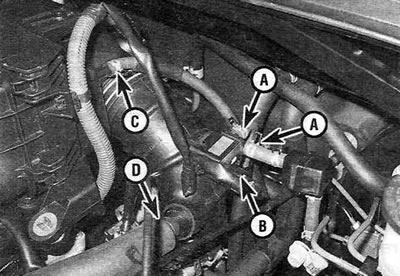


Figure 10.5. Vacuum solenoid valve hoses (A), its wiring connector (B), purge valve hose (C), and crankcase ventilation valve hose (D).


After loosening the clamp, disconnect the intake air duct from the throttle body.

6. Disconnect the mass air flow sensor connector, unscrew the two mounting bolts and remove the air filter housing from the engine compartment (see Figure 10.6).
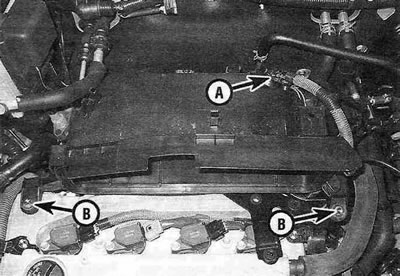


Figure 10.6. Mass air flow (MAF) sensor connector (A) and air filter housing mounting bolts (B).


Installation


7. Installation is carried out in the reverse order of removal.
This article is available at: russian, bulgarian, belarusian, ukrainian, serbian, croatian, romanian, polish, slovak, hungarian
The article material has been checked: Kondratyeva Ulyana
Share information:
◀ Previous
RAV 4 XA20: Fuel system (petrol)
Next ▶

Fuel tank — removal and installation
Fuel level sensor assembly — removal and installation
Fuel pressure regulator — removal and installation
Fuel pump — removal and installation
Fuel lines and fittings — general information
Accelerator cable — removal, installation and adjustment
Electronically controlled fuel injection system — general information
Electronic fuel injection system — check
Throttle body — inspection, removal and installation
Fuel pulsation damper (models produced since 2001) — removal and…
Similar articles on other Toyota models

➥ Air Filter Housing — Removal and Installation Toyota Camry XV20 (1996-2001)
➥ Air filter housing — removal and installation Toyota Highlander 1 (2000-2007, petrol)
➥ Replacing the air filter element Toyota Corolla E80 (1983-1990)
➥ Engine oil and filter Toyota Corona T190 (1992-1997)
➥ Changing engine oil and filter Toyota Carina T190 (1992-1996)
➥ Changing engine oil and oil filter Toyota Cruiser 60/80 (1980-1997, petrol)
Link in different formats to this article
Comments and feedback from visitors
No comments yet


Add two numbers 24 + 28


RAV 4 XA20 (2000-2005) 
  • General information
  • Introduction to manual
  • User manual
  • Daily care
  • Maintenance (petrol)
  • Maintenance (diesel)
  • Troubleshooting
  • Power unit
  • Gasoline engines (before 2000)
  • Petrol engines (since 2001)
  • Diesel engines
  • Engine overhaul
  • Cooling and heating
  • Fuel system (petrol)
  • Fuel system (diesel)
  • Engine electrical equipment
  • Control system (petrol)
  • Control system (diesel)
  • Transmission
  • Manual gearbox
  • Automatic gearbox
  • Clutch and drive shafts
  • Chassis, running gear
  • Brake system
  • Front suspension
  • Rear suspension
  • Steering system
  • Body and interior
  • Exterior (external elements)
  • Interior (internal elements)
  • Doors, locks and windows
  • Electrical equipment
  • Equipment and devices
  • Electrical circuits
RAV 4 XA10 (1994-2000) 
  • General information
  • User manual
  • Maintenance
  • Power unit
  • Petrol engine 3S-FE
  • Petrol engine 1AZ-FE
  • Engine overhaul
  • Cooling and air conditioning
  • Fuel and exhaust system
  • Ignition system
  • Toxicity reduction system
  • Transmission
  • Clutch
  • Mechanical gearbox
  • Automatic gearbox
  • Cardan and drive shafts
  • Chassis, running gear
  • Brake system
  • Car suspension
  • Steering
  • Body and interior
  • Exterior (external elements)
  • Interior (internal elements)
  • Doors, locks and windows
  • Electrical equipment
  • Equipment and devices
  • Power devices
  • Electrical circuits
ToyotaMan.ru © 2018–2026 • Mobile version • Interesting about Toyota • Administration • Sitemap: EN BG BY UA RS HR RO PL SK HU • Search system • Bookmark
Camry Vista-V40 • Camry XV10 • Camry XV20 • Camry XV30 • Corolla Verso-AR10 • Corolla E80 • Corona T190 • Carina T170 • Carina T190 • Land Cruiser J70 (diesel) • Land Cruiser J60 (petrol) • Land Cruiser J100 • Highlander XU20 (petrol) • 4Runner N120 • RAV4 XA10 • RAV4 XA20 • Duet M100 • Dyna Y50 •
We require cookies to enable some interactive features. Is that ok with you?