Contents: Precautions when working with oils ↓ Selecting motor oil ↓ Checking the engine oil level ↓ Engine oil change ↓ Replacing the oil filter ↓
Precautions when working with oils
1. Long-term and repeated contact with motor oil removes the natural oil layer from the skin, causing dryness, irritation and dermatitis. In addition, the motor oils used contain potentially dangerous components that can cause skin cancer.
2. After working with oil, wash your hands thoroughly with soap or other cleanser. After cleaning the skin, apply a special cream to restore the skin's natural fat layer.
3. Do not use gasoline, kerosene, diesel fuel or solvent to clean the skin.
Selecting motor oil
1. Use oil according to API classification (for petrol engines - SG, SH, SJ), (for diesel engines - CO, CE, CF).
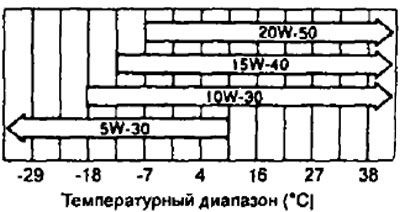
2. Select viscosity (SAE) according to the temperature range diagram corresponding to the vehicle operating conditions until the next oil change.
The publication is taken from the website www.TOYOTAMAN.ru
Checking the engine oil level
1. Place the car on a flat horizontal surface. After turning off the engine, wait a few minutes for the oil to drain into the crankcase.
2 Remove the dipstick and wipe it with a rag.
3. Reinstall the dipstick until it stops.
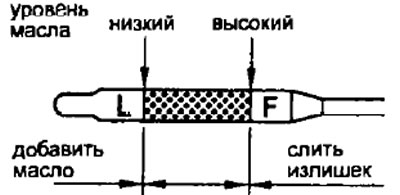
4. Remove the dipstick and check the oil level in the engine crankcase. If the oil level is below or slightly above the low mark on the dipstick scale, add engine oil of the same type that was poured into the engine.
5. Add oil if necessary.
- a) Remove the oil filler cap.
- b) Add the required amount of engine oil. The approximate amount of oil required to fill the volume between the low and high level marks on the dipstick is 1.0 liter.
Note:
- Avoid overfilling the oil, otherwise the engine may be damaged.
- After adding oil, always check the oil level on the dipstick.
- c) Install the oil filler cap.
Engine oil change
1. Place the vehicle on a flat, horizontal surface.
2. Warm up the engine for a few minutes to normal operating temperature, then turn off the engine.
3. Remove the engine oil filler cap.
4. Unscrew the drain plug on the oil pan and drain the oil into a suitable container.

3S-FE, 3S-GE, 4S-FE, 5E-FE. | 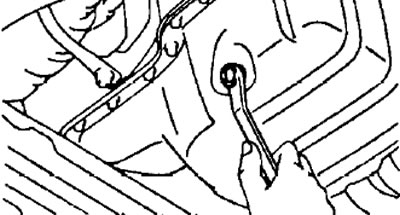
2C, 2C-T. |
5. Install a new gasket and tighten the drain plug.
- Tightening torque 37 Nm
6. Fill the engine with new oil.
Note: For the type and recommended viscosity of oil, see the "Choosing Engine Oil" subsection.
Filling capacity:
- 2C, 2C-T:
- with filter replacement - 5.1 l
- dry engine - 5.4 l
- 3S-FE, 3S-GE, 4S-FE:
- with filter replacement - 4.1 l
- dry engine - 4.6 l
- 4A-FE:
- with filter replacement - 3.3 l
- dry engine:
- with oil radiator - 3.9 l
- without oil radiator - 3.5 l
- 6E-FE:
- with filter replacement - 3.2 l
- dry engine - 3.4 l
- 7A-FE:
- with filter replacement - 3.7 l
- dry engine
- with oil radiator - 4.7 l
- without oil radiator - 4.3 l
7. Replace the oil filler cap.
8. Check the oil level and make sure there are no leaks.
9. Check the oil level and ensure there are no leaks with the engine running.
Replacing the oil filter
Attention: when operating in severe conditions, replace every 5000 km (or 6 months).
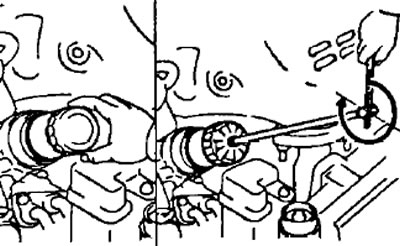
1. Using a special key, loosen the oil filter fastening (rotate counterclockwise).
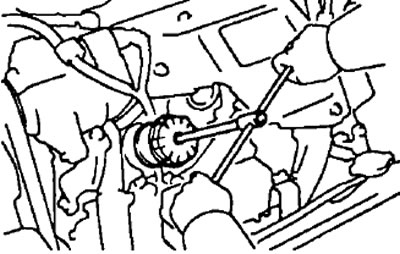
2. Unscrew the filter by hand and remove it, holding it with the working side up to avoid spilling oil.
3. Clean the mating surface on the cylinder block. Make sure there are no remains of the old filter gasket.
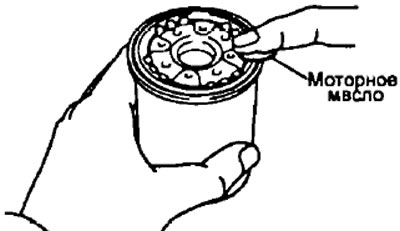
4. Apply a small amount of engine oil to the gasket of the new filter.
5. Screw the filter onto the seat by hand until the gasket contacts the mating surface of the cylinder block
6. Using a special key, tighten the filter an additional 3/4 turn.