



Share information:
Interior (internal elements) body Toyota Carina 6 (T190)

Removal and installation of interior trim
When removing and installing interior trim, refer to the corresponding assembly drawing: "Interior trim". 1 - roof finishing (models without sunroof), 2 - handle, 3 - central interior lighting lamp, 4 - front interior...
When removing and installing interior trim, refer to the corresponding assembly drawing: "Interior trim". 1 - roof finishing (models without sunroof), 2 - handle, 3 - central interior lighting lamp, 4 - front interior...
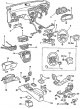
Instrument panel design
1 - instrument panel, 2 - connector cover, 3 - heater control panel (lever version), 4 - radio, 5 - instrument cluster, 6 - instrument cluster trim panel, 7 - upper and lower protective covers of the steering column, 8...
1 - instrument panel, 2 - connector cover, 3 - heater control panel (lever version), 4 - radio, 5 - instrument cluster, 6 - instrument cluster trim panel, 7 - upper and lower protective covers of the steering column, 8...
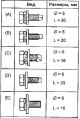
Removal and installation the instrument panel
Note: When removing and installing the instrument panel, refer to the corresponding assembly drawings. The table shows the symbols, types and sizes of the instrument panel fasteners. Below are the types and installation...
Note: When removing and installing the instrument panel, refer to the corresponding assembly drawings. The table shows the symbols, types and sizes of the instrument panel fasteners. Below are the types and installation...

Precautions for use and repair work with the airbag
Errors in the operation and maintenance of the airbag system may lead to the inadvertent activation of the system during service activities, or to the failure of the system to activate during an accident, so always...
Errors in the operation and maintenance of the airbag system may lead to the inadvertent activation of the system during service activities, or to the failure of the system to activate during an accident, so always...

Driver's airbag device
Models before 19994 1 - fuse bolt, 2 - fuse bracket, 3 - airbag, 4 - igniter, 5 - airbag sensor. Models after 19994
Models before 19994 1 - fuse bolt, 2 - fuse bracket, 3 - airbag, 4 - igniter, 5 - airbag sensor. Models after 19994

Removal the steering wheel cover
1. Using a screwdriver, remove the lower steering wheel covers. 2. Using an Allen key, loosen the fuse bolt until it rotates freely and slide the fuse bracket as shown in the figure. Removal the steering wheel cover...
1. Using a screwdriver, remove the lower steering wheel covers. 2. Using an Allen key, loosen the fuse bolt until it rotates freely and slide the fuse bracket as shown in the figure. Removal the steering wheel cover...
Checking the steering wheel pad
Replace the overlay with a new one in the following cases: a) The airbag has deployed. b) The surface of the overlay, sensor or igniter is damaged or deformed. c) The airbag is damaged or not secured to the steering...
Replace the overlay with a new one in the following cases: a) The airbag has deployed. b) The surface of the overlay, sensor or igniter is damaged or deformed. c) The airbag is damaged or not secured to the steering...

Checking the steering wheel
1. Check the condition of the steering wheel. Replace it with a new one if: a) The metal bracket of the steering wheel is deformed. Models before 1994 Models after 1994 b) It is impossible to install a new overlay...
1. Check the condition of the steering wheel. Replace it with a new one if: a) The metal bracket of the steering wheel is deformed. Models before 1994 Models after 1994 b) It is impossible to install a new overlay...

Installing the steering wheel cover
1. Check that the fuse bolt is loose and can be turned without resistance. 2. Install the steering wheel cover and tighten the mounting bolts. Tightening torque - 9 Nm 3. Close the fuse bracket and tighten the bolt....
1. Check that the fuse bolt is loose and can be turned without resistance. 2. Install the steering wheel cover and tighten the mounting bolts. Tightening torque - 9 Nm 3. Close the fuse bracket and tighten the bolt....
This section is available on: russian, bulgarian, belarusian, ukrainian, serbian, croatian, romanian, polish, slovak, hungarian
Similar sections for other Toyota models
➥ Interior (internal elements) Toyota Camry XV20 (1996-2001)
➥ Interior (internal elements) Toyota RAV 4 XA20 (2000-2005)
➥ Interior (internal elements) Toyota Corolla E80 (1983-1990)
➥ Interior (internal elements) Toyota Highlander 1 (2000-2007, petrol)
➥ Interior (internal elements) Toyota Cruiser 100 (1998-2007)
➥ Interior (internal elements) Toyota 4Runner N120 (1989-1995)
Link in different formats to this article
TEXTHTMLBB Code
- General information
- User manual
- Maintenance
- Power unit
- Engines 4A-FE, 5A-FE, 7A-FE
- Engines 3S-FE, 4S-FE
- Diesel engines 2C
- Engine repair
- Cooling system
- Lubrication system
- Fuel system
- Control system (diesel)
- Fuel injection system
- Engine electrical equipment
- Transmission
- Clutch
- Mechanical gearbox
- Automatic gearbox
- Drive shafts
- Chassis, running gear
- Car suspension
- Steering
- Brake system
- Body and interior
- Exterior (external elements)
- Interior (internal elements)
- Air conditioning and heater
- Electrical equipment
- Equipment and devices
- Headlights and lighting
- Breakers and switches
- Electrical circuits
- General information
- Introduction to the manual
- Power unit
- Gasoline engines
- Diesel engines
- Lubrication system
- Cooling system
- Fuel system (carburetor)
- Fuel system (injector)
- Ignition system
- Transmission
- Clutch
- Car gearbox
- Drive shafts
- Chassis, running gear
- Front suspension
- Rear suspension
- Steering
- Brake system
- Electrical equipment
- Power devices
- Electrical circuits