Share information:

Car engine fuel system Toyota Carina 6 (T190)

Fuel filter replacement
1. Remove the fuel filter assembly with fuel filter support. 2. Loosen the drain plug and drain the fuel from the fuel filter. 3. Using pliers, unscrew the water sensor and remove the O-ring. Note: Be careful not to...
1. Remove the fuel filter assembly with fuel filter support. 2. Loosen the drain plug and drain the fuel from the fuel filter. 3. Using pliers, unscrew the water sensor and remove the O-ring. Note: Be careful not to...

Checking the components of the fuel heating system
1. Remove the fuel heater. 2. Checking the fuel heater. A) Create a vacuum of 300 mmHg. or more to the vacuum switch channel. b) Using an ohmmeter, measure the resistance between the terminal "1" and switch housing....
1. Remove the fuel heater. 2. Checking the fuel heater. A) Create a vacuum of 300 mmHg. or more to the vacuum switch channel. b) Using an ohmmeter, measure the resistance between the terminal "1" and switch housing....

Removing nozzles
1. Turn away nuts and remove a clip of fuel pipes of a high pressure. 2. Remove the high pressure fuel pipes. A) Remove the high pressure fuel line holders. b) Loosen the union nuts of the high-pressure fuel pipes on...
1. Turn away nuts and remove a clip of fuel pipes of a high pressure. 2. Remove the high pressure fuel pipes. A) Remove the high pressure fuel line holders. b) Loosen the union nuts of the high-pressure fuel pipes on...

Checking the injectors
1. Check injection pressure. A) Install the nozzle on the stand for testing. b) Move the fuel injection lever rapidly several times to build up pressure to clear the nozzle opening. Slowly swing the lever and read the...
1. Check injection pressure. A) Install the nozzle on the stand for testing. b) Move the fuel injection lever rapidly several times to build up pressure to clear the nozzle opening. Slowly swing the lever and read the...

Dismantling, cleaning and checking the condition of the injectors
Nozzle disassembly 1 - nozzle coupling nut, 2 - spacer, 3 - spring, 4 - nozzle body, 5 - adjusting washer, 6 - pusher, 7 - body and needle of the atomizer. 1. Disassembly of the fuel injector, A) Loosen the injector...
Nozzle disassembly 1 - nozzle coupling nut, 2 - spacer, 3 - spring, 4 - nozzle body, 5 - adjusting washer, 6 - pusher, 7 - body and needle of the atomizer. 1. Disassembly of the fuel injector, A) Loosen the injector...

Assembly and installation of nozzles
1. Assemble the nozzle. Using the special tool, tighten the coupling nut. Tightening torque - 37.5 Nm Note: overtightening of the coupling nut is not allowed. 2. Check injection pressure and fuel spray pattern. 3....
1. Assemble the nozzle. Using the special tool, tighten the coupling nut. Tightening torque - 37.5 Nm Note: overtightening of the coupling nut is not allowed. 2. Check injection pressure and fuel spray pattern. 3....

Removal and installation of the fuel cut-off valve
Note: install the parts in the reverse order of removal. At installation use new linings and a sealing ring. Check for leaks after installing the valve. 1. Disconnect the fuel supply pipe. A) Loosen the set screw. b)...
Note: install the parts in the reverse order of removal. At installation use new linings and a sealing ring. Check for leaks after installing the valve. 1. Disconnect the fuel supply pipe. A) Loosen the set screw. b)...

Removing the high pressure fuel pump (injection pump)
1. Drain the coolant. 2. Remove the timing belt. 3. Remove the air intake with the air filter cover. 4. Remove the injection pump drive pulley. 5. Disconnect the vacuum hose. 6. Disconnect the fuel cutoff valve...
1. Drain the coolant. 2. Remove the timing belt. 3. Remove the air intake with the air filter cover. 4. Remove the injection pump drive pulley. 5. Disconnect the vacuum hose. 6. Disconnect the fuel cutoff valve...

Checking injection pump
Check the fuel cut off solenoid valve. a) Connect the solenoid valve lead and housing to the appropriate battery terminals. b) When closing and opening the contacts, a characteristic click should be heard. If there is...
Check the fuel cut off solenoid valve. a) Connect the solenoid valve lead and housing to the appropriate battery terminals. b) When closing and opening the contacts, a characteristic click should be heard. If there is...

High pressure fuel pump device
1 - sealing washer, 2 - drive pulley of mounted units, 3 - drive belt of mounted units, 4 - cover No. 1 of the timing belt, 5 - timing belt guide, 6-, 16 - engine mounting bracket, 7 - cover No. 2 of the timing belt, 8...
1 - sealing washer, 2 - drive pulley of mounted units, 3 - drive belt of mounted units, 4 - cover No. 1 of the timing belt, 5 - timing belt guide, 6-, 16 - engine mounting bracket, 7 - cover No. 2 of the timing belt, 8...
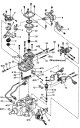
Disassembly and assembly of injection pump
1 - internal return spring, 2 - external return spring, 3 - control lever No. 1, 4 - damper control lever, 5 - control lever No. 2, 6 - position sensor of the injection pump control lever, 7 - cover, 8 - damper...
1 - internal return spring, 2 - external return spring, 3 - control lever No. 1, 4 - damper control lever, 5 - control lever No. 2, 6 - position sensor of the injection pump control lever, 7 - cover, 8 - damper...

High pressure fuel pump adjustment
1. Preliminary check and preparation for adjustment of high pressure fuel pump at the stand. A) Type and adjustment of bench nozzles. Type of control nozzles of the fuel stand - DN12SD12 (NIPPONDENSO) The pressure of...
1. Preliminary check and preparation for adjustment of high pressure fuel pump at the stand. A) Type and adjustment of bench nozzles. Type of control nozzles of the fuel stand - DN12SD12 (NIPPONDENSO) The pressure of...

Installation of injection pump
1. Install injection pump: A) Align the alignment marks on the high pressure fuel pump and the coolant pump. b) Temporarily tighten the injection pump mounting bolt and nuts. Torque: nut - 18.5 Nm bolt - 47.5 Nm Note:...
1. Install injection pump: A) Align the alignment marks on the high pressure fuel pump and the coolant pump. b) Temporarily tighten the injection pump mounting bolt and nuts. Torque: nut - 18.5 Nm bolt - 47.5 Nm Note:...
This section is available on: russian, bulgarian, belarusian, ukrainian, serbian, croatian, romanian, polish, slovak, hungarian
Similar sections for other Toyota models
➥ Power unit: Fuel system Toyota Camry XV10 (1991-1996)
➥ Power unit: Supply system Toyota Corolla E80 (1983-1990)
➥ Power unit: Power and exhaust systems Toyota Cruiser 100 (1998-2007)
➥ Power unit: Supply and exhaust system Toyota Highlander 1 (2000-2007, petrol)
➥ Power unit: Fuel system Toyota 4Runner N120 (1989-1995)
➥ Power unit: Fuel and exhaust system Toyota RAV 4 XA10 (1994-2000)
➥ Diesel engines «L»: Fuel system Toyota Dyna Y50/Y60 (1984-1995)
Link in different formats to this article
TEXTHTMLBB Code
- General information
- User manual
- Maintenance
- Power unit
- Engines 4A-FE, 5A-FE, 7A-FE
- Engines 3S-FE, 4S-FE
- Diesel engines 2C
- Engine repair
- Cooling system
- Lubrication system
- Fuel system
- Control system (diesel)
- Fuel injection system
- Engine electrical equipment
- Transmission
- Clutch
- Mechanical gearbox
- Automatic gearbox
- Drive shafts
- Chassis, running gear
- Car suspension
- Steering
- Brake system
- Body and interior
- Exterior (external elements)
- Interior (internal elements)
- Air conditioning and heater
- Electrical equipment
- Equipment and devices
- Headlights and lighting
- Breakers and switches
- Electrical circuits
- General information
- Introduction to the manual
- Power unit
- Gasoline engines
- Diesel engines
- Lubrication system
- Cooling system
- Fuel system (carburetor)
- Fuel system (injector)
- Ignition system
- Transmission
- Clutch
- Car gearbox
- Drive shafts
- Chassis, running gear
- Front suspension
- Rear suspension
- Steering
- Brake system
- Electrical equipment
- Power devices
- Electrical circuits