
Attention! If the vehicle is equipped with electronically controlled air suspension, turn off the suspension height control switch by raising the vehicle.
1. Loosen the rear wheel nuts. Raise the rear of the vehicle and place secure supports under it. Remove rear wheels.
2. Remove the heat shield from the exhaust system.
3. Disconnect the stabilizer links from the stabilizer (pic. 9.3). If the ball head stud turns with the nut, use a hex socket wrench to hold the stud.
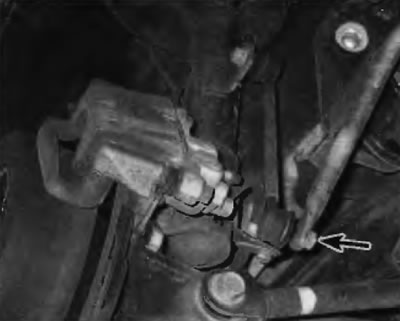
Pic. 9.3. To disconnect the stabilizer stack from the stabilizer, unscrew the lower nut
4. Turn out bolts of fastening of clips of plugs of the stabilizer. If necessary, remove the two clamp brackets from the body.
5. Now you can remove the stabilizer from the car. Remove the bushings from the stabilizer, having previously marked their positions.
6. Check bushings for wear, curing, distortion, cracks, or other signs of deterioration. Replace them if necessary. Check the stabilizer links as described in paragraph 2. When installing bushings, the cut should be facing upwards.
7. Using a wire brush, clean the areas of the stabilizer that mate with the bushings. Lubricate the inside and outside of the new bushings with vegetable oil.
Warning. Do not use petroleum or mineral based lubricants or brake fluid. This worsens the condition of the bushings.
8. Installation is carried out in the reverse order of removal.