
Attention! If the vehicle is equipped with electronically controlled air suspension, turn off the suspension height control switch before raising the vehicle.
Removing
1. Loosen the wheel nuts, raise the vehicle and securely support it under it. Remove the wheel. Support the control arm with a floor jack.
2. Disconnect the stabilizer link from the suspension strut (pic. 2.3).
3. Remove the brake hose bracket and wheel speed sensor wiring harness bracket from the suspension strut (pic. 3.3).
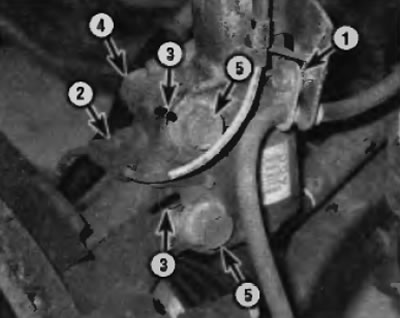
Pic. 3.3. Mounting the suspension strut on the bottom bracket:
1 - Brake hose bracket
2 - ABS wiring harness bracket
3 - Marks for saving camber adjustment
4 - Nuts (one is shown)
5 - Bolts
4. Mark the position of the steering knuckle relative to the suspension strut to help maintain camber. Unscrew the nuts securing the strut to the steering knuckle and knock out the bolts with a hammer and center punch (pic. 3.3).
5. Separate a rack from a rotary fist. Be careful not to cause excessive movement of the inner constant velocity joint. Also, do not allow the steering knuckle to turn outward, as this may damage the brake hose.
6. If the suspension strut is to be disassembled, loosen but do not completely remove the damper rod nut (in the center).
7. On 2004 and later Lexus models, remove the hood panels to gain access to the top of the pillar (pic. 3.7).
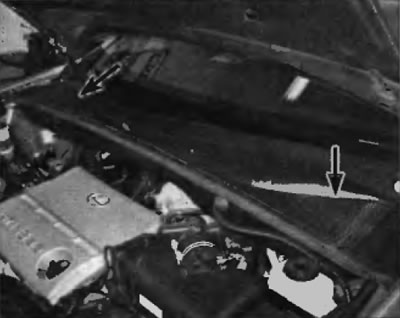
Pic. 3.7. On 2004 and later Lexus models, remove the mesh screen (s) from the dashboard
8. On 2004 and later Lexus models equipped with electronically controlled air suspension, remove the shock absorber cap and disconnect the air line fitting from the top of the strut.
9. Support the strut assembly with the spring with your hand (or ask an assistant to support her) and unscrew the three nuts securing the rack to the support (pic. 3.9).
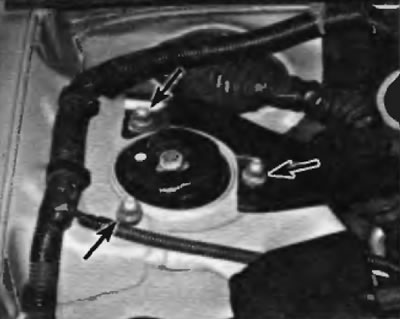
Pic. 3.9. Fastening elements of the upper part of the suspension strut and screed.
Attention! Do not unscrew the large nut in the center.
Remove the assembly from the niche in the mudguard of the engine compartment.
Application. On some models, there is a coupler between the upper supports of the suspension struts, which is fastened with the same nuts that are used to connect the strut to the body. If necessary, the tie can be removed without removing the suspension struts.
Inspection
10. Check the rack body for leaks, dents, cracks, or other obvious signs of damage that would require rack repair or replacement.
11. Check the spring for chips or cracks in the coating (this can lead to premature failure of the spring due to corrosion). Inspect the spring seat for cuts, hardening, and general deterioration.
12. If there are signs of damage, go to the rack disassembly procedure (see paragraph 4).
Note. On 2004 and later Lexus models with electronically controlled air suspension, if the strut assembly is found to be defective, it should be replaced.
Installation
13. Guide the strut assembly up into the recess in the engine compartment mudguard and thread the top three studs through the holes in the support plane. As soon as the studs come out, tighten the nuts so that the rack does not fall. It is easiest to work together with an assistant, since the stand is quite heavy and bulky.
Note. Do not forget to install a coupler between the racks, if provided for by the design.
14. Insert a rotary fist into a rack flange and insert two bolts. Screw on the nuts, align the position of the rack with respect to the steering knuckle in accordance with the previously made marks and tighten the nuts to the prescribed torque specified in Specifications at the beginning of this chapter.
15. Connect the brake hose bracket to the strut and install the wheel speed sensor wiring harness bracket.
16. Establish a wheel and screw nuts of its fastening. Then lower the vehicle and tighten the wheel nuts to the prescribed torque specified in Specifications at the beginning of this chapter.
17. Tighten the top three nuts to the specified torque shown in Specifications at the beginning of this chapter.
18. If you are dealing with a vehicle equipped with electronically controlled air suspension, connect the air line to the top of the strut and then install the cap.