
Attention! If the vehicle is equipped with electronically controlled air suspension, turn off the suspension height control switch before raising the vehicle.
Note. Removing the anti-roll bar requires removing the steering gear and then removing the anti-roll bar through the first wheel arch. Any damage to the stabilizer is usually the cause of a collision that was so severe that it could lead to damage to other major components (such as a stretcher). Damage of this serious nature requires a visit to a service station.
1. Loosen the nuts securing the front wheel, then raise the front of the car and place secure supports under it.
2. Remove the front wheels.
3. Disconnect the legs from the stabilizer (pic. 2.3). If the ball head stud comes out with the nut, use a hex socket wrench to hold the stud.
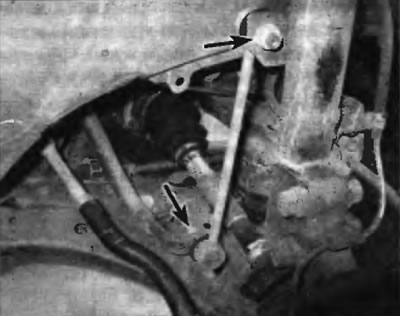
Pic. 2.3. To disconnect the stabilizer link from the stabilizer, unscrew the bottom nut. If you removed the suspension strut (or replace the stabilizer link), unscrew the top nut
4. Disconnect both clamps of fastening of bushings of the stabilizer from a stretcher (pic. 2.4).
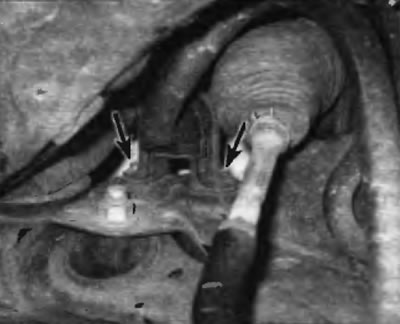
Pic. 2.4. Sleeve clamp screws
5. After releasing the stabilizer, slide the bushings out of the clamps and inspect them. If they show cracks, wear, or general deterioration, replace them. It is also recommended to inspect the stabilizer links. To check the strut, move the ball joint stud from side to side five or six times, then screw on the nut. Using a torque wrench, continuously turn the nut one turn every two to four seconds and note the torque reading at the fifth turn. It should be approximately 0.045...1.9 Nm. If not, replace the strut assembly.
6. Clean the bushing area on the stabilizer with a stiff wire brush to completely remove rust and dirt.
7. To facilitate assembly, grease the inside and outside of the new bushings with vegetable oil.
Warning. Do not use petroleum or mineral based lubricants or brake fluid. This causes deterioration of the condition of the bushings.
Note. These bushings are cut and can be installed without putting on the end of the stabilizer. The bushings must be installed so that the slit faces towards the rear of the vehicle.
8. Install the uprights and tighten the appropriate nuts to the specified torque specified in Specifications at the beginning of this chapter.
9. Install the clamps and bolts by tightening the bolts to the specified torque specified in Specifications at the beginning of this chapter.