
Removing
Attention! If the vehicle is equipped with electronically controlled air suspension, turn off the suspension height control switch before raising the vehicle.
Application. When removing/replacing any rear suspension components, loosely tighten all bolts, adjust to normal ride height, and then fully tighten the bolts.
1. Remove the trim panel that covers the top of the rack mounts (pic. 10.1).
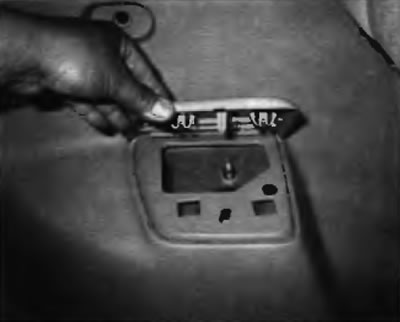
Pic. 10.1. Pull up on the plastic cover to remove it
2. Loosen the nuts securing the rear wheel, raise the rear of the vehicle and place secure supports under it. Remove the wheel.
3. Disconnect the brake hose and wheel speed sensor wiring harness from the suspension strut (pic. 10.3).
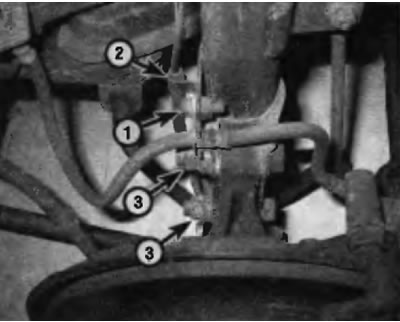
Pic. 10.3. Mounting the suspension strut on the bottom bracket:
1 — Bolt of an arm of a brake hose
2 - ABS wiring harness bracket
3 — Elements of fastening of a rack
4. Disconnect the stabilizer link from the suspension strut (see paragraph 9).
5. Support the hub support with a floor jack.
6. Loosen the nuts on the bolts of the suspension strut to the hub support (pic. 10.3).
7. On 2004 and later Lexus models equipped with electronically controlled air suspension, disconnect the air hose to the strut assembly.
Note. A special tool is required to disconnect the air hose from the suspension strut.
8. If the strut is to be disassembled, loosen but do not completely unscrew the damper stem nut (in the center).
9. Turn away three top nuts of fastening of a rack to a body.
10. Lower the hub support with a jack, remove the two bolts securing the suspension strut to the hub support, and then remove the strut assembly.
Inspection
11. Follow the inspection procedures described in paragraph 3. If you want to disassemble the suspension strut to replace the shock absorber or spring, please contact paragraph 4.
Application. On Lexus models since 2004 with electronically controlled air suspension, if the strut is found to be defective, it should be replaced.
Installation
12. Have an assistant guide the strut into the niche in the engine compartment mudguard and thread the studs through the holes in the body. Screw on the nuts, but do not tighten them yet.
13. Insert the hub support into the lower rack bracket, insert the bolts and nuts, and then tighten them to the prescribed torque specified in Specifications at the beginning of this chapter.
14. Attach the stabilizer link to the strut bracket.
15. Attach the brake hose bracket and wheel speed sensor harness to the strut.
16. Install the wheel and tighten the wheel nuts. Lower the vehicle and tighten the wheel nuts to the specified torque specified in Specifications at the beginning of this chapter.
17. Tighten the three top strut mounting nuts to the specified torque as specified in Specifications at the beginning of this chapter, and replace the decorative cover that covers the fasteners.