
Inspection
1. The rubber hoses that connect the steel brake lines to the front and rear brakes should be inspected for cracks, chafing of the outer braid, leaks, swelling, and other damage approximately every six months. To do this, raise the car and place reliable supports under it. These hoses are an important and at the same time vulnerable part of the brake system, and inspection must be very thorough. A flashlight and a mirror can help you when checking. If the hose shows any of the above symptoms, replace it with a new one.
Replacement
Front brake hose
2. Loosen the wheel nuts. Raise the vehicle and place secure supports under it. Remove the wheel.
Attention! If the vehicle is equipped with electronically controlled air suspension, turn off the suspension height control switch before raising the vehicle.
3. Disconnect the brake line from the hose on the frame bracket (pic. 7.3). Use a wrench to prevent rounding of the flare nuts.
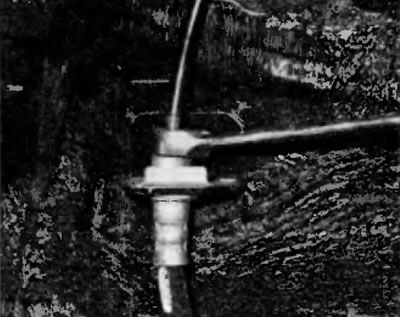
Pic. 7.3. In order not to damage the edges of the union nuts, use a special wrench to loosen the nipple connections on the brake pipes
4. Using pliers, remove the U-clip from the female fitting on the bracket (pic. 7.4), and then pass the hose through the bracket.
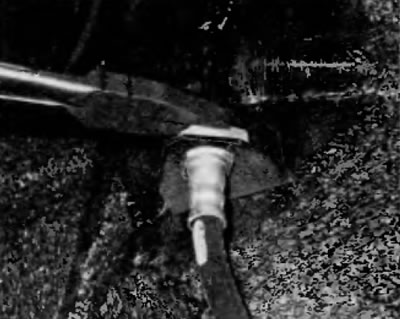
Pic. 7.4. Using pliers, remove the U-clip from the fitting between the brake hoses and the brake pipe
5. At the end of the hose from the side of the caliper, unscrew the bolt of the fitting type «banjo», and then disconnect the hose from the caliper. Note that there is one copper sealing washer on both sides of the fitting; when installed, they must be replaced with new ones.
6. Remove the retainer from the rack bracket and disconnect the hose from the bracket.
7. To install the hose, pass the caliper-side hose fitting through the bracket on the strut, and then connect the in-line bar fitting «banjo» to the caliper using a hollow bolt and new sealing washers. Make sure that the locating lug on the fitting fits into the hole in the caliper, and then tighten the bolt to the prescribed torque indicated in Specifications at the beginning of this chapter.
8. Insert the metal post into the post bracket and install the U-clamp. Make sure that the hose in the area between the caliper and the bracket on the rack is not twisted.
9. Guide the hose into the bracket on the frame without bending it, and then connect the brake pipe at this stage by hand-tightening the fitting. Install clamp and E-ring (in the presence of), and then securely tighten the union.
10. Remove air from the caliper (see paragraph 8).
11. Install the wheel and tighten the wheel nuts. Lower the vehicle and tighten the wheel nuts to the specified torque specified in Specifications at the beginning of this chapter.
Rear brake hose
12. Follow the steps in p.p. 2, 3 and 4 described above, and then repeat the steps in p.p. 3 and 4 at the other end of the hose. Bleed the air out of the caliper (see paragraph 8).
Metal brake lines
13. When replacing brake lines, use the correct replacement parts. Do not use copper piping to connect brake system components. Purchase genuine steel brake lines from an auto parts store or dealer.
14. Factory-made brake lines with flared ends and fitted fittings are available from auto parts stores and dealership parts departments.
15. When installing new piping, secure it securely in the appropriate brackets and ensure there is adequate clearance between it and moving parts or hot parts.
16. After installation, check the brake fluid level in the hydraulic brake fluid reservoir and add fluid if necessary. Bleed air from brake system (see paragraph 8) and carefully check the operation of the brakes before putting the vehicle into normal operation.