



Contents: Cleaning the radiator ↓ Radiator check ↓
Cleaning the radiator
Flush the radiator with a pressure hose to remove any dirt from the core.
Note: if the water pressure at the outlet of the hose is higher than 30-35 bar, it is necessary to keep the spray nozzle from the radiator at a distance of 40-50 cm to avoid damaging the radiator.
Radiator check
1. Remove the radiator cap.
Caution: When the engine is hot, this operation must be carried out with care to avoid burns from hot water or steam.
2. Check the radiator cap using a radiator tester.
Note:
- If there are traces of liquid and/or foreign deposits on the lid, rinse and blow out the lid.
- When performing the tests described below, it is necessary to hold the radiator tester installed on the radiator cap at an angle of at least 30°C from the horizontal, as shown in the figure.
(The original can be found on this resource: «www.TOYOTAMAN.ru»)
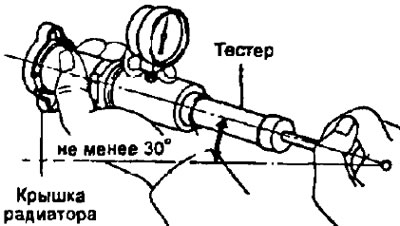
Evenly and slowly (1 stroke of the tester piston in 3 seconds or more) by moving the tester piston, create pressure on the steam valve of the radiator cap and make sure that the valve opens under air pressure. Otherwise, replace the radiator cap.
- Valve opening pressure:
- nominal - 0.75-7.05 bar
- minimum permissible - 0.6 bar
If the valve opening pressure is less than the minimum, replace the radiator cap.
Make sure that the pressure gauge reading on the tester does not drop too quickly when the pressure drops below 0.6 bar, this indicates that the valve is tight.
3. Check the cooling system for leaks:
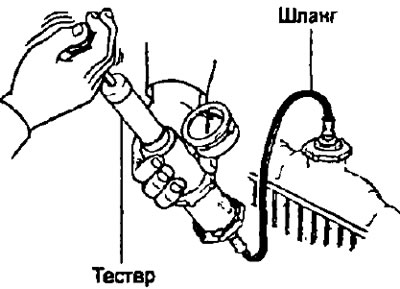
- a) Fill the system with coolant and connect the tester with a hose to the radiator neck as shown in the figure.
- b) Warm up the engine.
- c) Using a tester, create a pressure of 1.2 bar in the system and make sure that the pressure does not decrease.
If pressure drops, check the hoses, radiator and coolant pump for leaks.
If no leaks are found, check the condition of the radiator core, cylinder block and cylinder head.
4. Install the radiator cap.