
Note. Do not adjust gap on iridium spark plugs. Using a gap adjustment tool on them may damage the iridium coating of the electrodes. The gap of these spark plugs is set directly by the manufacturer.
1. Replacing spark plugs requires the use of a spark plug socket fitted with a ratchet. This socket is lined with a rubber grommet to protect the porcelain insulator of the spark plug and hold the spark plug as it is unscrewed into the appropriate hole (pic. 27.1).
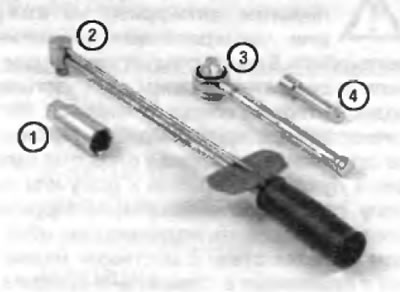
Pic. 27.1. Tools for changing spark plugs
1 - Spark plug socket - it has a special padding inside to protect the porcelain spark plug insulator
2 - Torque wrench - although not required, using this tool is the best way to ensure that the spark plugs are properly tightened
3 - Ratchet knob - standard tool for working with a socket for spark plugs
4 - Extension - depending on the model and accessories, you may need a special extension and universal joint to get to some spark plugs
2. If you are replacing spark plugs, purchase new ones and replace spark plugs one at a time.
Note. The manufacturer specifies that only spark plugs with iridium coated tips be used on these models. When purchasing new spark plugs, be sure to purchase the correct spark plugs for your specific vehicle. This information can be found in «Specifications» at the beginning of this chapter, on the Emissions Standard label located on the back of the hood (VECI), that satisfies a particular vehicle, or in the owner's manual that came with the vehicle. If these sources list different spark plugs, get the type listed on the VECI label because that information is specific to your engine.
3. Inspect each of the new spark plugs for defects. If there are any signs of cracks in the porcelain insulator of the spark plug, do not use it.
4. Remove the cover (And) engine and disconnect any hoses or items that may interfere with access and move them to the side. If you are running a V6 model, remove the upper intake manifold to access the rear row spark plugs (see chapter 2B).
5. Turn out bolts and disconnect each coil of ignition in gathering from spark plugs (pic. 27.5).
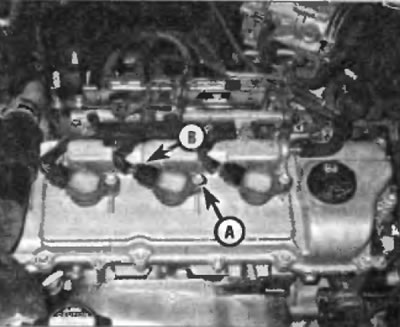
Pic. 27.5. Remove the bolt (A), disconnect the electrical connector (IN) and disconnect the individual coils to get to the spark plugs
6. If compressed air is available, blow out any dirt or foreign material from the spark plug area before continuing.
Attention! Always wear eye protection when working with compressed air!
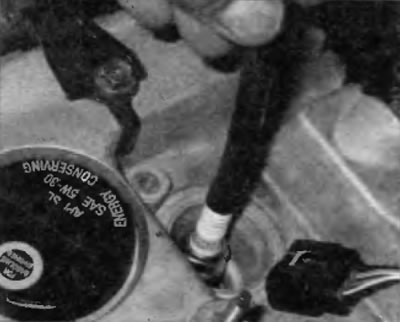
7. Remove spark plug (pic. 27.7).
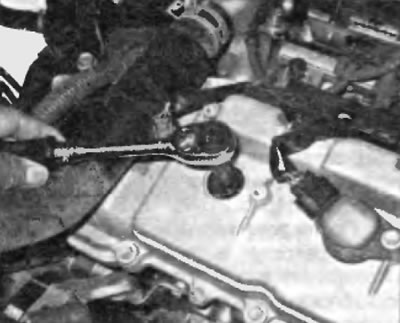
Pic. 27.7. Since the spark plugs are located in a deep recess, a proper spark plug socket and extension will be required when removing or installing them
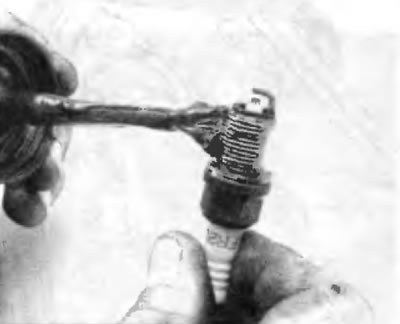
8.Whether you are replacing the spark plugs this time or are going to reuse «old» spark plugs, compare each old spark plug to the pictures on the inside back cover to determine the overall operating condition of the engine.
9. Apply a little grease to the threads of the spark plugs (pic. 27.9, a). It is often difficult to screw spark plugs into their holes without being twisted. To avoid this, put a short piece of rubber hose on the end of the spark plug (pic. 27.9, b). The flexible hose acts as a gimbal to help align the spark plug with the appropriate mounting hole. If the spark plug starts to stick, the hose will slip on it, preventing damage to the threads. Tighten the spark plug to the specified torque as specified in «Specifications» at the beginning of this chapter.
Pic. 27.9, a. A thin layer of lubricant applied to the threads of the spark plugs will keep the threads in the cylinder head from being damaged the next time the spark plugs are removed
Pic. 27.9, b. A piece of rubber hose can help «make money» spark plug when it is screwed into the mounting hole
10. Install the ignition coil assembly on the new spark plug.