
Note. Although the manufacturer does not prescribe it. it is recommended to periodically clean the mesh filter in the gearbox to remove all accumulated dirt and metal particles from it.
2. Obtain the prescribed transmission fluid for the transaxle before starting work (see «Recommended Fluids and Lubricants»).
3. This work also requires reliable supports to support the vehicle in a raised position, a hex bit or 10 mm Allen key, a drain container that can hold at least 4 liters of liquid, newspapers and clean rags.
4. Fluid should be drained immediately after driving. Hot liquid allows you to remove accumulated sediment more efficiently than cold liquid.
Attention! With a hot gearbox in a block with a driving axle, the fluid temperature may exceed 175°C. Use protective gloves.
5. After driving a car to warm up the fluid, raise it and install unstable supports to access the gearbox and differential drain plugs.
Attention! If the vehicle is equipped with electronically controlled air suspension, turn off the suspension height control switch.
6. Place the necessary equipment under the vehicle, being careful not to touch the hot elements of the exhaust system.
7. Place a drain pan under the drain plug on the transmission pan and remove the drain plug (pic. 23.7). Make sure that the drain container is in the wrong place, as the liquid will flow out with some displacement. Once the fluid is drained, replace the drain plug and tighten it securely. If you are not going to clean the mesh filter, go to step 14.
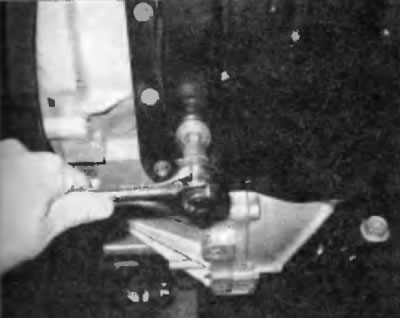
Pic. 23.7. Unscrew the drain plug from the automatic transmission in the block with the drive axle
8. To clean the mesh filter, unscrew the front bolts securing the transmission pan, then loosen the rear bolts, carefully separate the pan with a screwdriver and allow the remaining fluid to drain (pic. 23.8. a, b). Once the liquid is drained, remove the bolts and lower the sump.
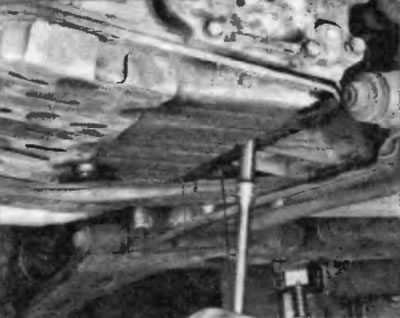
Pic. 23.6, a. After loosening the front bolts, unscrew the rear pan mounting bolts...

Pic. 23.6, b....and let the remaining liquid drain off
9. Turn out bolts of fastening of the mesh filter, release a clip (some models) and lower the strainer, separating it from the gearbox (pic. 23.9). Be careful when lowering the strainer as it contains liquid residue.
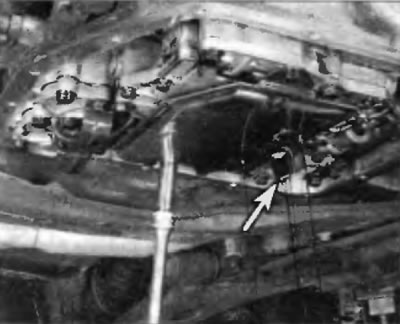
Pic. 23.9. Remove the strainer bolts and lower the strainer (be careful as it contains liquid residue)
10. Thoroughly wash the strainer in clean transmission fluid.
11. Install the strainer in its original position, install the clip (in the presence of) and screw in the bolts Tighten the bolts to the prescribed torque (see «Specifications» at the beginning of the chapter).
12. Gently clean the gasket surfaces on the pan to remove all traces of the old gasket material. Remove the magnets (pre-noting their position), rinse the pan in clean solvent and dry with compressed air.
Attention! Always wear eye protection when working with compressed air! Clean and install the magnets in the wrong place in the pallet (pic. 23.12).
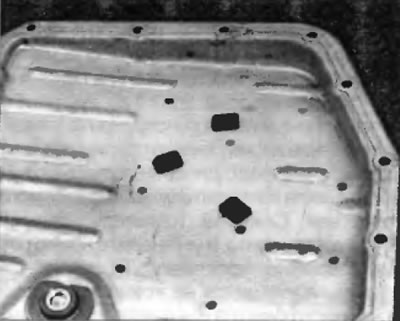
Pic. 23.12. Mark the location of the magnets, remove them and wash them and the sump in solvent before installation
13. Install a new gasket, place the pallet in its original position and screw the boots into their original places. Tighten the bolts to the specified torque (see «Specifications» at the beginning of this chapter).
14. Lower the car.
15. With the engine off, add new fluid to the transmission through the dipstick tube (information on recommended grades of liquid and their filling volumes are presented in the paragraph «Recommended Fluids and Lubricants»). Use a funnel to avoid spillage. It is recommended to add liquid little by little, periodically checking the level with a dipstick (see paragraph 4). Give the liquid time to drain into the pan.
16. Start the engine, move the selector lever through all positions from P to L, then return to position P and apply the parking brake.
17. With the engine running at idle, check the transmission fluid level. Add fluid up to the COOL level on the dipstick.
18. Drive the vehicle to warm up the transaxle to normal operating temperature, and then check the fluid level again.