
Examination
1. Drive belt (neither) located on the right side of the engine distance. Good condition and correct adjustment of belts are the key to reliable engine operation. Due to their structure, and due to the high stresses that occur during operation, the belts stretch as they try, and their condition deteriorates. Therefore, they should be checked periodically.
2. On four-cylinder models, a single belt drives the alternator, air conditioner, and power steering. On V6 models, one belt transmits power from the crankshaft to the alternator and air conditioner, and the other belt drives the power steering pump.
3. With the engine off, open the hood and locate the drive belts on the right side of the engine compartment. Using a flashlight, check each belt for split rubber on both sides of the core, separation of the core from the sidewalls of the belt, splitting of the core, separation of the ribs from the base, cracks or delamination of the ribs, and breakage or wear of the ribs or cracks on the inner surfaces of the ribs (pic. 21.3). Also check for abrasion and oiling, which give the belt a shiny appearance. Both sides of the belt should be inspected, which means that you need to twist the belt to check the reverse side. If you cannot see the back of the belt, do a finger test. If any of the above conditions are present, replace the belt (see item 8 or item 16).
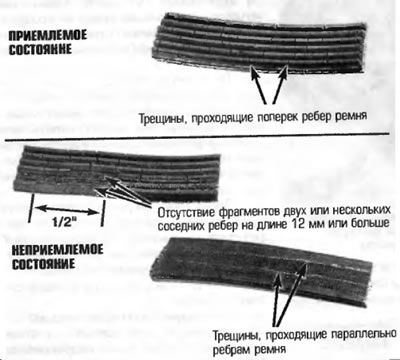
Pic. 21.3. Check poly V-belt for symptoms similar to those shown. If the belt looks worn, replace it
4. The tension of each belt is checked by pressing the belt in the middle of the area between the pulleys. Press firmly on the belt with your thumb and see how much the belt moves (bends) (pic. 21.5). As a general rule, the belt should flex about 6 mm.
Adjustment (V6 engine only)
5. If the A/C alternator/compressor belt requires adjustment, loosen the alternator pivot bolt located on the left front corner of the cylinder block. Loosen the clamping bolt and turn the adjusting bolt (pic. 21.5). Measure the belt tension using the method described above. Repeat this procedure until lor. until the A/C compressor drive belt is adjusted.
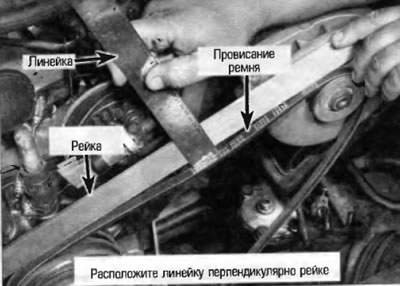
Pic. 21.5. Measuring the sag of the righteous belt with a straight rod and ruler
6. Adjust the power steering pump belt, loosen the adjusting bolt that holds the pump to the bracket and rotate the pump (away from the engine to tension the belt and towards the engine to release it). Repeat the procedure until you achieve the correct drive belt tension and tighten the bolt.
Replacement
Four cylinder engine
7. Remove the right front wheel.
8. Remove a sealant of an apron of the right wing.
9. Remove the right engine cover assembly.
10. Remove the upper jet engine and bracket (see paragraph 17 of chapter 2A).
11. Slowly turn the drive belt tensioner clockwise and remove the belt from the pulleys.
12. When purchasing a new belt, use the old belt to directly compare belts in length, width, and design.
13. After replacing the drive belt, make sure it is correctly positioned in the pulley grooves. Correct centering of the belt is very important.
V6 engine
14. When replacing the belt, follow the V6 drive belt adjustment procedure, but remove the belt from the crankshaft pulley and remove it from the engine compartment. If you are replacing the power steering pump belt, due to the location of the belts on the crankshaft pulley, you must first remove the A/C compressor belt. For this reason, and because belts tend to wear at almost the same rate, it is recommended that both belts be replaced at the same time. Mark each belt and its position on the pulley so replacement belts can be installed properly.
15. When purchasing new belts, use the old belts to directly compare belts in length, width and design.
16. After replacing the drive belt, make sure it is correctly positioned in the pulley grooves. Correct centering of the belt is very important.
17. Adjust the strap (neither) in accordance with the procedure described above in this paragraph.