
Unfortunately, battery readings are easy to misinterpret. Therefore, this check should be used along with other checks to confirm the diagnostic results.
For an accurate interpretation, both absolute readings and the rate of movement of the arrow are important. Most instruments show vacuum in millimeters of mercury (mmHg.). The following vacuum reference values are given on the assumption that diagnostics are performed at sea level. As altitude increases (or decrease in atmospheric pressure) readings decrease. At altitudes above about 600 meters above sea level, for every 300 meters in altitude, the vacuum gauge reading decreases by about 25 mmHg. Art.
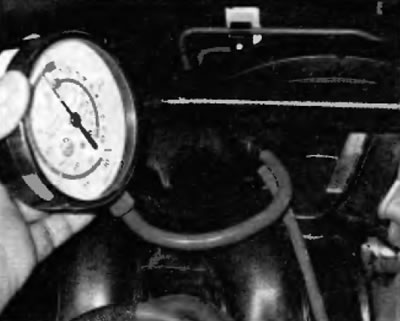
Connect a vacuum gauge directly to the intake manifold that is under vacuum, not to the throttle body (pic. 4.6). Do not disconnect any hoses while performing this test as this may result in erroneous readings
Allow the engine to fully warm up before starting welding. Install wheel chocks and apply the parking brake. Shift the transmission to position P, start the engine and let it run at normal idling speed.
Attention! Keep clear of fans and drive belts. Keep the vacuum gauge away from these elements.
Take a reading from the vacuum gauge; on average, on a serviceable engine, the reading should be in the range from 430 to 560 mm Hg. Art. while maintaining a fairly stable position of the arrow (pic. 4.6). Refer to the following vacuum gauge readings and see what they say about the condition of the engine:
1. A low steady reading usually indicates a gasket leak between the intake manifold and the head (ami) cylinders or throttle body, leaky vacuum hose, delayed ignition or incorrect valve timing. Before removing the timing chain cover to check the timing marks, check the ignition timing with a stroboscope and rule out all other possible causes using the checks in this chapter.
2. If the reading is 75-200 mm Hg. Art. below normal and fluctuating in this reduced range, a leak through the intake manifold gasket in the intake port or a malfunctioning fuel injector is suspected.
3. If the arrow periodically drops by 50-100 mm Hg. Art. at a steady pace, there is probably a leak in the valves. To confirm this condition, perform a compression test or leak test.
4. Irregular drop in reading or needle jumps down can be caused by sticking valves or misfiring. Perform a compression or leak test and inspect the spark plugs.
Pic. 4.4. When diagnosing the condition and dynamic characteristics of the engine, you can use a simple vacuum gauge
5. Fast vibration in the range of approximately 100mmHg. Art. at idle, in combination with exhaust smoke, indicates wear on the valve guides. To confirm this condition, perform a leak test. If rapid vibration occurs along with increased engine speed, check for intake manifold or head gasket leaks, loose valve springs, riveted burn, or misfiring.
6. Minor fluctuations, at 25 mm Hg. Art. up and down may indicate an ignition problem. Check all normal items affected by scheduled maintenance and, if necessary, check engine operation with an ignition analyzer.

Ras. 4.6. Examples of vacuum gauge readings
7. If there are large fluctuations, perform a compression or leak test to check for a poorly performing or non-performing engine cylinder or a burnt cylinder head gasket.
8. If the needle moves slowly over a wide range, check the positive crankcase ventilation system for blockage, the correct air-fuel mixture at idle, and the throttle body or intake manifold gasket for leaks.
9. Check for slow reset after increasing engine speed by quickly opening the throttle until the engine reaches approximately 2500 rpm and then closing the throttle. Normally the reading should drop to near zero, rise above the normal reading for idling (approximately 125 mmHg Art.) and then return to the previous idle reading. If the vacuum returns slowly and does not reach its maximum when the throttle closes, the rings may be worn. If there is a long delay, identify the reason for the reduced capacity of the exhaust system (often the cause lies in the muffler or catalytic converter). An easy way to check for this is to temporarily disconnect the exhaust system upstream of the suspect element and test in that state.