
Attention! Wait until the engine has completely cooled down before starting this procedure.
Removing
1. Disconnect the ground wire from the batteries (see paragraph 1 of chapter 5).
2. Raise the front of the car and place secure supports under it. Remove the lower engine cover (rice. 6.5).
Attention! If the vehicle is equipped with electronically controlled air suspension, turn off the suspension height control switch.
3. Apply penetrating oil to the bolts and springs securing the intake manifold to the exhaust manifold. After the bolts are saturated, turn them out. Separate the downpipe from the manifold, being careful not to damage the oxygen sensor (pic. 9.3).
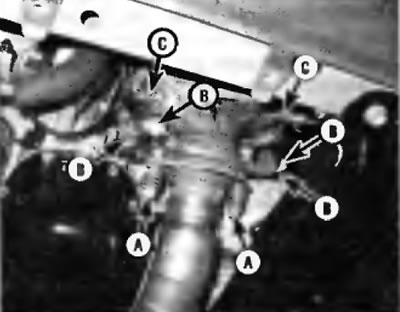
Pic. 9.3. Working under the vehicle, remove the bolts securing the front exhaust pipe to the manifold (A) and lower the pipe. Do not damage the oxygen sensor (C). (IN) - exhaust manifold lower mounting bolts
4. Turn out bolts and remove the bottom couplers of a final collector with the engine. Disconnect the oxygen sensor electrical connectors.
5. Working in the engine room, remove the upper heat shield from the manifold (pic. 9.5).
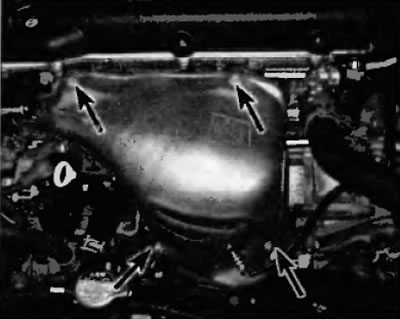
Pic. 9.5. Working from the engine compartment, remove the top heat shield mounting bolts...
6. Remove nuts/bolts, disconnect manifold and remove gasket (pic. 9.6).
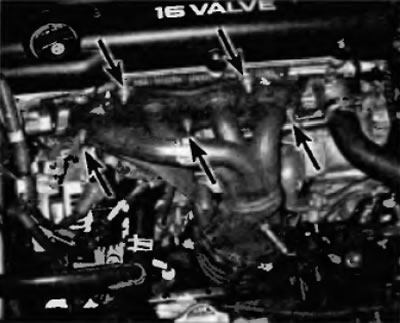
Pic. 9.6.... and unscrew the exhaust manifold mounting nuts, and then remove the manifold from the studs on the cylinder head and remove it from the engine compartment
Installation
7. Using a scraper, remove all traces of the old gasket material and carbon deposits from the mating surfaces of the cylinder head and manifold. If the gasket shows signs of leakage, use a ruler to check for flatness on the manifold mating surface. If the mating surface is deformed, the manifold must be replaced.
8. Install a new gasket, being guided by the studs on the cylinder head and paying attention to the direction marks or arrows on the gasket (if any).
9. Establish a collector and screw nuts of its fastening.
10. Working from the center outwards, evenly, in three or four stages, tighten the nuts/bolts to the prescribed torque shown in Specifications at the beginning of this chapter.
11. Reinstall the remaining elements, working in the reverse order of removal.
12. Turn on the engine and check it for leaks in the exhaust system.