
System controls
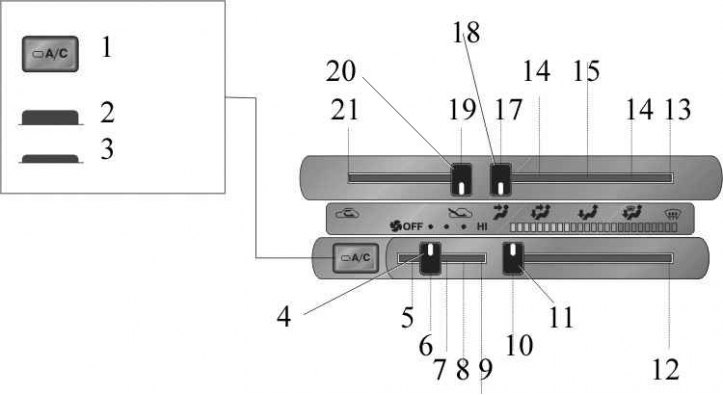
1. Air conditioner on/off button; 2. Turn off; 3. Enable; 4. Air flow direction controller; 5. Lever for adjusting the air intake; 6. Air recirculation; 7. Outdoor air; 8. In the face; 9. Flow to feet and face; 10. On the floor; 11. On the floor or windshield; 12. On the windshield; 13. Fan speed control lever; 14. Off; 15. Low speed; 16. Moderate speed; 17. Increased speed; 18. High rotation speed; 19. Low temperature; 20. Thermostat lever; 21. High temperature
Controls and their purpose
The temperature controller sets the temperature of the air entering the passenger compartment.
In the extreme left position of the handle, the temperature is the lowest, in the extreme right - the highest.
With the air intake adjustment knob, you can set the mode of full or partial recirculation with the intake of outside air.
When the OUTSIDE AIR lever is in position, air is supplied to the air conditioning system from outside the vehicle. To recirculate, move the lever to the RECIRCULATED AIR position.
The flow direction control lever sets the channel through which air enters the passenger compartment.
Air Direction Control Positions
| In face | |
| In the legs and in the face | |
| On the floor | |
| On the floor and windshield | |
| On the windshield |
Turning on, off and rotation speed is set by the fan control lever. To turn off the fan, move the lever to the OFF position. A special button is designed to turn the air conditioner on and off. Press the button to turn it on, press the button again to turn it off.
If the backlight of the button flashes, then contact a car service as soon as possible.
The cause may be a slipping belt, or a compressor malfunction. In this case, the air conditioner will automatically turn off to prevent the destruction of the belt.
Air heating
1. Move the thermostat lever to any position except the leftmost one. If you need air with a low moisture content, then move the lever to a position between the middle and the right extreme. If you need warm air blowing at face level, then move the lever to a position close to the middle one.
2. Move the air intake control lever to the OUTSIDE AIR position.
3. If you want to quickly heat the air in the cabin, then move the lever to the RECIRCULATED AIR position.
4. It is recommended that the air intake control lever be in the OUTSIDE AIR position at all times. Otherwise, the glasses will fog up quickly.
5. Move the flow direction control lever to the FLOOR position (on the floor). If you need warm air blowing at face level, move the lever to the BI LEVEL position.
6. If the windows fog up quickly, move the lever to the FLOOR/WINDSHIELD position (floor and windshield).
7. Move the fan control lever to any position except the leftmost one.
8. The air conditioner button must be depressed. If you need dry warm air, then press the button.
Air cooling
1. Move the thermostat lever to a position between the middle and left extreme.
2. If you need heated air at floor level with a two-level blowing mode, then move the thermostat lever to a position close to the middle.
3. Move the air intake control lever to the OUTSIDE AIR position. If rapid circulation of cool air is required, move the lever to the RECIRCULATED AIR position.
4. It is recommended that the air intake control lever be in the OUTSIDE AIR position at all times. Otherwise, the glass will fog up quickly.
5. Move the flow direction control lever to the FLOOR position (on the floor). If you need warm air blowing at face level, move the lever to the BI LEVEL position.
6. If the windows fog up quickly, move the lever to the FLOOR/WINDSHIELD position (floor and windshield).
7. Move the fan control lever to any position except the leftmost one.
8. The air conditioner button must be depressed. If you need dry warm air, then press the button.
Ventilation
1. Move the thermostat lever to the leftmost position.
2. Move the air intake control lever to the OUTSIDE AIR position.
3. Move the flow direction control lever to the FACE position (on the face).
4. Move the fan control lever to any position except the leftmost one.
5. The button for turning on the air conditioner must be depressed.
Heated and blown windshield
To clear a windshield that is fogged up from the inside
1. Move the thermostat lever to any position.
2. Move the air intake control lever to the OUTSIDE AIR position.
3. Move the flow control lever to the WINDSHIELD position (windshield).
4. Move the fan control lever to the left extreme position.
5. Press the button for turning on the air conditioner.
To clear an icy or misted windshield from the outside
6. Move the thermostat lever to the extreme right position.
7. Move the air intake control lever to the OUTSIDE AIR position.
8. Move the flow control lever to the WINDSHIELD position (windshield).
9. Move the fan control lever to the HI position.
10. The button for turning on the air conditioner must be depressed.
Airflow Direction Control Positions
FACE position - direction of flow at face level.
Position BI LEVEL - the flow is directed to the level of the face and legs at the same time. The air at the level of the legs is slightly warmer than at the level of the face (except for ventilation mode).
FLOOR position - the flow is almost completely directed to the level of the face and legs. On some vehicles, the air at foot level is somewhat warmer than at face level.
FLOOR / WINDSHIELD position - the flow is directed to the windshield, front door windows, face and legs. A less heated stream is directed to the face.
WINDSHIELD position - the flow is directed to the windshield, front door windows and face. On some cars, in this position of the regulator lever, a less heated stream is directed to the face.
Do not use the WINDSHIELD position for air cooling in very high humidity conditions. Otherwise, due to the temperature difference between the outside air and the windshield, the outer surface of the glass will fog up.