
Attention! If the vehicle is equipped with electronically controlled air suspension, turn off the suspension height control switch.
1. Frequent oil changes are the best engine troubleshooting a car enthusiast can do on their own, because as «aging» the oil becomes more dilute and contaminated, and this leads to premature engine wear.
2. Before starting this procedure, make sure you have all the necessary tools (pic. 6.2) Also, prepare enough rags or newspapers to clean up splashes and spilled oil.
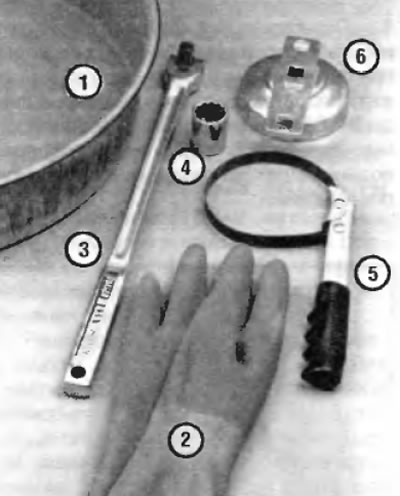
Pic. 6.2. When changing the engine oil and filter, these tools are required:
1. Drain container - it should be shallow enough in depth, but wide enough to prevent oil from spilling
2. Rubber gloves - when removing the drain plug and filter, oil will inevitably fall on your hands (gloves prevent burns)
3. Socket extension - sometimes the oil drain plug is quite tight and will require an extension to release it
4. Socket - should not be used with an extension or ratchet (the size must match the drain plug)
5. The filter wrench is a metal strap wrench that must have some clearance relative to the outer surface of the filter to work effectively
6. Filter Wrench - This wrench fits onto the base of the filter and can be turned with a ratchet or extension (see above) (for different types of filter, keys of different sizes are provided)
3. Access to the bottom of the car can be greatly facilitated by lifting the car on a lift, placing it on a flyover or using a jack to put it on reliable supports.
Attention! Do not work under a vehicle that is only supported by a hydraulic or rolling jack.
4. If this is your first oil change, check the location of the oil drain plug. The engine and exhaust components will be quite hot when actually doing the work, so try to anticipate any potential problems before the engine and other components get hot.
5. Park the car on a flat, level area. Start loop days and let it reach normal operating temperature (the arrow on the temperature gauge must be at least above the lower mark). Warm oil and sediment will flow out more easily. Once the engine is warm, turn it off. Remove the filler cap.
6. Raise the vehicle and place secure supports under it.
Attention! To avoid personal injury, never work under a vehicle that is only supported by a jack. The jack supplied with the vehicle is for the sole purpose of lifting the vehicle for the purpose of removing and replacing a wheel. To support the vehicle when you intend to work under it, be sure to place secure stands underneath it.
7. Being careful not to touch the hot elements of the exhaust system, place a drain pan under the drain plug on the bottom of the oil pan and remove the plug (pic. 6.7). If the engine is really very hot, you can use gloves when unscrewing the plug by hand on the last few revolutions.
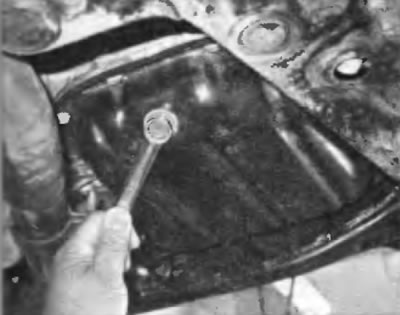
Pic. 6.7. Use the proper size box wrench or socket to remove the oil drain plug without rounding the corners
8. Allow the oil to drain into a container. Please note that as the oil flow slows down and turns into a trickle, it may be necessary to move the container. Inspect the drained oil for metal filings and other small particles.
9. When all the oil is drained, wipe the drain plug with a clean rag. Even the smallest metal particles adhering to the plug will immediately lead to contamination of the new oil.
10. Clean the area around the drain. Screw in the drain plug and tighten it securely, but be careful not to strip the threads.
11. Move the drain pan under the oil filter.
12. Remove all tools, rags, etc. from under the vehicle, but be careful not to spill the oil in the drain pan. Lower the car.
13. Release the oil filter (pic. 6.13, a, b), by turning it counterclockwise with the special wrench. As soon as the filter goes freely, completely unscrew it by hand and remove it from the cylinder block. After removing the filter from the unit, immediately tilt it with the open end up so that the oil contained in the filter does not leak out.
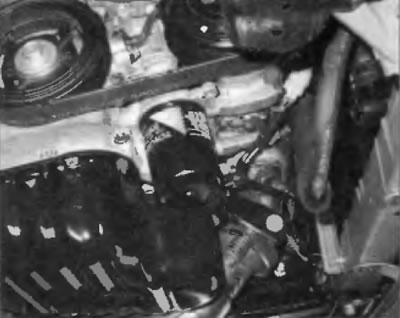
Pic. 6.13, a. Oil filter location on four-cylinder models

Pic. 6.13b. On V6 models, the oil filter is mounted on the side of the cylinder block. Since it is usually very tight, you will need a special wrench to remove it. DO NOT use this wrench to tighten a new filter
Attention! The engine exhaust manifold may still be very hot. So be careful.
14. Wipe the support surface on the unit with a clean rag. If allowed «old» oil to remain on the block, it will smoke when the block is heated. In addition, it will prevent the correct installation of the new filter. Also remove any remnants of the old gasket from the bearing surface. If necessary, this can be done with a scraper.
15. Compare the old filter with the new one to make sure. that they are the same type. Apply some engine oil to the rubber gasket of the new filter and install it in place (pic. 6.15). Overtightening the filter will damage the gasket, so do not use a filter wrench when tightening. Most filter manufacturers recommend hand-tightening the filter only. Typically the filter should be tightened 3/4 of a turn after the gasket has made contact with the block. Follow the instructions supplied with the filter or on the filter housing.
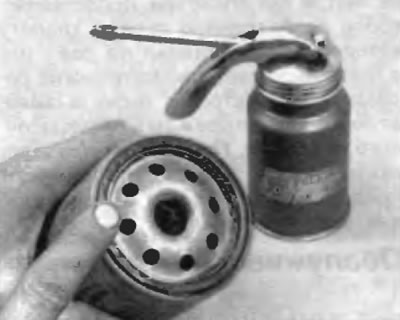
Pic. 6.15. Before installing the oil filter on the engine, lubricate the filter gasket with clean engine oil
16. Fill the engine with fresh oil through the oil filler neck in the cylinder head cover. Use a funnel to avoid spilling oil on the engine. Fill the engine with approximately 2.8 liters of fresh oil. Wait a few minutes for the oil to drain into the sump and then check the oil level on the dipstick (if necessary see paragraph 4). If the oil level is close to the F mark, install the filler cap, tighten it by hand, start the engine and let the new oil fill the engine lines.
17. Let the engine run for about a minute. With the engine running, look under the vehicle and check for leaks around the oil pan drain plug and around the oil filter. If there is a leak, stop the engine and slightly tighten the plug or filter.
18. Wait a few minutes for the oil to drain into the sump, and then recheck the level on the dipstick and, if necessary, add enough oil to bring the level to the F mark.
19. During the first few trips after an oil change, boil the engine for leaks and check the oil level more frequently.
20. Used oil drained from the engine cannot be reused and must be disposed of. After the oil has cooled, it can be drained into a suitable container (a plastic bottle with a stopper, a milk carton, etc.) for transfer to one of the disposal sites. Dispose of drained oil properly. Do not dump oil on the ground or down the drain!