
Attention! Dust generated during the normal operation of the brake system is harmful to health. Never blow it out with compressed air or inhale it. Always use a certified filter mask when working on brakes. Under no circumstances should you use petroleum-based solvents to clean the brake system. Use only brake cleaner!
Note. Be sure to replace calipers in pairs; never replace a caliper on just one wheel.
Removing
1. Loosen the wheel nuts. Raise the vehicle and place secure supports under it. Remove wheels.
Attention! If the vehicle is equipped with electronically controlled air suspension, turn off the suspension height control switch before raising the vehicle.
2. Remove the bolt of the union type «banjo» brake hose and disconnect the hose from the caliper. Plug the hose to prevent dirt from entering the brake system and causing large amounts of brake fluid to leak out (pic. 4.2).
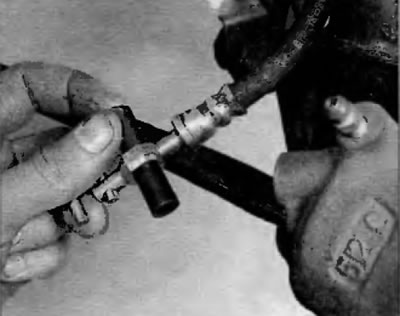
Pic. 4.2. Using a piece of rubber hose of the correct size, plug the fitting of the barb type «banjo» on the brake pipe to prevent leakage of brake fluid and penetration of dirt and moisture into the hose
Application. If you are only removing the caliper to access other items, do not disconnect the hose.
3. Turn out bolts of fastening of a support (pic. 4.3).
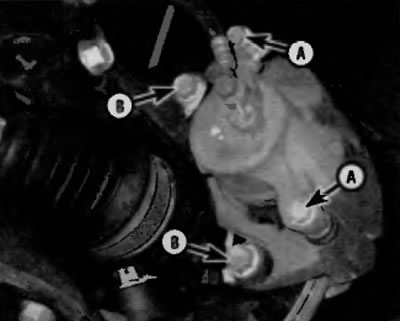
Pic. 4.3. Front brake caliper mounting (the length of the rear caliper is similar)
A. Caliper mounting bolts
B. Caliper bracket bolts
4. Remove a support. If necessary, remove the caliper bracket from the steering knuckle or rear hub support (pic. 5.2. a, b).
Installation
5. Establish a support, working in sequence, return to removal. Tighten the caliper mounting bolts (and bracket bolts, if removed) prescribed force specified in Specifications at the beginning of this chapter. Install new sealing washers on both sides of the barb fitting «banjo» on the brake hose, and then tighten the bolt (hollow) this nipple connection with the prescribed force specified in Specifications at the beginning of this chapter.
6. Remove air from the brake system (see paragraph 8).
7. Install the wheels and turn the wheel nuts. Lower the vehicle and tighten the wheel nuts to the specified torque specified in Specifications at the beginning of this chapter.