
Removing
Warning. Brake agility causes damage to painted or polished surfaces. Cover all parts of the body and be careful not to spill liquid when performing this procedure. In the event of a fluid spill, clean up all traces of the spilled brake fluid immediately and flush the affected area with plenty of water.
1. Remove the engine top cover (in the presence of) (see chapter 2).
2. Remove the cable tie located between the suspension struts (in the presence of) (see chapter 10). On Lexus 2004 and later models, remove the air box deflector from the engine compartment (see chapter 11).
3. Remove the air filter housing (see chapter 4).
Note. On later vehicles, for easier access, if necessary, remove the air duct between the throttle body and air filter housing (see chapter 4).
4. Using a syringe, pump out as much brake fluid as possible from the reservoir.
Note. On late Lexus models, the reservoir is not connected directly to the master cylinder. Empty the tank and disconnect all hoses from it, and then remove it to gain access.
5. Disconnect the electrical connector for the low brake fluid warning light switch (pic. 6.5).
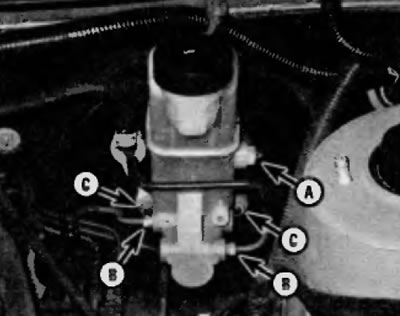
Pic. 6.5. Master cylinder installation details
A. Electrical connector
B. Brake line fittings
S. nuts
6. Place a rag under the fittings and prepare suitable plugs or plastic bags to cover the ends of the lines after they have been disconnected.
7. Loosen the fittings at the ends of the brake lines where they enter the master cylinder. To avoid damaging the nut faces, use a special flare nut wrench that fits snugly around the appropriate hex (pic. 6.5).
8. Carefully lay the brake lines away from the master cylinder and plug the ends to prevent contamination.
9. Turn away nuts of fastening of the main cylinder to the vacuum amplifier. Remove the master cylinder from the studs. Be careful not to spill any fluid or deform the brake lines (pic. 6.5).
Note. If necessary, if the brake lines from the master cylinder to the ABS actuator cannot be moved to the side without damaging them, remove them.
Installation
10. Before installing a new master cylinder, remove air from it. This procedure is performed on the stand. Since it is necessary to press down on the master cylinder piston and at the same time control the flow at the outlet ports for the brake lines, it is recommended that the master cylinder be clamped in a vise.
11. Connect a pair of bleed tubes to the master cylinder outlet ports (pic. 6.11).

Pic. 6.11. The best way to bleed air from a master cylinder before installing it on a car is to use a pair of bleed tubes
Note. On models with a detachable reservoir, lower the bleed tubes back into the master cylinder where the reservoir hoses connect. On models with an auxiliary reservoir, place the bleed tubes in the small reservoir mounted on the master cylinder.
12. Fill the reservoir with the recommended brand of brake fluid (see chapter 1).
13. Slowly insert the pistons into the master cylinder (You can use a large Phillips screwdriver for this). Air will exit the pressure chambers into the reservoir. Because the tubes are immersed in liquid, air cannot flow back into the master cylinder when you release the pistons.
14. Repeat the procedure until there are no air bubbles in the escaping liquid.
15. Remove the air outlet tubes, one at a time, and install plugs on open ports to prevent fluid from escaping and air from entering. When installing a new master cylinder, adjust the length of the vacuum booster pusher (see paragraph 9).
16. Install the lid on the tank. Then install the master cylinder on the vacuum brake booster, guided by the studs. At this stage, tighten the nuts only by hand.
17. Connect the brake lines to the master cylinder. Since the master cylinder still has some slack, it can be moved slightly to make it easier to connect the brake lines. Do not strip the threads when tightening the fittings.
18. Tighten the nuts to the specified torque specified in the Specifications at the beginning of this chapter, and then securely tighten the brake pipe fittings.
19. Fill the master cylinder reservoir, and then purge air from the master cylinder and brake system as described in paragraph 8. To remove air from the cylinder (when it is installed not a car) ask an assistant to slowly depress the brake pedal several times and then hold the pedal pressed to the floor. Loosen the flare nut on the union to allow air and fluid to escape. Repeat this procedure on both fittings until a liquid comes out that does not contain air bubbles (fig 6.19).

Pic. 6.19. Loosen the fittings on the master cylinder to purge air from it when it is on the vehicle (shows a typical example)
Warning. Prepare a sufficient amount of rags to collect the escaping brake fluid, as fluid on painted surfaces will damage them.
20. If the brake lines coming from the master cylinder were removed. To the ABS actuator, also bleed air from the ABS actuator lines.
21. The rest of the installation is performed in the reverse order of removal. Before entering the vehicle into normal operation, carefully check the operation of the brakes.
Attention! Do not operate the vehicle if you are in doubt about the effectiveness of the braking system. On models equipped with ABS, air can enter the hydraulic anti-lock brake control unit. Therefore, if after re-bleeding the pedal continues to be perceived «soft» or the brake or ABS warning light stays on, have the vehicle towed to a dealer or other workshop where the bleed procedure can be performed using a special tester.