



Knock sensor
Caution: Allow the engine to cool completely before beginning this procedure.
Removal
1. The knock sensor determines the moment of the onset of hard combustion - detonation knocks. This allows the engine to operate at the optimal ignition timing, which has a positive effect on its performance characteristics. When vibrating (the onset of detonation) in an engine, the knock sensor produces a voltage output signal that increases as the intensity of the knocking noise increases. This signal is sent to the ECM, which retards the ignition timing until detonation ceases. The knock sensor is mounted on the rear side of the engine cylinder block, directly under the cylinder head (from the engine shield side).
2. Disconnect the cable from the negative battery terminal.
3. Drain the cooling system (see Chapter 1A).
4. If you are working on a four-wheel drive (4WD) model produced before 2000 or a model produced since 2001, remove the intake manifold (see chapter 2A or 2B). If you are working with a pre-2000 model without all-wheel drive (2WD), lift the front of the vehicle with a jack and install safety supports.
5. Disconnect the wiring connector and remove the knock sensor (see figure 12.5, a, b).
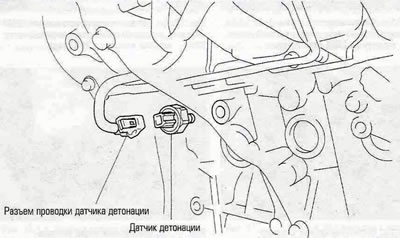
Figure 12.5,a. Location of the knock sensor in models produced before 2000.
The original can be viewed on the website [TOYOTAMAN]
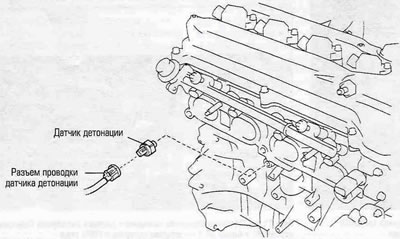
Figure 12.5,b. Location of the knock sensor in models produced since 2001.
Installation
6. If you are going to reinstall the old sensor, apply thread sealant to its threads. The threaded part of the new sensor already has sealant applied; additional sealant should not be applied, as this may impair the operation of the sensor.
7. Screw in the knock sensor and tighten it securely (approximately 41 Nm). Do not overtighten the sensor to avoid damaging it. The rest of the procedure is performed in reverse order of removal. Fill the cooling system and check for leaks.