
Attention! Do not attempt to unscrew the radiator cap, drain the coolant, or remove the thermostat until the engine is completely cool.
General check
1. Before blaming the thermostat for cooling system slavery problems, check the coolant level (see chapter 1), drive belt tension (see chapter 1) and operation of the temperature gauge (or control lamp).
2. If the engine takes a long time to warm up (what can be seen on the temperature gauge or heater operation), the thermostat may have been in the open position. Replace it with a new one.
3. If the engine is warm, feel the lower radiator hose with your hand to check its temperature. If the hose is not hot and the engine is warm, the thermostat may have been in the closed position, preventing the coolant inside the engine from flowing out to the radiator. Replace thermostat.
Warning. Do not operate the vehicle without a thermostat. The engine management system will work without feedback, and this will have a negative impact on the reduction of harmful emissions and fuel consumption.
4. If the lower radiator hose is hot, coolant is flowing and the thermostat is open. For more information on diagnostics, see paragraph «troubleshooting» at the beginning of this guide.
Thermostat check
5. A more complete thermostat test can only be performed after removing the thermostat from the vehicle (see below). If the thermostat stays open at room temperature, it is defective and should be replaced.
6. To test this completely, hang the thermostat (closed) on a piece of fishing line or wire in a container of cold water, into which the thermometer should be dipped (household type that gives readings above 100°C).
7. Heat the water while watching the temperature and thermostat. Neither the thermostat nor the thermometer should touch the sides of the container.
8. Note the temperature reading at which the thermostat begins to open and at which it is fully open. Compare the temperature readings with the values given in Specifications at the beginning of this chapter. The number stamped on the thermostat is usually the full opening temperature of the thermostat. Some manufacturers give data on the temperature at which the thermostat starts to open, the temperature at which it opens fully, and sometimes the height of the valve lift at opening.
9. If the thermostat does not open and close properly or sticks in any position, replace it.
Replacement
10. Disconnect the ground wire from the battery (see paragraph 1 of chapter 5).
11. Drain the coolant from the cooling system (see chapter 1).
12. On models with a four-cylinder engine, remove the generator (see chapter 5).
13. On VB models, remove the air filter housing (see chapter 4).
14. Follow a radiator hose to a cover of the case of the thermostat or an inlet pipeline of a cooling liquid and disconnect a hose.
15. On 2004 and later Lexus models, remove the starter (see chapter 5).
16. On models with the four-cylinder engine remove elements of fastening of a cover of the case of the thermostat and then remove it from the block of cylinders.
17. On models V6 turn out bolts and remove the inlet pipeline of a cooling liquid. Remove the pipeline and O-ring (pic. 3.17).
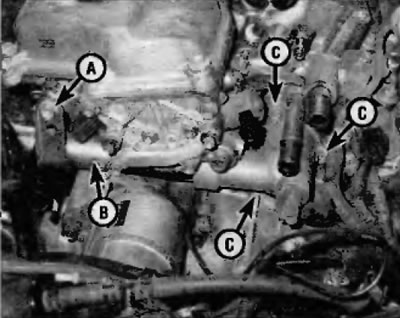
Pic. 3.17. On VE models, remove the coolant inlet pipe retainer (A) and then pipeline (H). Move the hoses and wiring harnesses to the side and then remove the thermostat housing fasteners (WITH).
18. Remove the fasteners, disconnect the electrical connectors on the cover of the thermostat housing and disconnect the cover from the engine (pic. 3.17). Be prepared for some coolant to leak out when «autopsy» seals.
19. Remove the thermostat, noting for yourself its location in the housing, and thoroughly clean the sealing surfaces.
20. Install a new gasket on the thermostat (pic. 3.20). Take care of the uniformity of its location.

Pic. 3.20. The thermostat seal is located around the perimeter of the thermostat
21. Install the thermostat and housing, aligning the rocker pin with the highest stud for the housing cover (pic. 3.21).
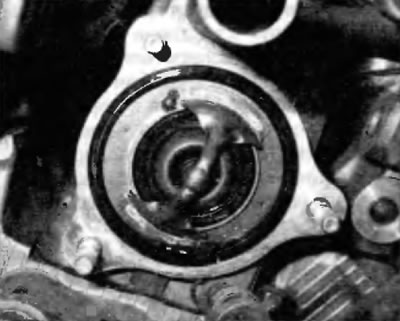
Pic. 3.21. Mark for yourself the position of the thermostat and the seal on it
22. Tighten the body cover fasteners to the specified torque as specified in Specifications at the beginning of this chapter, and reinstall the remaining items in reverse order of removal. On V6 models, install a new O-ring on the coolant inlet pipe and lubricate the O-ring with soapy water.
23. Fill the cooling system (see chapter 1). Start the engine and check for correct operation. Check the engine for leaks.