



Contents: Removal ↓ Installation ↓
Removal
Remove the cylinder head on a cold engine in the following order:
- relieve pressure in the fuel system;
- turn off the ignition and disconnect the ground wire from the battery;
- drain the coolant;
- remove the accessory drive belt;
- remove the generator;
- remove the cylinder head cover;
- remove the throttle body, injectors and fuel distribution line;
- remove the intake manifold;
- remove the exhaust manifold;
- remove the chain and sprockets from the camshafts;
- remove the camshafts and tappets;
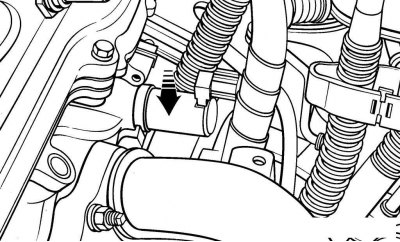
Figure 3.54. Location of the oil control valve (OCV) at the rear of the cylinder head
- remove the oil control valve (OCV) (see Figure 3.54);
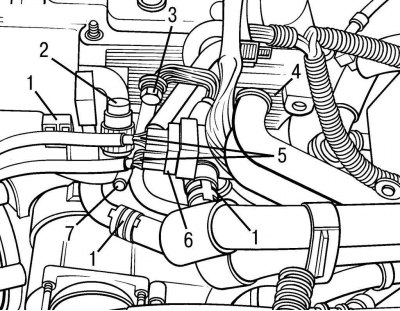
Figure 3.79. Locations of component connections to the cylinder head on the driver's side: 1 – cooling system hoses; 2 – radio interference suppressor; 3 – ground wire; 4 – camshaft position sensor; 5 – oxygen sensor electrical connector; 6 – coolant temperature sensor; 7 – oil pressure sensor
- mark and disconnect the cooling system hoses and all electrical wires and connectors from the cylinder head (figure 3.79);
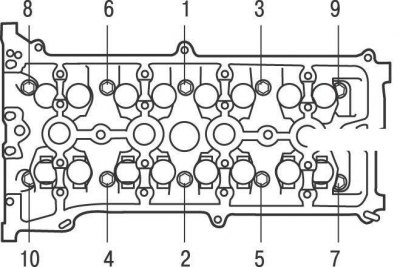
Figure 3.84. Cylinder head bolt tightening sequence
- using a 10 mm Allen key, in the reverse order of tightening, gradually loosen and then completely remove the cylinder head mounting bolts (see Figure 3.84);
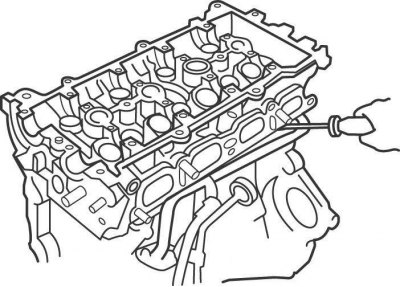
Figure 3.80. Using a screwdriver to separate the head from the cylinder block
- remove the head from the cylinder block. If the head is very tight, use a screwdriver from the side opposite the timing chain to separate the head from the cylinder block (figure 3.80).
Installation
When replacing the cylinder head, it is necessary to fill the cooling system with fresh coolant.
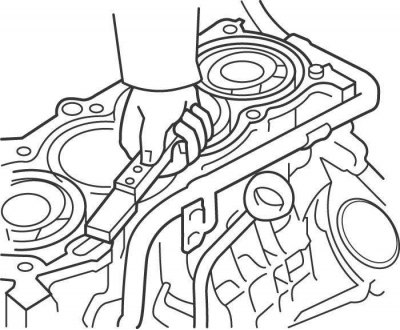
Figure 3.81. Using a scraper to clean the cylinder block mating surface
The mating surfaces of the cylinder head and block must be completely clean. To clean them, use a hard plastic or wooden scraper (figure 3.81). When cleaning, be careful as the aluminum alloy is very easy to damage. Make sure that carbon deposits do not get into the lubrication and cooling system channels. This is especially important for the lubrication system, as carbon deposits can block the supply of oil to engine parts. Clean the channels if necessary. If any dirt gets into the cylinders, remove it with a vacuum cleaner.
Check the mating surfaces of the cylinder head and block: they should not have any nicks, deep scratches or other damage. Minor defects can be removed by mechanical processing. In case of significant defects, parts are subject to replacement.
Use a tap to clean the threads of the cylinder head bolt holes in the block. Clean the bolt holes in the block. Driving a bolt into an oil filled hole can cause the block to burst due to hydraulic pressure.
Perform installation in the following order:
- install the parts and assemblies that were removed from the cylinder head;
- check that the guide bushings are installed in the cylinder block;
Caution! Remove the new cylinder head gasket from its packaging immediately before installation.
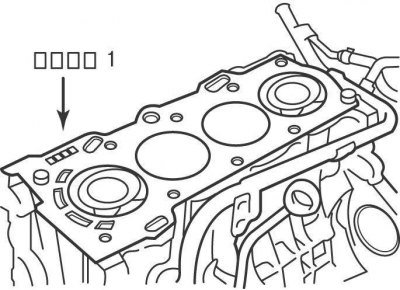
Figure 3.82. Location of markings (1) on the gasket
- install the gasket on the guide bushings, with the "top" inscription facing the head and the 1 marking (figure 3.82) the gaskets are located on the rear side of the engine;
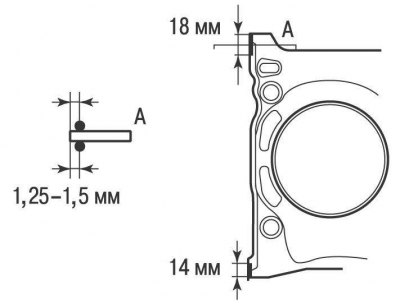
Figure 3.83. Places where a layer of RTV sealant is applied to the cylinder head gasket
- apply a 2.5-3.0 mm thick layer of RTV sealant to the gasket in the places shown in the figure 3.83.
- install the head on the cylinder block without disturbing the position of the gasket;
- apply a thin coat of engine oil to the threads and under the bolt heads, insert the cylinder head bolts and tighten them by hand;
- in the sequence shown in the figure 3.84, tighten the cylinder head bolts in two stages:
- 1st - tighten to 79 Nm;
- 2nd - turn it to an angle of 90°.
There is no need to further tighten the cylinder head mounting bolts.
Further installation of the cylinder head is carried out in the reverse order of removal, taking into account the following.
Check and adjust valve clearances if necessary.
Fill with coolant.
Install a new oil filter and fill the engine with engine oil.
Start the engine and check for leaks.