



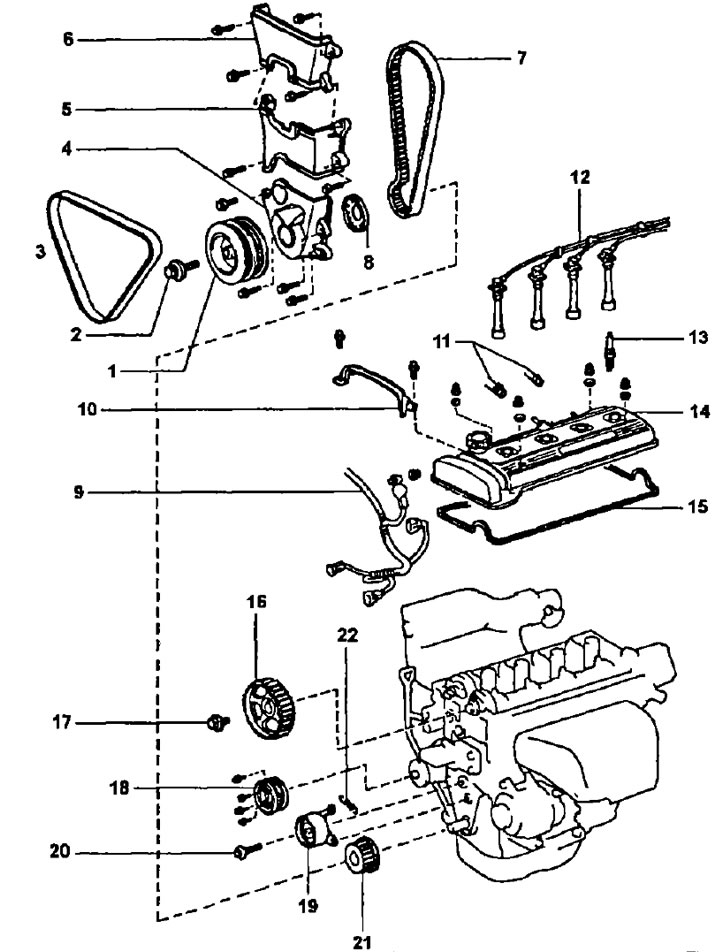
Removal and installation the timing belt. 1 - crankshaft pulley; 2 - crankshaft pulley mounting bolt (M3=118 Nm); 3 - V-belt for generator and coolant pump drive; 4 - timing belt protective cover No.1; 5 - timing belt protective cover No.2; 6 - timing belt protective cover No.3; 7 - timing belt; 8 - timing belt guide; 9 - Engine wiring; 10 - protection of engine wiring; 11 - Hoses of the forced crankcase ventilation system; 12 - high voltage wires; 13 - spark plug; 14 - cylinder head cover; 15 - gasket; 16 - camshaft toothed pulley; 17 - camshaft toothed pulley mounting bolt (M3=59 Nm); 18 - coolant pump pulley; 19 - timing belt tension roller; 20 - timing belt tension roller mounting bolt (M3 = 37 Nm); 21 - toothed pulley of the crankshaft for the timing belt; 22 - tension roller spring.
Removal the timing belt
1. Remove the alternator and coolant pump drive belt.
- a) Loosen the 4 coolant pump pulley mounting bolts.
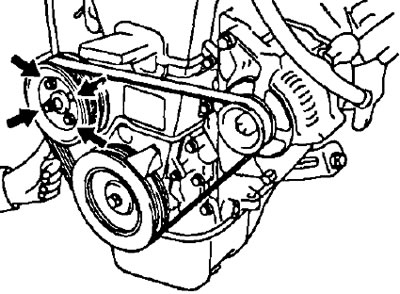
- b) Loosen the generator mounting bolt and the adjusting lock bolt.
- c) Loosen the adjusting bolt and remove the generator and coolant pump drive belt.
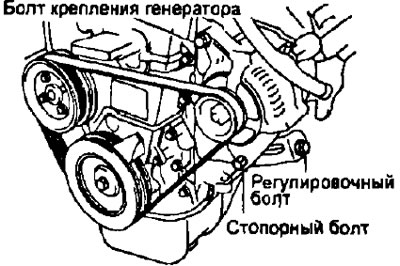
- d) Unscrew the 4 mounting bolts and remove the coolant pump pulley.
2. Remove the spark plugs, first removing the high-voltage wires, holding them only by the rubber boots.
3. Remove the cylinder head cover.
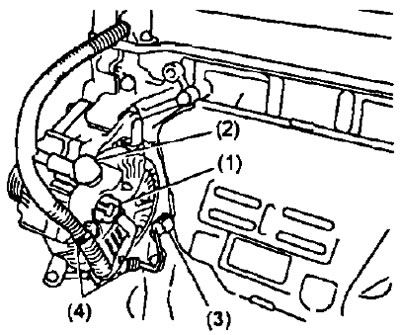
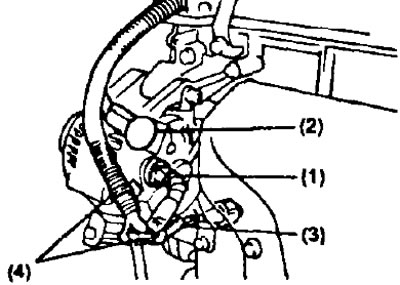
- a) Disconnect:
- (1) Generator connector.
- (2) generator wire.
- (3) Oil pressure sensor connector.
- (4) two electrical wiring clamps.
- b) Unscrew the 2 bolts, fasteners and remove the protective cover of the electrical wiring.
- c) Disconnect the 2 positive crankcase ventilation hoses from the cylinder head cover,
- d) Unscrew the 4 cap nuts and remove the sealing washers, cover and cover gasket.
4. Set the piston of the first cylinder to TDC at the end of the compression stroke.
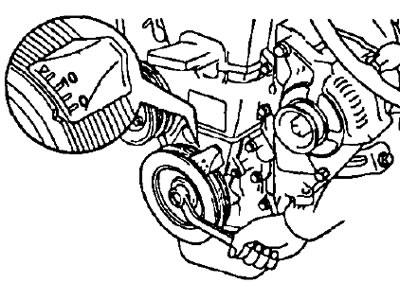
- a) Turn the crankshaft pulley and align the groove on the pulley with the "O" mark on the timing belt protective cover No.1.
- b) Make sure that the hole in the camshaft drive pulley is aligned with the mark on its bearing cap.
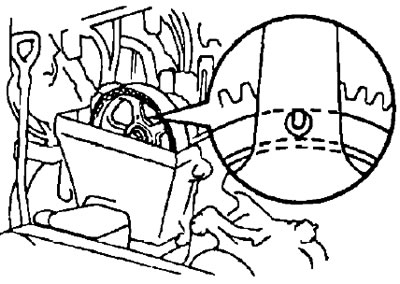
Otherwise, rotate the crankshaft one revolution (360°).
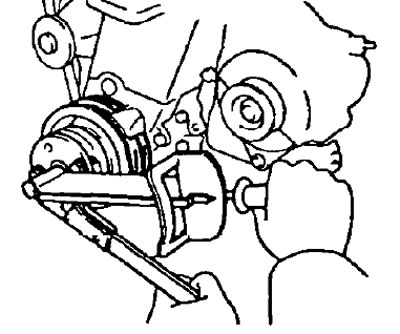
5. Remove the crankshaft pulley.
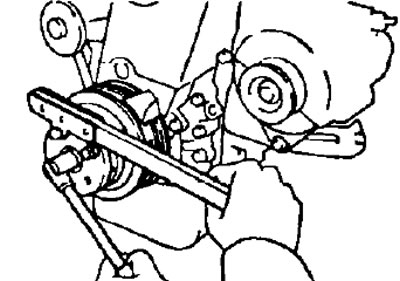
- a) Using a suitable tool, loosen the pulley retaining bolt.
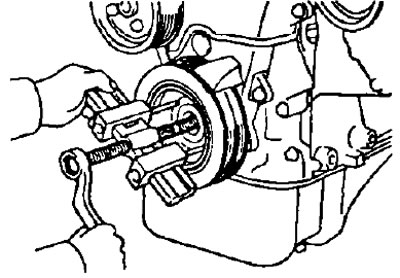
- b) Use a puller to remove (compress) crankshaft pulley.
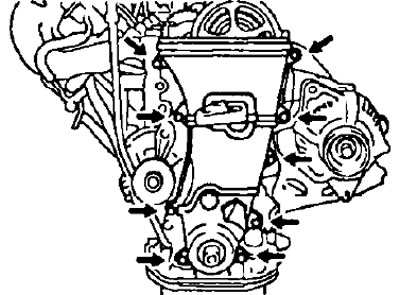
6. Remove the timing belt protective covers.
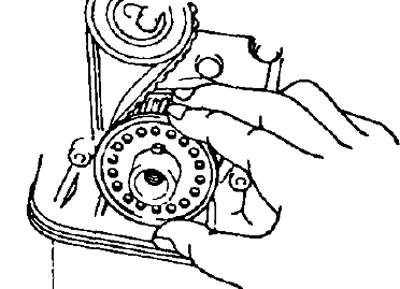
7. Remove the timing belt guide.
8. Remove the timing belt.
Note: If you reuse the belt, please draw an arrow indicating the direction of the belt movement (in the direction of rotation of the engine crankshaft) and make marks on the belt and pulleys as shown in the pictures.
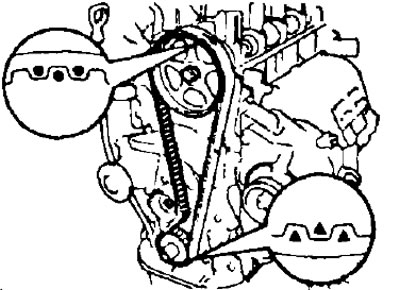
- a) Loosen the tension roller mounting bolt, move it all the way to the left and then temporarily fix it in this position with the same mounting bolt.
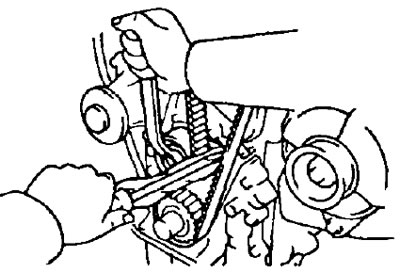
- b) Remove the timing belt.
9. Remove the tension roller and tension spring by completely unscrewing the tension roller mounting bolt.
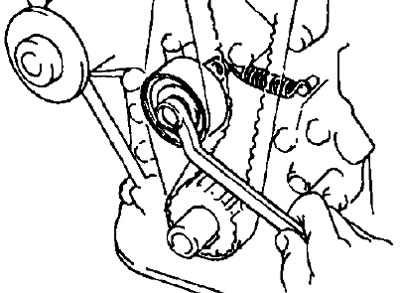
10 If necessary, remove the crankshaft toothed pulley. If difficult, use 2 screwdrivers.
Note: To prevent damage to the cylinder block components, place a rag underneath as shown in the figure.
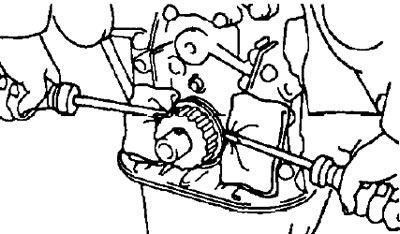
11. If necessary, remove the camshaft drive sprocket.
While holding the camshaft from turning, place an adjustable wrench on its hexagonal part, unscrew the locking bolt and remove the pulley.
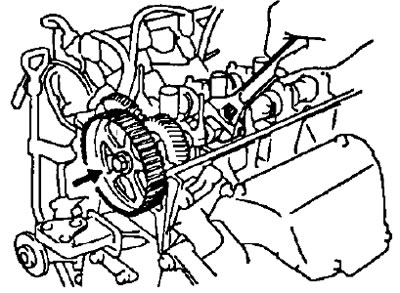
Note: When performing this operation, do not damage the cylinder head with the adjustable wrench.
Installing the timing belt
Note: Do not allow water or oil to come into contact with the camshaft and crankshaft sprockets and keep them clean.
1. Install the camshaft drive sprocket (if it was filmed).
- a) Align the dowel pin on the camshaft nose with the groove on the toothed pulley and place the pulley on the camshaft.
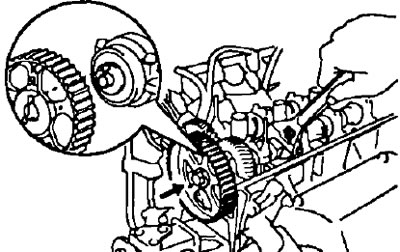
- b) Temporarily install the pulley mounting bolt.
- c) Holding the camshaft by its hexagonal part with an adjustable wrench, tighten the camshaft pulley mounting bolt (M3=59 Nm).
2. Install the crankshaft timing pulley (if it was filmed).
- a) Align the key on the crankshaft with the keyway on the toothed pulley.
- b) Place the pulley on the nose of the crankshaft until it stops with the flange facing inward.
[The publication is taken from the website toyotaman.ru]
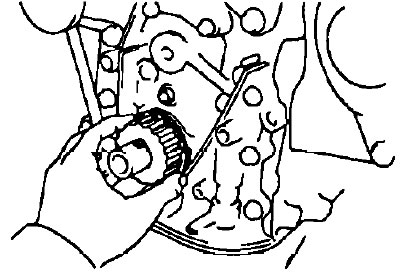
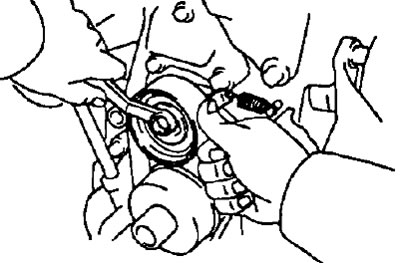
3. Temporarily install the tension roller and tension spring.
- a) Secure the roller with a bolt, without tightening it.
- b) Install the tension spring.
- c) Pull the roller to the left until it stops and tighten the bolt.
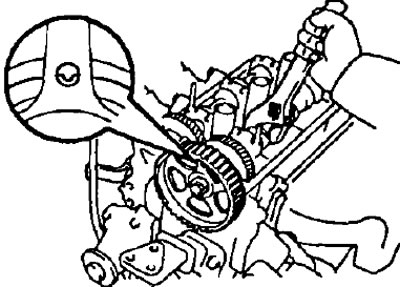
4. Set the piston of the 1st cylinder to the TDC position at the end of the compression stroke.
- a) Place an adjustable wrench on the hexagonal section of the camshaft, turn it and align the mark on the camshaft bearing cap with the center of the small hole on the camshaft pulley.
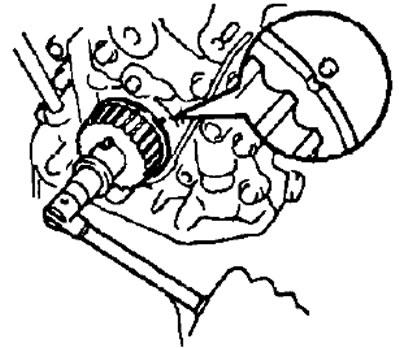
- b) Using the crankshaft toothed pulley mounting bolt, turn the crankshaft and align the timing marks on the toothed pulley and on the oil pump housing.
5. Install the timing belt.
Warning: The engine must be cold.
Note: If reusing the belt, align the previously applied marks on the pulleys and belt and take into account the direction of rotation of the belt.
Install the timing belt, observing the marks and ensuring the required tension in the area between the toothed pulleys of the crankshaft and camshaft.
6. Check that the belt is installed correctly (valve timing)
- a) Slowly loosen the tension roller mounting bolt.
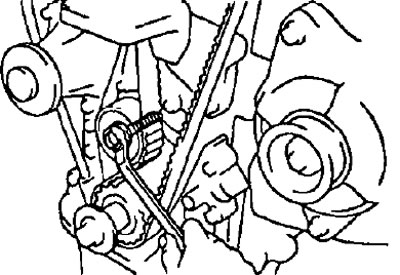
- b) Slowly turn the crankshaft clockwise 2 turns from TDC to TDC, having first installed the toothed pulley mounting bolt.
- c) Make sure that the timing marks on each pulley match the corresponding marks on the oil pump housing (for crankshaft pulley) and on the camshaft bearing cap, as shown in the figure.
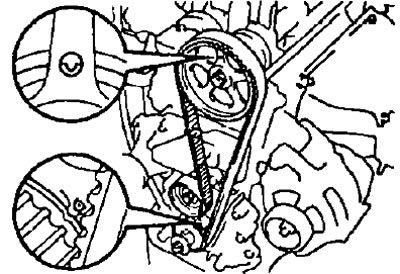
- d) Tighten the tension roller mounting bolt (M3=37 Nm).
- d) Temporarily loosen the crankshaft toothed pulley mounting bolt
7. Check the timing belt tension.
- Timing belt deflection under a force of 20 N at the point shown in the figure is 5-6 mm
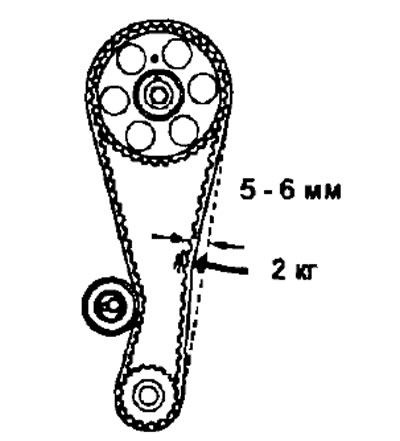
If the deflection does not meet the specifications, reposition the tension roller.
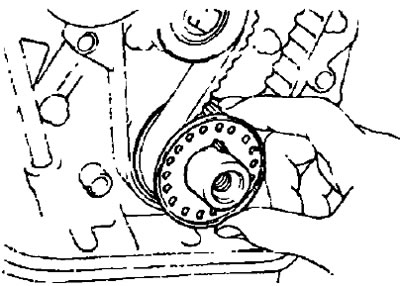
8. Install the timing belt guide with the flange facing outward as shown in the figure.
9. Install timing belt protective covers No.1, NB2 and No.3.
- Tightening torque of bolts - 7.4 Nm
10. Install the crankshaft pulley (to drive the generator and coolant pump).
- a) Align the key on the crankshaft with the groove in the pulley and place the pulley on the shaft.
- b) Using a suitable tool, tighten and tighten the crankshaft pulley mounting bolt (M3=118 Nm).
11. Install the cylinder head cover (timing mechanism cover).
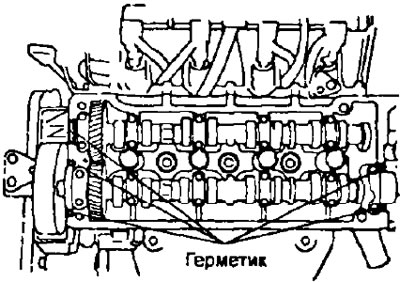
- a) Remove old sealant from surfaces.
- b) Apply fresh sealant to the areas shown in the figure.
Note: When using an old gasket, apply sealant to the entire contact surface.
- c) Install the gasket on the timing cover.
- d) Install the cover in place and secure it through the seals with 4 cap nuts (M3=6 Nm).
- d) Connect 2 positive crankcase ventilation hoses to the cylinder head cover
- e) Secure the wiring protection with 2 bolts.
- g) Connect: generator connector (1), generator wire (2), oil pressure sensor connector (3), two wiring clamps (4).
12. Install the spark plugs and connect the high tension wires.
13. Install the alternator and coolant pump drive belt.
- a) Temporarily secure the coolant pump pulley with 4 bolts.
- b) Put on the drive belt and secure the adjusting bolt and the generator mounting bolt. The locking bolt of the adjusting bolt should be tightened only after adjusting the tension of the generator drive belt and the coolant pump.
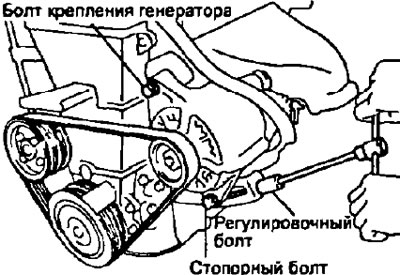
- c) Tighten the 4 pump pulley bolts.
14. Adjust the tension of the generator and coolant pump drive belt (see chapter "General check and adjustment procedures").