
2. On Highlander 2004 and later and all Lexus models, remove the bonnet top/air box deflector (see chapter 11).
3. On Highlander 2004 and later and all Lexus models, remove the windshield wiper arms and windshield wiper motor (see chapter 12).
4. On Highlander 2004 and later and all Lexus models, remove the lower hood panel (see chapter 11).
5. Loosen the right front wheel nuts, but do not completely unscrew them yet.
6. Raise the front of the car and place secure supports under it. Apply the parking brake and chock the rear wheels. Remove the right front wheel.
Attention. If the vehicle is equipped with electronically controlled air suspension, turn off the suspension height control switch.
7. Remove the apron of the right front inner fender (see chapter 11).
8. Remove the sections of the lower engine protection (rice. 6.3 a, b).
9. Bring the piston of cylinder No. 1 to the TDC position (see paragraph 3).
10. Remove drive belts (see chapter 1).
11. Support the engine with a jack from under the bottom and remove the engine mount tie rod and its bracket on the engine (rice. 16.1, e). Place a block of wood on the head of the jack and do not place the jack directly under the oil pan drain plug.
12. Remove the power steering pump and position it to the side without disconnecting the hydraulic lines from it. Remove the power steering pump bracket.
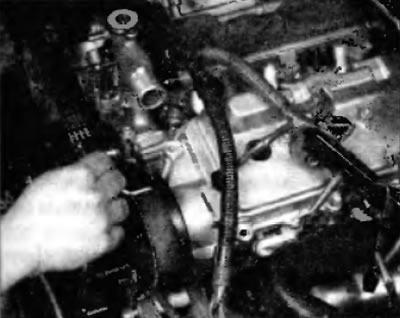
13. Remove the top (№2) timing belt cover and corresponding gasket (pic. 7.13)

Note. Loosen the harness above the cover and push it back just enough to remove the belt cover.
14. Remove engine support brackets (pic. 7.14 a, b).
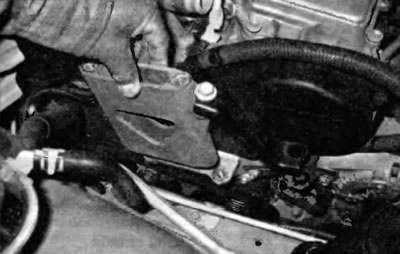
Pic. 7.14 a. Remove bolts and remove engine mount spacer and side bracket with engine mount support
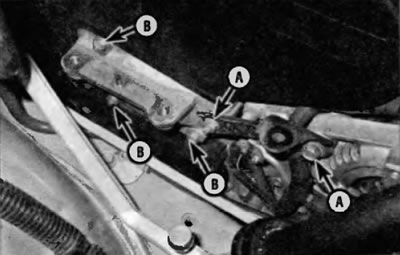
Pic. 7.14b. Remove the alternator bracket bolts first (A) remove the bracket, then remove the engine support bracket bolts (IN) and separate the bracket from the cylinder block
15. Remove the alternator bracket (pic. 7.14b).
16. See if there are alignment marks on the timing belt. If you intend to reuse the belt and the markings have worn off, apply a new one (pic. 7.16).
Ras. 7.16. If you intend to continue using the belt and the rectangular alignment marks are not visible or missing, install new
17. Turn out a bolt of a pulley of a cranked shaft. To keep the engine from rotating, insert a large screwdriver into the ring gear of the faceplate or rest against the torque converter bolt. A chain wrench can be used to hold the pulley. Use an extension and socket to loosen the pulley bolt.
18. After releasing the crankshaft pulley bolt, the TDC position of the crankshaft may be violated. Check it and adjust again if necessary.
Note. There is a timing mark on the timing belt pulley located on the crankshaft, which is aligned with the mark on the oil pump housing. These marks make it easy to check TDC alignment even after removing the crankshaft pulley and lower timing belt cover.
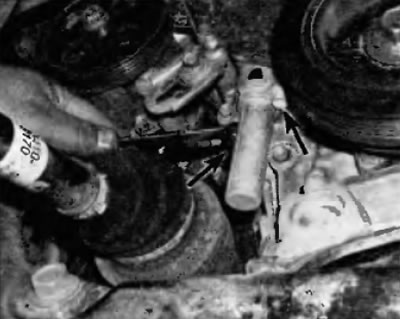
19. After unscrewing the bolt, remove the pulley from the crankshaft. The pulley must be removed from the shaft by hand (pic. 7.19), but if it cannot be removed, use a threaded type puller to remove it.
Warning. Do not use a puller with grips. Its use will cause damage to the damper pulley assembly. Be sure to use the correct adapter to prevent damage to the end of the crankshaft.
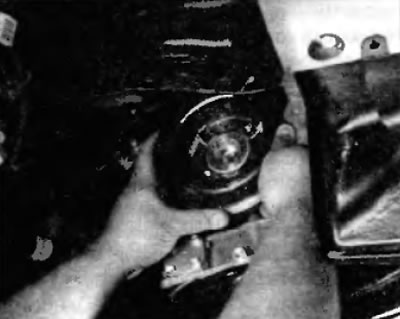
Pic. 7.19. After releasing the crankshaft pulley with a puller, it should be easily removed by hand
20. Remove the bottom (№ 1) timing belt cover and appropriate gasket.
21. Properly align the marks on the camshafts with the marks on the back cover of the timing belt (pic. 7.21).
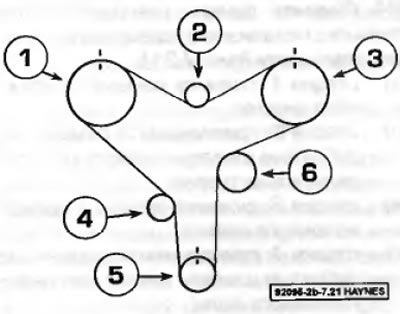
Pic. 7.21. Timing belt alignment marks on the crankshaft sprocket and camshaft sprocket
1 — a gear pulley of the right camshaft
2 - Intermediate pulley
3 - Toothed pulley of the left camshaft
4 - Tension pulley
5 — a gear pulley of a cranked shaft
6 - Coolant pump pulley
22. Turn the crankshaft counterclockwise to approximately 60°before TDC.
Warning. The engine pistons should not be moved out of the TDC position for cylinder No. 1, in which their accidental contact with the valves is excluded, when the timing belt tension has been loosened and the timing belt has been removed.
Note. To be able to turn the engine counterclockwise, the crankshaft pulley bolt must be screwed in and sufficiently tightened.
23. Remove the timing belt tensioner (pic. 7.23).
Warning. Loosen the bolts one at a time, a little at a time, until tension is completely removed from the timing belt.
Pic. 7.23. Remove the two bolts and remove the timing belt tensioner
24. Remove the timing belt in the correct sequence (pic. 7.21):
- A) stage 1: remove the belt from the idler pulley;
- b) stage 2: lift the belt over the right camshaft sprocket;
- V) stage 3: remove the belt from the intermediate pulley;
- G) stage 4: lift the belt over the toothed pulley of the left camshaft;
- d) stage 5: remove the belt from the water pump pulley;
- e) Step 6: Remove the belt from the crankshaft sprocket.
25. At this point, you can remove the toothed pulleys from the camshafts. Remove the cover (And) cylinder heads (see paragraph 5) and while loosening the timing pulley bolt, hold the camshaft with a wrench on the hex section (pic. 7.25). Turn out a bolt and disconnect a gear pulley.
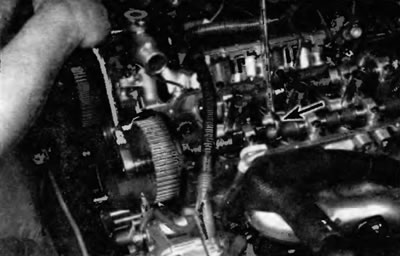
Pic. 7.25. If the camshaft pulleys are to be removed, hold the shaft with a wrench on the hex section when unscrewing the pulley bolt
26. Now you can remove the toothed pulley from the crankshaft, but only after removing the holder of this pulley (rice. 7.39). If it will not be removed by hand, it may require an appropriate puller to remove it. Be careful not to damage the part of the pulley serving as the crankshaft position sensor impulse wheel when removing.