
Removing
1. Disconnect the ground wire from the battery (see paragraph 1 of chapter 5).
2. Apply the parking brake and chock the rear wheels.
3. Raise the front of the car and place secure supports under it.
Attention! If the vehicle is equipped with electronically controlled air suspension, turn off the suspension height control switch.
4. Remove the lower engine protection (rice. 6.5).
5. Drain engine oil and remove oil filter (see chapter 1). Remove the oil level dipstick.
6. Turn out bolts and disconnect the oil pallet. If it doesn't go, pry it gently with a small screwdriver or putty knife (pic. 13.6, a, b). Do not damage the mating surfaces of the sump and cylinder block, as this may lead to oil leakage.
Pic. 13.6, a. Oil pan bolts
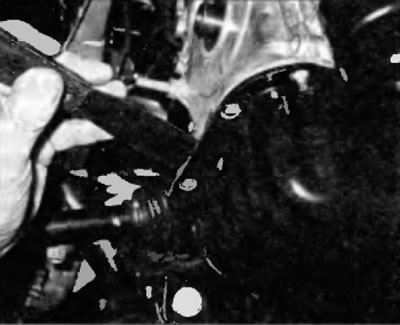
Pic. 13.6, b. Pry off the oil pan with a screwdriver or putty knife
Installation
7. Using a scraper, remove all traces of old sealant from the cylinder block and oil pan. Clean mating surfaces with lacquer thinner or acetone.
8. Clean the threaded bolt holes in the block.
9. Check the oil pan flange for deformation, especially around the bolt holes. If necessary, remove any nicks or bumps.
10. Inspect the oil inlet pipe of the oil pump for cracks and blockage of the strainer. If the oil receiver has been removed, thoroughly clean it and install using a new gasket. Tighten the nuts/bolts to the specified torque specified in Specifications at the beginning of this chapter.
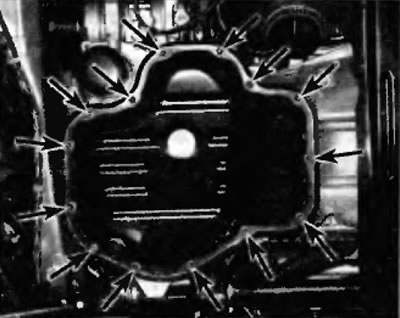
11. Apply RTV Sealant about 5 mm wide to the mating surface of the oil pan, following the groove contour but moving inward in the area of the bolt holes.
12. Carefully expose the oil pan relative to the cylinder block and screw in the bolts securing the oil pan to the engine, but do not tighten them.
13. Working from center outwards, tighten the oil pan to cylinder block bolts in three or four stages to the prescribed torque specified in Specifications at the beginning of this chapter.
14. The rest of the installation is performed in the reverse order of removal.
Note. Follow the sealant manufacturer's recommendations for assembly technique and cure time for the sealant.
15. Start the engine, check that the oil pressure is correct and that there are no leaks.