



Contents: Radio ↓ Cassette player ↓ CD player ↓ Radio tape recorder ↓ Radio ↓ Tape recorder ↓ CD player ↓
Radio
The quality of radio signal reception may vary significantly while the vehicle is moving due to terrain features, weather conditions and proximity to sources of electromagnetic radiation.
Cassette player
Clean the tape drive of your radio with a cleaning cassette about once a month. This will ensure consistent playback quality.
It is not recommended to use 120-minute cassettes, as the thin film can cause damage to the film or cause it to become entangled in the tape drive mechanism.
Radio tape recorder
Do not expose audio cassettes to high temperatures, such as under a windshield. This may cause deformation of the cassette case.
CD player
In cold weather or high humidity, due to fogging of the disc surface and optical elements of the player, playback failures are possible. After normalization of humidity, the system operation is restored.
Strong vibration may cause distortion and interruptions in playback. This is not a malfunction.
It is not recommended to leave discs in direct sunlight. Protect the disc surface from scratches.
Radio tape recorder
Turning on and off
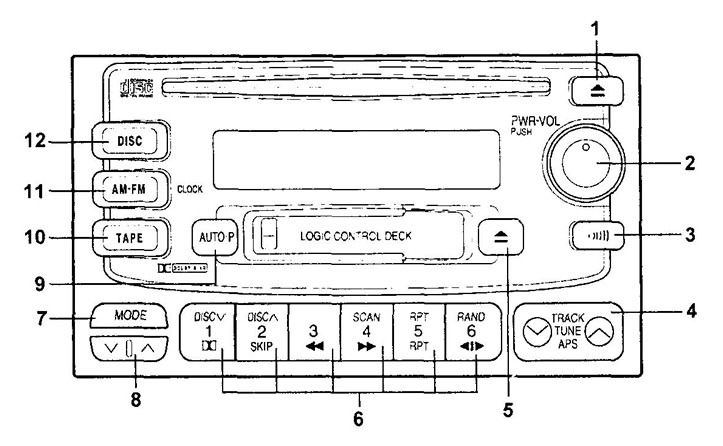
The audio system is switched on by pressing the button (2) "PWR/VOL" (the system that was running before the last shutdown will turn on). The cassette player also turns on automatically when you insert a cassette or load a disc.
When you eject the cassette or remove the disc, the audio system will return to its original state - turn off or switch to radio mode.
Volume control
Turn the knob (2) to the right to increase the volume and to the left to decrease it.
Adjusting tone and balance
Adjustment is carried out by pressing the button (7). Switching between adjustment parameters is carried out by pressing the button (8) "MODE".
- BAL (balance between right and left speakers) - from BAL L7 to BAL R7.
- FAD (balance between front and rear speakers) - from FAD F7 to FAD R7.
- BAS (low frequency timbre) - from BAS -5 to BAS +5.
- TRE (high frequency timbre) - from TRE -5 to TRE +5.
Radio
The radio is switched on by pressing the button (11) "AM-FM". By pressing this button again, the range (AM and FM) is switched.
Tuning radio stations
1. "TUNE" button (4).
When you press the "TUNE" button until you hear a beep (automatic radio station search will be turned on). The search will stop when a stable signal is found. If the signal is weak, if the automatic search does not fix the setting, press the setting button again (automatic search will be disabled) and adjust manually one step at a time. To increase the frequency, press the button on the "l" side, to decrease - on the "v" side.
2. "AUTO-P" button (9).
Pressing the (9) "AUTO-P" button will activate the automatic search and memorization mode of radio stations.
The automatic radio station search mode allows you to automatically tune radio stations to the setting buttons "1" through "6" (6) if a stable signal is found.
During stereo reception, the "ST" indicator appears on the display.
Information on the situation on the roads
This function is selected using button (3). This function does not work in the Russian Federation.
Note: New radios are set to 1620 kHz.
Programming settings
The settings of the most frequently listened to radio stations can be saved into memory. To do this, tune in to the desired radio station, then press and hold one of the buttons (6) until a beep is heard. Switching to the tuned radio station is done by briefly pressing the desired button.
Note: if the batteries are absent for a long time, the radio memory is erased and factory settings are restored.
Tape recorder
Switching the radio to the tape recorder mode is done by pressing the button (10) "TAPE". When inserting a cassette, the radio automatically switches to the tape recorder mode. To remove the cassette, press the button (5).
Rewind
To rewind the tape, press the button (rewind "3", forward "4"). To stop rewinding, press the rewind button again or the button (10) "TAPE".
Noise reduction system
When listening to tapes recorded using the DOLBY NR® noise reduction system, press the "1" button.
Reverse
Changing the direction of cassette playback is done by pressing button "6".
Search for a melody
This function is designed to jump to any of the 9 records located before or after the current playback position.
To do this, press the button (4) as many times as you need to go to the number of records (when going back, take into account the current entry).
Note: If the pause between recordings is less than 3 seconds or there are extraneous sounds, this function may not work properly.
Skipping empty spaces
This function is designed to rewind empty spaces on the tape. To turn it on, press the "2" "SKIP" button. To turn it off, press the button again.
Note: This feature may not work properly if:
- The pause between recordings is less than 15 seconds.
- There are extraneous sounds between the recordings.
- The beginning and end of the recording cannot be clearly defined.
Repeat recording
To play the current recording in a loop, press the "5" "RPT" button. To turn off the repeat, press the button again.
Note: If the pause between recordings is less than 3 seconds or there are extraneous sounds, this function may not work properly.
CD player
Switching to the CD player mode is done by pressing button (12). To eject the disc, press button (1).
Loading the disk
Insert the disc into the loading slot.
Note: Do not insert one disc on top of another, do not insert the disc backwards.
Ejecting the disc
To eject the disc, press the button (1).
Rewind
Press and hold the "3" button to rewind or the "4" button to fast forward. Rewinding will stop when you release the button.
Repeat recording
To play the current recording repeatedly, press the "5" "RPT" button. The display will show "RPT". To turn off the repeat, press the button again.
Random selection of records
To play the disc recordings in random order, press the "6" "RAND" button. The display will show "RAND". To continue playing the recording, press the "RAND" button again.
Search for a melody
This function is designed to jump to any of the 9 records located before or after the current playback position.
To do this, press the button (4) "APS" as many times as you need to go to the number of records (when going back, take into account the current entry).
Note: If the pause between recordings is less than 3 seconds or there are extraneous sounds, this function may not work properly.