



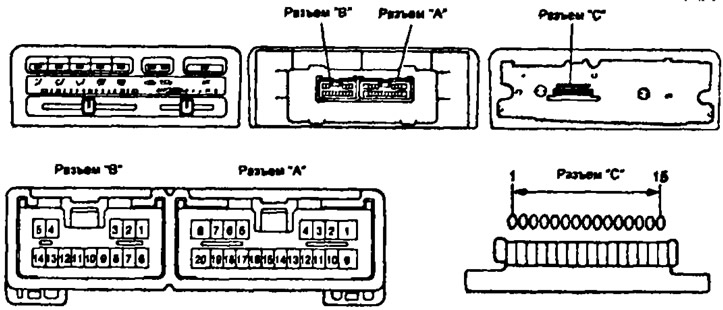
Examination
1. Check the backlight operation:
- a) Connect the battery to terminals "A9" (+) and "A20" (-). Check that the backlight lamp lights up. If the lamp does not light up, perform the following checks.
- b) Disconnect the air conditioner control panel from the amplifier. Connect the battery to terminals "C15" (+) and "C1" (-).
If the lamp does not light, replace the lamp. If the lamp lights, check the connection between the air conditioner amplifier and the control panel or replace the amplifier.
2. Check the operation of the air intake flap switch.
- a) Connect the battery to terminals "A1" (+) and "A20" (-). Check that the indicator lamp lights up each time the switch is pressed.
- b) Switch the positive wire to terminal "A9", check that the lamp goes out.
If the work does not match the description, please check the following:
- a) Disconnect the air conditioner control panel from the amplifier. Connect the battery to terminals "C14" (+) and "C1" (-). Check that the test lamp lights up each time the switch is pressed.
- c) Switch the positive wire to the "C15" terminal, check that the lamp goes out. If the operation does not correspond to the description, replace the air conditioner control unit.
If the operation is as described, check the connection between the air conditioner amplifier and the control panel or replace the amplifier.
3. Check the operation of the air conditioner mode switch. The check is carried out similarly to point 2.
4. Check the operation of the air conditioner switch.
- a) Connect the battery to terminals "A1" (+) and "A20" (-). Check that the indicator lamp lights when the air conditioner button is pressed and the heater fan switch is in the "ON" position.
- b) Switch the positive wire to terminal "A9", check that the lamp goes out.
If the work does not match the description, please check the following.
- c) Disconnect the air conditioner control panel from the amplifier. Connect the battery to the terminals "C14" (+) and "C12" (-). Check that the lamp lights up when the air conditioner switch is pressed.
- d) Switch the positive wire to terminal "C15", the negative wire to "C1" and check that the lamp goes out.
- d) Switch the positive wire to terminal "C14".
- e) Check that the voltage between terminals "C13" (+) and "C1" (-) is approximately 12 V.
If the operation is not as described, replace the air conditioner control panel.
If the operation is as described, check the connection between the air conditioner amplifier and the control panel or replace the amplifier.
5. Check the operation of the heater fan speed controller.
- a) Disconnect the air conditioner control panel from the amplifier.
- b) Check that the resistance between terminals "C1" and "C9" is about 1.5 kOhm.
- c) Gradually move the lever from the "OFF" to "HI" position. Check that the resistance between terminals "C1" and "C11" increases from 0 to 3 kOhm.
If the operation is not as described, replace the air conditioner control panel.
If the operation is as described, check the connection between the air conditioner amplifier and the control panel or replace the amplifier.
6. Check the operation of the temperature controller.
- a) Disconnect the air conditioner control panel from the amplifier.
- b) Check that the resistance between terminals "C1" and "C9" is about 1.5 kOhm.
- c) Gradually move the lever from the "OFF" to "HI" position. Check that the resistance between terminals "C1" and "C10" increases from 0 to 3 kOhm.
If operation is not as described, replace the air conditioner control unit.
If the operation is as described, check the connection between the air conditioner amplifier and the control panel or replace the amplifier.
7. Check the air conditioning control unit circuit.
- a) Disconnect the air conditioner control panel from the amplifier and check the connector from the wire side as shown in Table 1.
Note: The test is performed with the ignition on.
The material is reprinted from an online resource [toyotaman]
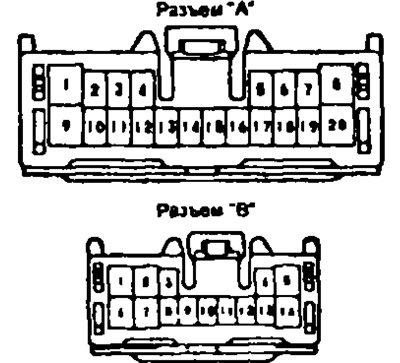
If the circuit matches the table, replace the air conditioner amplifier. If the circuit does not match the table, check other system components.
- b) Connect the connector to the air conditioner control unit and check the connector from the rear side as shown in Table 2.
Verification conditions
- The ignition is on.
- Fan speed controller in the "HI" position.
- The air conditioner switch is in the "ON" position.
- Temperature regulator in the "MAX COOL" position.
If the target matches the table, replace the air conditioner booster. If the target does not match the table, check other system components.
