
Company Honda Company Ford Company Skoda Company Kia Company Mazda Company Mercedes Company Renault
English Русский
Български
Беларускі
Український
Српски
Hrvatski
Română
Polski
Slovenský
Magyar
Bookmark Articles Sitemap Contacts
ToyotaMan.ru


Camry Corolla Corona Carina Land Cruiser Highlander 4Runner RAV4 Others
Corona T190 (1992-1997)

Evacuation and charging of the air conditioning system [Toyota Corona T190]

  • Main
  • Corona
  • T190 (1992-1997)
  • Body and interior
  • Heating and air conditioning
  • Evacuation and charging of the air conditioning system
0
1. Install the pressure gauge block.

2. Evacuate the system.
  • a) Install the adapter on the vacuum pump.
  • b) Connect the central hose of the pressure gauge block to the vacuum pump adapter.
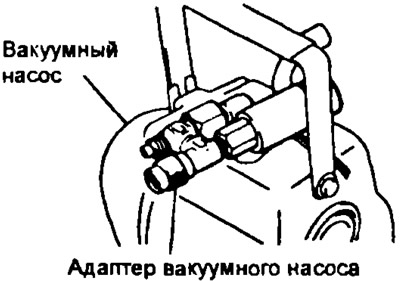

  • c) Open both valves of the pressure gauge block and turn on the vacuum pump.
  • d) After at least 10 minutes, check that the low pressure gauge shows 100 kPa or more.

Note: If the pressure is lower, close both gauge block valves and turn off the vacuum pump.


Check the system for leaks and troubleshoot.

(The original can be viewed on the website: Toyotaman.ru)
  • d) Close both gauge block valves and turn off the vacuum pump.
  • e) Leave the system in this state for at least 5 minutes, check that the instrument readings do not change.

3. Install the charging cylinder.

Note: When working with the charging cylinder, always follow the requirements described in its instructions.
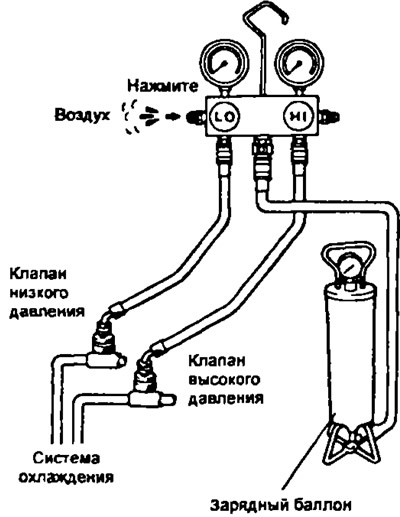


  • a) Fill the charging cylinder with the required amount of refrigerant.
  • b) Connect the central hose to the charging cylinder.

Caution, do not open the valves on the pressure gauge block!


  • c) Open the valve on the charging cylinder
  • d) Press the valve core located on the side of the gauge block and release air from the central hose.

4. Check the tightness of the system.
  • a) Open the high pressure valve on the gauge block and fill the system with refrigerant.
  • b) When the pressure on the low pressure side reaches 98 kPa, close the high pressure valve.
  • c) Check the tightness of the system with a leak detector.
  • d) If leaks are detected after repair, repeat the vacuuming procedure.

5. Top up the system with refrigerant. After checking for leaks, bring the amount of refrigerant to the standard

Attention!
  • Never charge the system through the high pressure side while the engine is running.
  • Do not open the low pressure valve when the system is being charged with liquid refrigerant.

  • a) Open the high pressure valve of the pressure gauge block completely.
  • b) Fill the system completely, then close the high pressure valve.

Note: A fully charged system is indicated by the absence of bubbles in the service window.


6. Disconnect the pressure gauge block from the service valves.

Note: Close the pressure gauge block valves first!


7. Install the plugs on the cooling system service valves.
This article is available at: russian, bulgarian, belarusian, ukrainian, serbian, croatian, romanian, polish, slovak, hungarian
The article material has been checked: Kondratyeva Ulyana
Share information:
◀ Previous
Corona T190: Heating and air conditioning
Next ▶

Installing and removing the pressure gauge block
Air conditioning system — general information
Checking the air conditioning system using a pressure gauge block
Checking the amount of refrigerant
Checking the air conditioning compressor drive belt
Checking the idle speed increase system
Cooling Lines — Checking and Replacing
Similar articles on other Toyota models

➥ Heating and air conditioning system, charging system (cars… Toyota Cruiser 60/80 (1980-1997, petrol)
➥ Air conditioning system controls Toyota Camry XV20 (1996-2001)
➥ Air conditioning and heating system — general information Toyota Corolla Verso 3 (2004-2009)
➥ Precautions when working with the charging system Toyota Carina T190 (1992-1996)
➥ Air conditioning and heating system — inspection and… Toyota Highlander 1 (2000-2007, petrol)
➥ Air conditioning system — design description Toyota 4Runner N120 (1989-1995)
Link in different formats to this article
Comments and feedback from visitors
No comments yet


Add two numbers 29 + 42


Corona T190 (1992-1997) 
  • General information
  • User manual
  • Maintenance
  • Power unit
  • Engines 3S-FE/GE and 4S-FE
  • Engines 4A-FE and 7A-FE
  • Engines 5E-FE
  • Diesel engines 2C and 2C-T
  • Engine overhaul
  • Cooling system
  • Lubrication system
  • Fuel injection (petrol)
  • Control system (petrol)
  • Fuel system (diesel)
  • Turbo diesel
  • Ignition system
  • Engine electrical equipment
  • Transmission
  • Clutch
  • Mechanical gearbox
  • Automatic gearbox
  • Drive shafts and cardan
  • Chassis, running gear
  • Front suspension
  • Rear suspension
  • Steering
  • Brake system
  • Body and interior
  • Body and interior elements
  • Doors, windows and locks
  • Heating and air conditioning
  • Electrical equipment
  • Equipment and devices
  • Lighting and signaling
  • Electrical circuits
ToyotaMan.ru © 2018–2026 • Mobile version • Interesting about Toyota • Administration • Sitemap: EN BG BY UA RS HR RO PL SK HU • Search system • Bookmark
Camry Vista-V40 • Camry XV10 • Camry XV20 • Camry XV30 • Corolla Verso-AR10 • Corolla E80 • Corona T190 • Carina T170 • Carina T190 • Land Cruiser J70 (diesel) • Land Cruiser J60 (petrol) • Land Cruiser J100 • Highlander XU20 (petrol) • 4Runner N120 • RAV4 XA10 • RAV4 XA20 • Duet M100 • Dyna Y50 •
We require cookies to enable some interactive features. Is that ok with you?