



Contents: Checking the main switch ↓ Checking the central lock switch (in…↓ Checking the tailgate lock switch…↓ Checking the door lock drive motor ↓ Checking the thermistor ↓ Checking the central lock control…↓ Checking the door unlock sensor ↓
Checking the main switch
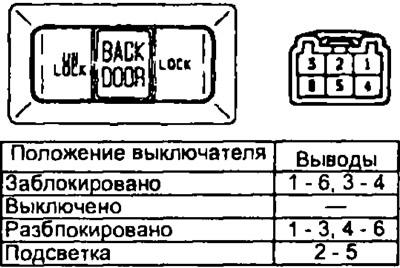
Check the main switch circuit as shown in the table.
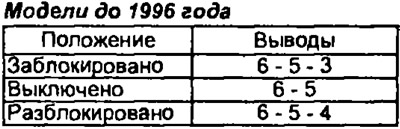 | 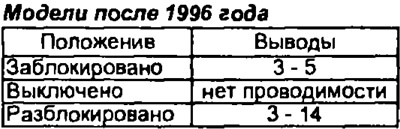 |
If the conductivity is different from the specified value, replace the switch.
Checking the central lock switch (in the door lock)
Models before 1996
1. Check for continuity between terminals "2" and "3" of the connector when the switch is in the "locked" position.
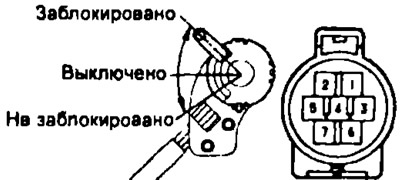
2. Check for continuity between terminals "1" and "2" of the connector when the switch is in the "unlocked" position.
Models after 1996
1. Check for continuity between terminals "2" and "3" of the connector when the switch is in the "locked" position.
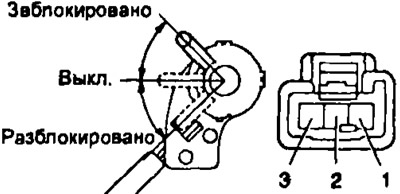
2. Check for continuity between terminals "1" and "3" of the connector when the switch is in the "unlocked" position. Replace the switch if the continuity of the circuits is broken.
Checking the tailgate lock switch (station wagon)
Check the conductivity.
Checking the door lock drive motor
Models before 1996
1. Checking the operation of the electric drive of the front door lock.
- a) Connect the battery to terminals "5" (+) and "7" (-) of the connector. Make sure that the lock latch moves to the "unlocked" position.
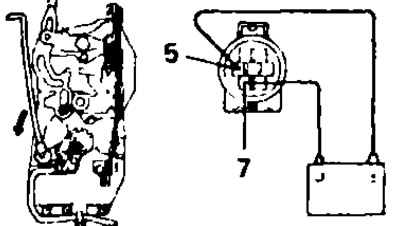
- b) Reverse the polarity of the battery connection; the door lock latch should move to the "locked" position. Replace the lock if it does not operate as specified.
2. Checking the operation of the electric drive of the rear door lock and the tailgate (for station wagon models).
- a) Connect the battery to terminals "2" (+) and "4" (-) of the connector. Make sure that the lock latch moves to the "unlocked" position.
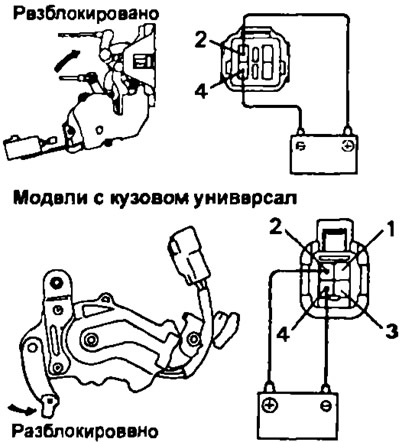
- b) Change the polarity of the battery connection: the door lock latch should move to the "locked" position.
Models after 1996
1. Connect the battery to terminals 3 (+) and 2 (-), check that the lock latch has moved to the "unlocked" position.
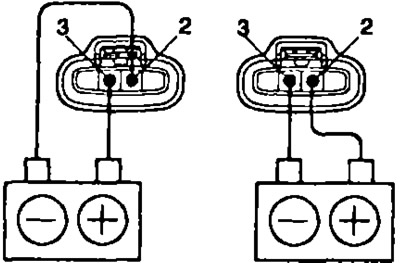
2. Reverse the polarity of the voltage, the latch should move to the "locked" position. Replace the lock if it does not work as specified.
Checking the thermistor
Note: The terminal numbers in brackets are for models produced since 1996.
J Connect the battery "+" to terminal "5" ("3") of the connector.
2. Connect the positive lead of the ammeter to terminal "7" ("2"), the negative lead of the ammeter to the battery. Check that the current changes from about 3.2 A to less than 0.5 A within 20-70 seconds.
3. Disconnect the wires from the connector.
4 After about 60 seconds, connect the battery to terminals "5" ("2") (+) and "7" ("3") (-), the door lock latch should move to the "locked" position. If the operation does not correspond to the description, replace the lock.
Checking the central lock control relay
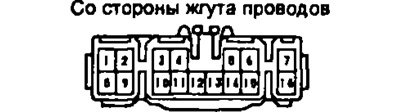
Models before 1996
Disconnect the connector from the relay and check the connector from the wire side as shown in the table.
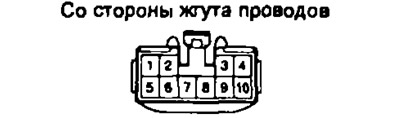
Models after 1996
1. Disconnect the connector from the relay and check the connector from the wire side as shown in the table.
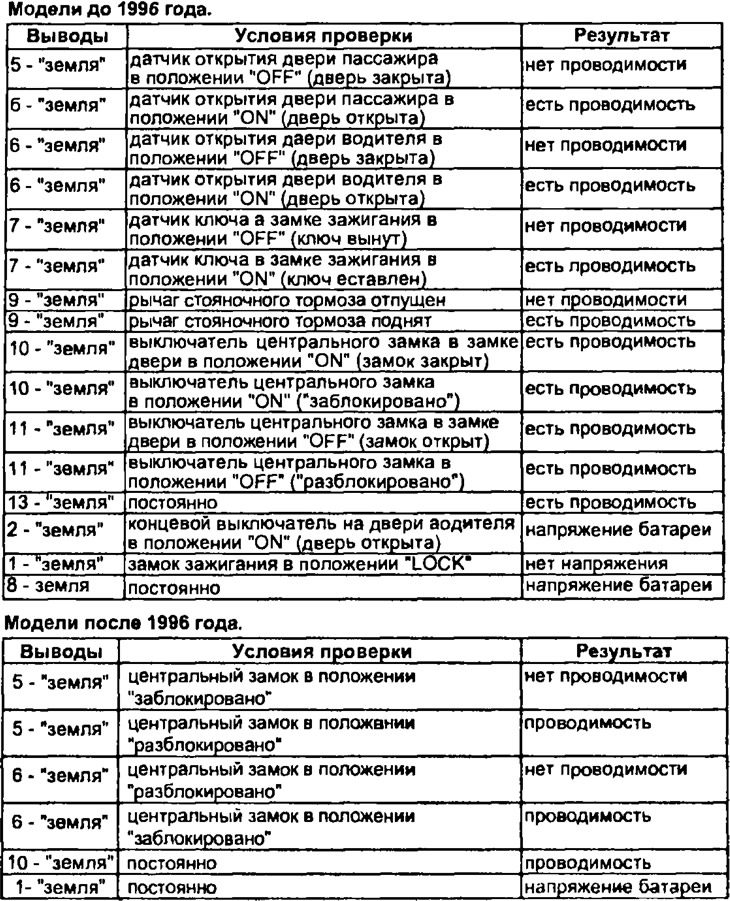
2. If the circuit matches the table and the fault is not corrected, check the target with the connector connected (for models produced after 1996).
- a) Connect the connector to the relay.
- b) Connect the positive wire of the voltmeter to terminal "8", the negative wire to terminal "7".
- c) Set the central locking switch to the "unlocked" position. Check that the voltage changes from 0 to battery voltage in about 0.2 seconds.
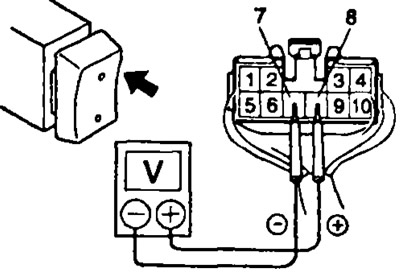
- d) Change the polarity of the voltmeter connection.
- d) Set the central locking switch to the "locked" position. Check that the voltage changes from 0 to battery voltage in about 0.2 seconds. If the operation is different from the description, replace the relay.
Checking the door unlock sensor
1. Check the conductivity.
- a) Check for conductivity between terminals "4" and "6" when the sensor is in the "OFF" position (the door is locked).
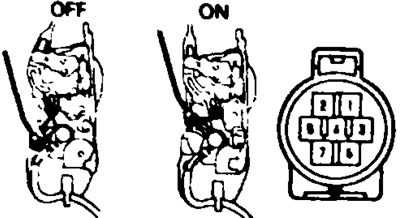
- b) Check for conductivity between terminals "4" and "6" when the sensor is in the "ON" position (the door is unlocked). If the conductivity is not as described, replace the lock.
2. Check the lock signal. Note: If the relay operation is as described, please check the lock signal.
- a) Connect the connector to the control relay.
- b) Connect the battery to terminals "3" (+) and "1" (-) of the connector.
- c) Set the lock switch to the "UNLOCK" position (unlocked), check that the voltage rises from 0 to battery voltage in about 0.2 sec.
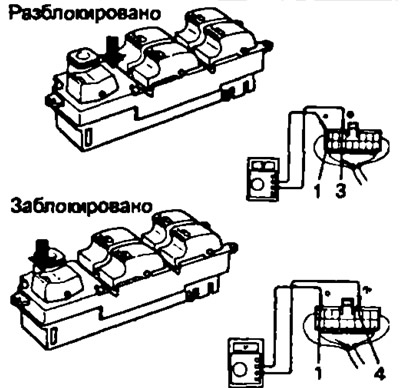
- d) Connect the battery to terminals "4" (+) and "1" (-) of the connector.
- d) Set the lock switch to the "LOCK" position (blocked), check that the voltage rises from 0 to battery voltage in about 0.2 sec. If the operation is not as described, replace the relay.