
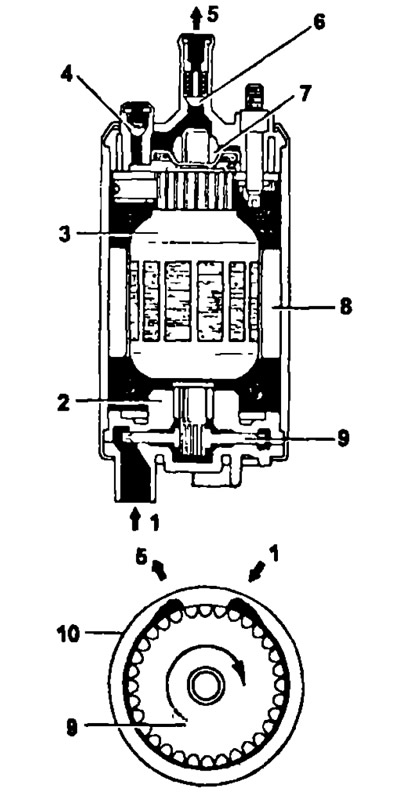
Fuel pump (details and knots): 1 - inlet, 2 and 7 - bearings, 3 - motor armature, 4 - pressure reducing valve, 5 - outlet, 6 - check valve, 8 - magnet, 9 - rotor (impeller), 10 - pump casing
Check on the engine
1. Check the operation of the fuel pump.
- A) Turn on the ignition. Note: do not start the engine.
- b) Short the terminals with a jumper "+V" and TR" fuel pump diagnostic connector.
- V) Check for fuel pressure in the hose coming from the fuel filter.
Note: At this point, noise is heard from the fuel flowing from the fuel pressure regulator to the return line.
3S-GE, 4A-FE, 7A-FE | 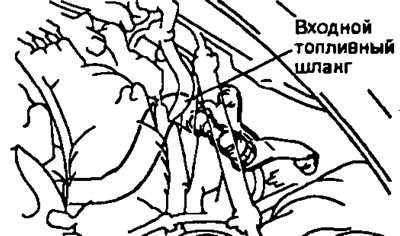
3S-FE, 4S-FE |
- G) Remove the jumper from the diagnostic connector
- d) Switch off the ignition. In the absence of the mentioned fuel pressure, check the following items:
- fusible inserts.
- circuit breakers.
- injection system main relay,
- fuel pump.
- start disable switch
- wire connections,
- electronic control unit.
2. Check fuel pressure.
- A) Make sure the battery voltage is at least 11-12V.
- b) Disconnect (-) battery wire.
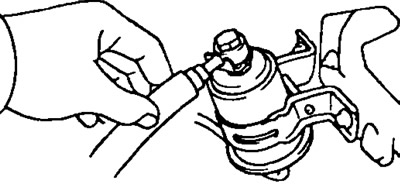
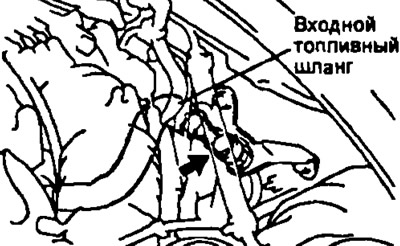
- V) (4A-FE, 7A-FE) Slowly loosen the fuel manifold inlet fuel hose bypass bolt, then remove the bolt, 2 gaskets, and fuel inlet hose.
Note:
- Place a suitable container under the fuel manifold.
- Slowly loosen the bypass bolt;
(3S-FE, 3S-GE, 4S-FE, 5E-FE) Unscrew the bypass bolt, remove the two gaskets and disconnect the inlet fuel hose from the fuel supply pipe (3S-FE, 4S-FE, 5E-FE) or from the fuel filter (3S-GE).
Note:
- - Place a suitable container under the fuel supply pipe or fuel filter;
- - Slowly loosen the bypass bolt;
- - When removing the bypass bolt, hold the tube in place with a wrench.
- G) Drain fuel.
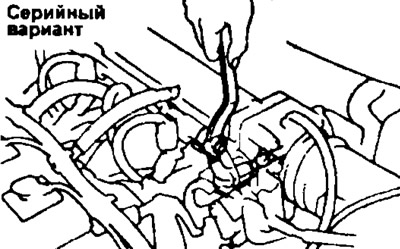
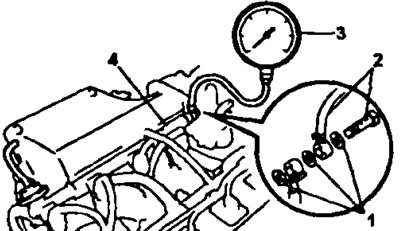
- d) (4A-FE, 7A-FE) Using new gaskets (1) and adapter fitting (2), install a pressure gauge (3) to the fuel manifold (4), by tightening the bypass bolt. Tightening torque: 29 Nm.
(3S-FE, 3S-GE, 4S-FE, 5E-FE) Using three new gaskets and an adapter fitting, connect a pressure gauge to the fuel line or fuel filter. Tightening torque: 29 Nm.
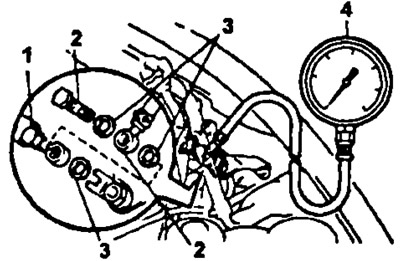
(3S-FE, 4S-FE). 1 - inlet fuel hose, 2 - adapter fitting, 3 - gasket, 4 - pressure gauge. | 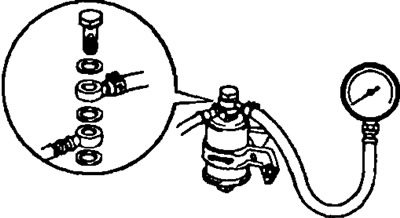
3S-GE, 5E-FE |
- e) Wipe up spilled fuel.
- and) Connect (-) wire to the battery.
- h) Jumper the terminals "FP" And "+V" diagnostic raevmv.
- And) Turn on the ignition.
- To) Check the fuel pressure, the nominal value of which should be within: 265-304 kPa (27-3.1 kg/cm2).
If the pressure is higher, replace the fuel pressure regulator. If the pressure is low, check:
- fuel hoses and their connections,
- fuel pump,
- fuel filter,
- fuel pressure control
- l) Remove the jumper from the diagnostic socket.
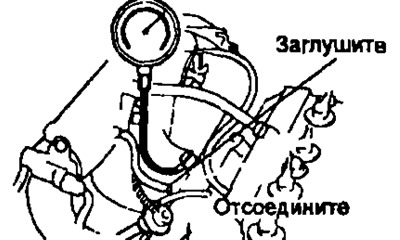
- m) Start the engine.
- n) Disconnect the vacuum hose from the fuel pressure regulator and plug it.
3S-GE
- o) Measure fuel pressure at idle. Nominal fuel pressure: 2.7-3.1 bar (2.7-3.1 kg/cm2).
- P) Connect a vacuum hose to the fuel pressure regulator and measure the fuel pressure at idle. Nominal fuel pressure: 2.1-2.6 bar (2.1-2.6 kg/cm2).
If fuel pressure is out of range, check vacuum hose and fuel pressure regulator.
- p) Stop the engine and check that the fuel pressure remains at least 1.5 bar (1.5 kg/cm2) within 5 minutes of stopping the engine. If not, check fuel pump, fuel pressure regulator and/or injectors.
- With) After checking the fuel pressure, disconnect again (-) battery wire. Carefully remove the gauge, being careful not to splash fuel.
- T) (4A-FE, 7A-FE) Using two new gaskets, connect the fuel inlet hose to the fuel manifold by tightening the bypass bolt. (3S-FE, 3S-GE, 4S-FE, 5E-FE) Using two new gaskets, reconnect the fuel inlet hose by tightening the bypass bolt. Tightening torque 29 Nm.
Note: When installing the bypass bolt, hold the fuel line or fuel filter in place with a wrench.
- at) Connect (-) wire to the battery.
- f) Start the engine and check that there are no fuel leaks at the connections.
Fuel pump check
1. Disconnect the wire from the negative (-) battery terminals.
2. Remove the rear seat cushion.
3. Disconnect the fuel pump and fuel level sensor connectors.
4. Check the fuel pump.
- A) Check the electrical resistance of the fuel pump armature by connecting an ohmmeter to the terminals "4" And "5" (3S-FE, 4A-FE, 4S-FE, 7A-FE) or "2" And "6" (5E-FE) fuel pump connector.
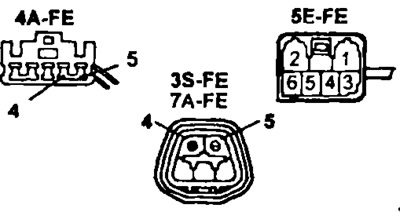
Resistance at 20°C - 0.2-3.0 Ohm. If the resistance is not within the specified range, replace the fuel pump.
- b) Check the operation of the pump by connecting (+) And (-) battery wires, respectively, to the terminals "4" and '5" ("2" And "6" (5E-FE)) pump connector. Make sure the fuel pump is working. Otherwise, replace the pump.
Note:
- To avoid burnout of the fuel pump winding, it must be checked quickly (within 10 seconds);
- Keep the fuel pump as far away from the battery as possible;
- Always turn on the pump only by connecting the wires to the battery terminals. Connect the fuel pump and fuel level sensor connectors.
- On the fuel pump housing, the terminals are marked accordingly "-" And "+". Using the color of the wires, check the polarity of the battery connection.
- V) Check the pressure of the fuel pump, to do this, lower the pump (with filter on) into a bucket and pour about two liters of gasoline. Connect a pressure gauge to the pump outlet tube and connect the pump to the battery.
Observe the pressure gauge for 2 seconds, then turn off the pump.
- If the pump pressure is less than 3 bar, then it is defective and must be replaced.
- If the pressure is 3-4 bar, the pump is working, but will not last long.
- If the pressure is 4-5.5 bar and above, then the pump is working.
6. Install the rear seat cushion.
7. Connect the wire to the negative (-) battery terminal.