
- A) Play (imitate) driving modes for which this diagnostic code is detected.
- b) Verify the correctness of the performed repairs, making sure that after performing them, this diagnostic code does not appear.
Code #21 - Oxygen sensor
Malfunction - damage to the oxygen sensor.
Test modes (numbers in circles in the figure):
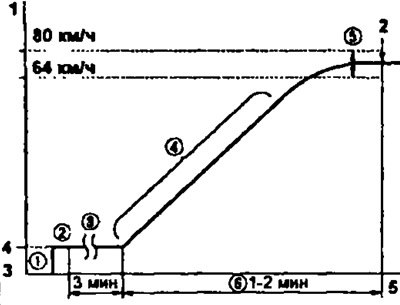
Code #21: 1 - vehicle speed, 2 - fixing a malfunction, 3 - ignition switch off, 4 - idle mode, 5 - time.
1. With the ignition off, disconnect the EFI fuse (15 A) for 10 seconds or more. Put the system into test mode by jumpering the TEZ contacts" And "E1" diagnostic connector with the ignition off.
2. With all accessories off, start the engine and warm it up to normal operating temperature.
3. Let the engine idle for at least 3 minutes.
4. Start driving, gradually increase the engine speed to 1300-1700 rpm, and then hold it at about 1500 rpm with the air conditioner on and in the position "D* automatic transmission selector or 5th gear manual transmission. Try not to drop below 1200 rpm when changing gears. Gradually depress the accelerator pedal and hold it in this position to prevent engine braking.
5. Set the vehicle speed within 64-80 km/h.
6. Maintain this mode for 2-3 minutes.
Note:
- - If a malfunction exists, then the light panel "CHECK" lights up approximately 60 seconds after acceleration starts.
- - The fault will not be fixed if the test procedure is not exactly followed.
Code No. 25 - Lean air-fuel mixture
Note: Before performing this test, ensure that power is available to the oxygen sensor heater. Test modes (numbers in circles in the figure):
3S-FE, 3S-GE, 4A-FE, 4S-FE, 5E-FE, 7A-PE
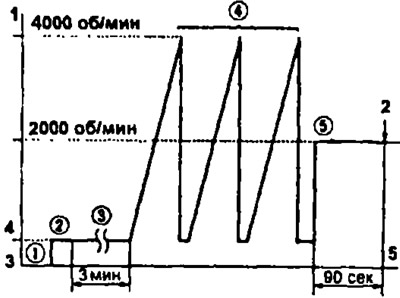
Code #25: 1 - engine speed, 2 - fixing a malfunction, 3 - turning on the ignition switch, 4 - idling mode, 5 - time
1 With the ignition off, disconnect the EFI fuse (15 A) for 10 seconds or more. Put the system into test mode by jumpering the contacts "TE2" And "E1" diagnostic connector with the ignition off.
2. Start the engine and warm it up to normal operating temperature.
3. Let the engine idle for about 3 minutes.
4. Quickly increase the engine speed to 4000 rpm by depressing the accelerator pedal. Repeat this three times.
5. Let the engine run at 2000 rpm for about 90 seconds.
Note: if there is a fault, the indicator light will flash on the 4th test step.
SE-FE
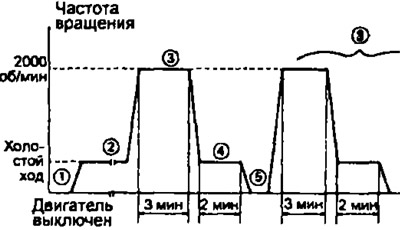
1. With the ignition off, disconnect the EFI fuse (15 A) for 10 seconds or more.
2. Start the engine and warm it up to normal operating temperature by turning on the accessories.
3. Let the engine run at about 2000 rpm for at least 3 minutes.
4. Let the engine idle for at least 2 minutes (for models with automatic transmission - in position "ABOUT" gear selector).
5. Switch off the ignition for at least 3 minutes.
6. Start the engine and repeat steps 3 and 4.
Note: If the test conditions are not strictly observed, fault detection will not be possible.
Troubleshooting with a volt/ohmmeter
Note:
- Troubleshooting procedures have been developed for each system. which are set out in this guide. These procedures may change slightly from time to time. However, the methods given in this manual are practically sufficient for troubleshooting.
- Before starting troubleshooting, it is recommended to check the fuses, fuse links and the condition of the connections.
- Troubleshooting procedures are based on the assumption that the fault is either an open circuit, or a short circuit in the circuit outside the electronics box, or a short circuit in it.
- If an engine malfunction appears at the required operating voltage at the terminals of the electronic unit, then it is faulty and must be replaced.