



Contents: General information ↓ Replacement ↓
General information
1. When servicing the oxygen sensor, take special precautions:
- Oxygen sensors have a permanently attached flexible wire and electrical connector that cannot be removed from the sensor. Damaging or removing the flexible wire or electrical connector destroys the sensor.
- Keep grease, dirt and other contaminants away from the electrical connector and sensor.
- Do not use cleaning solvents of any brand to clean the oxygen sensor.
- Do not drop the sensor and handle it with extreme caution.
Replacement
Note: Since the sensor is mounted in the exhaust manifold or catalytic converter, each of which is compressed when cold, removing the oxygen sensor when the engine is cold can be very difficult. To avoid damaging the sensor, which can occur, start the engine and let it run for one to two minutes, then turn it off. Be careful not to get burned when performing the following procedure.
Models with four-cylinder engine
Front Oxygen Sensor
Note: On 2003 and earlier models, there are two front oxygen sensors, one for each three-way catalytic converter, which are integral with their respective exhaust manifold. The front oxygen sensors are located on the upper ends of the three-way catalytic converters and are accessible through the exhaust manifold heat shield. On 2004 and later models, there is one three-way catalytic converter and therefore only one front oxygen sensor, which is also located on the upper end of the catalytic converter and is also accessible through the exhaust manifold heat shield.
2. Disconnect the ground cable from the battery (see paragraph 1 of chapter 5).
3. Locate the front oxygen sensor in the opening on the exhaust manifold heat shield (Fig. 9.3), then locate the sensor wiring, trace it to the electrical connector and disconnect the connector.
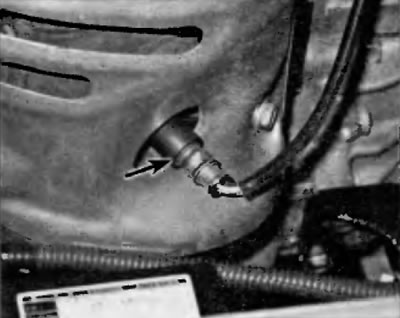
Fig. 9.3. On four-cylinder engines, the oxygen sensor is often located in the exhaust manifold and can be accessed through a hole in the heat shield (shown is a 2004 model with one front oxygen sensor)
4. Carefully unscrew the front oxygen sensor from the exhaust manifold. If you do not remove the exhaust manifold heat shield, you should use a special socket head to unscrew the oxygen sensor (Fig. 9.9).
5. Installation is carried out in the reverse order of removal. Apply a suitable lubricant to the threads of the oxygen sensor, then tighten it to the specified torque specified in Specifications at the beginning of this chapter.
Rear oxygen sensor
Note: On 2001-2003 models, there are two rear oxygen sensors, one for each of the two three-way catalytic converters that are integral to their respective exhaust manifolds. The rear sensors are located directly on the lower ends of the converters. On 2004 and later models, there is a single three-way catalytic converter and therefore only one rear sensor, which is located on the downpipe that connects the three-way converter to the rear converter.
6. Disconnect the ground cable from the battery (see paragraph 1 of chapter 5).
7. Raise the vehicle and place secure supports underneath it.
8. Locate the rear oxygen sensor in the exhaust manifold, then locate the sensor wiring, trace it to the electrical connector and disconnect the connector.
9. Unscrew the oxygen sensor (Fig. 9.9).
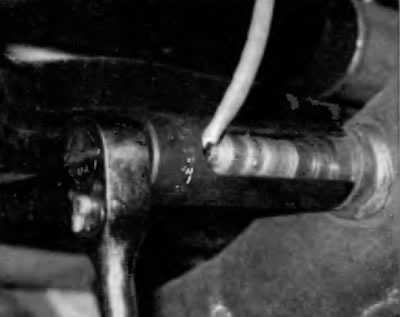
Fig. 9.9. After disconnecting the electrical connector of the rear oxygen sensor, carefully unscrew the sensor using a special socket head (shown) or a large wrench (when there is insufficient space to work with a wrench, a special socket head for oxygen sensors is convenient to use)
10. Installation is carried out in the reverse order of removal. Apply a suitable lubricant to the sensor threads, then tighten it to the prescribed torque specified in Specifications at the beginning of this chapter.
Models with V6 engine
Front oxygen sensors
Note: The front oxygen sensors are located on the exhaust manifolds, above the three-way catalytic converters.
11. Disconnect the ground cable from the battery (see paragraph 1 of chapter 5).
12. Disconnect the electrical connector of the front oxygen sensor (fig. 9.12, a, b).
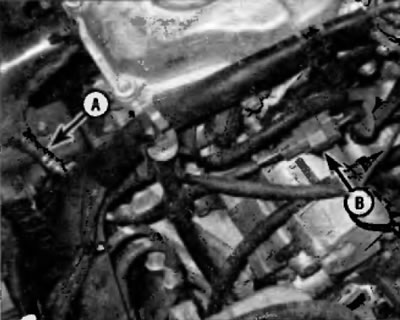
Fig. 9.12, a. The front oxygen sensor (A) for the front cylinder head on the V6 engine is located on the front exhaust manifold. To find the electrical connector, trace the wiring to connector (B), and then disconnect the connector. Then unscrew the sensor from the manifold
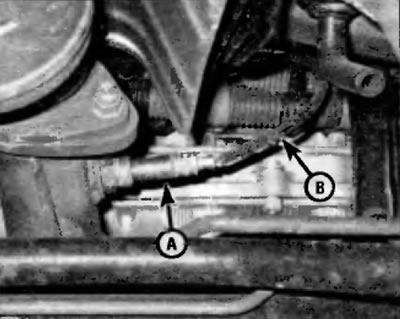
Fig. 9.12, b. The front oxygen sensor (A) for the rear cylinder head on the VG engine is located on the rear exhaust manifold. To locate the electrical connector, follow the wiring to the connector (B), then disconnect the connector. Then unscrew the sensor from the manifold
13. If you are replacing the front oxygen sensor for the rear exhaust manifold, raise the front of the vehicle and support it securely.
14. Remove the oxygen sensor from the exhaust manifold.
15. Installation is carried out in the reverse order of removal. Apply a suitable lubricant to the sensor threads, then tighten it to the prescribed torque specified in Specifications at the beginning of this chapter.
Rear oxygen sensor
Note: On 7999-2003 models, the rear oxygen sensor is located just behind the rear flange for the rear catalytic converter, just before the first muffler. On 2004 and later models, there are two rear oxygen sensors. The rear sensor for the front exhaust manifold is located in the downpipe that connects the front exhaust manifold to the Y-pipe, which in turn connects the front and rear exhaust manifolds to the center exhaust pipe. The rear oxygen sensor for the rear exhaust manifold is also located in this Y-pipe (there is no connecting pipe between the rear exhaust manifold and the center exhaust pipe).
16. Disconnect the ground cable from the battery (see paragraph 1 of chapter 5).
17. Raise the vehicle and place secure supports underneath it.
18. Locate the rear oxygen sensor (Fig. 9.18) and trace the sensor wiring to the appropriate electrical connector. On some models, the rear seat and carpet will need to be removed to access the rear sensor connector (see chapter 11).
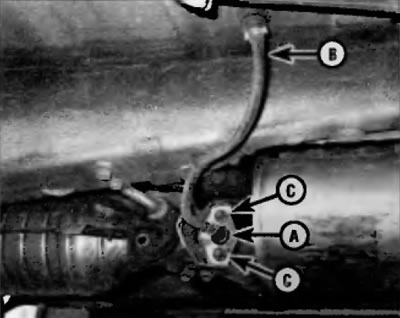
Fig. 9.18. On 1999-2003 models with a V6 engine, the rear oxygen sensor (A) is located just behind the flange for the rear catalytic converter, just before the first muffler. To replace the sensor, remove the rear seat and carpet, disconnect the electrical connector at the sensor wiring harness (B), then remove the two nuts (C) and remove the sensor
19. Unscrew the oxygen sensor.
20. Installation is carried out in the reverse order of removal. Apply a suitable lubricant to the sensor threads, then tighten it to the prescribed torque specified in Specifications at the beginning of this chapter.