Company Honda Company Ford Company Skoda Company Kia Company Mazda Company Mercedes Company Renault
English Русский
Български
Беларускі
Український
Српски
Hrvatski
Română
Polski
Slovenský
Magyar
Bookmark Articles Sitemap Contacts
ToyotaMan.ru


Camry Corolla Corona Carina Land Cruiser Highlander 4Runner RAV4 Others
Duet (1998-2004) Dyna Y50/Y60 (1984-1995)

Checking vehicle handling improvement systems [Toyota Duet M100]

  • Main
  • Toyota
  • Duet (1998-2004)
  • Chassis, running gear
  • Brake system
  • Checking vehicle handling improvement systems
0
1. Make sure the battery voltage is (with ignition off) corresponds to the nominal value.
  • Nominal voltage - 10 - 14 V

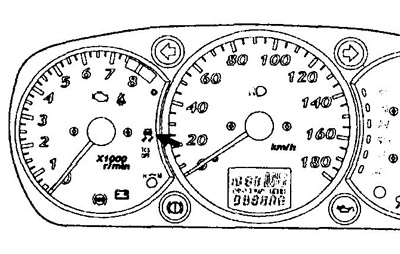
2. Check the ABS and slip indicators.

a) Turn on the ignition.

b) Make sure the indicator lights up for three seconds. If not, repair or replace (if necessary) fuse, indicator lamp and wiring harness.
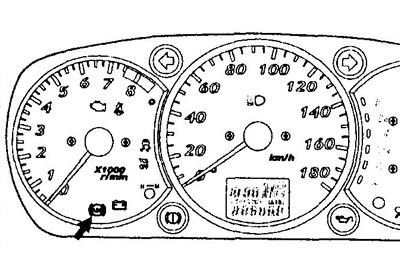


3. Read the fault code.

(Using the ABS indicator)

a) Short-circuit the "ECUT" and "E" terminals of the diagnostic connector (see the "Diagnostics" figure).

b) Turn on the ignition.

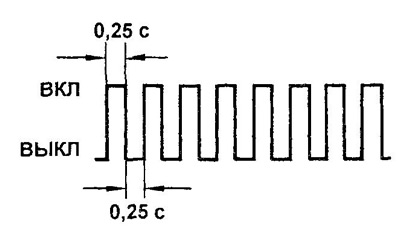
c) If there is a malfunction, the indicator will start flashing after 4 seconds. Count the number of flashes.

Note:
  • The fault code consists of two digits, the first digit is determined by the initial series of flashes, then after a pause of 1.5 seconds follows a second series of flashes, which corresponds to the second digit of the code.
  • If there are two or more fault codes, the lowest code will be displayed first, followed by the remaining codes in ascending order. There will be a 2.5 second pause between codes.
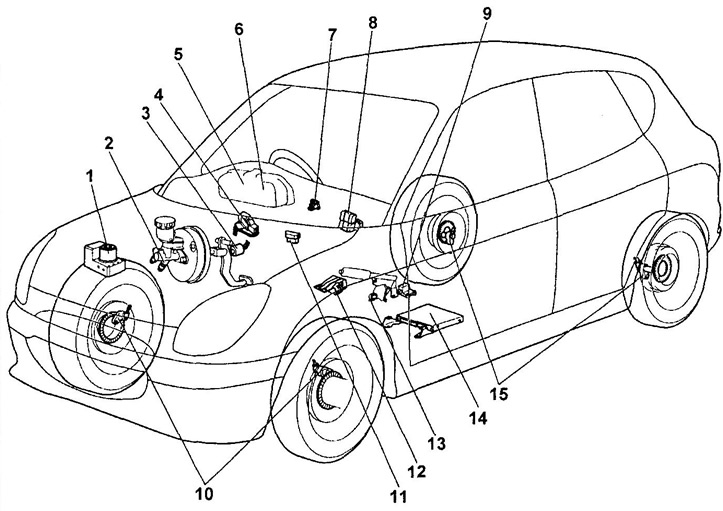


Location of the vehicle's handling improvement system components.
1 - pressure modulator,
2 - pressure sensor in the main brake cylinder,
3 - brake light switch,
4 - steering wheel position sensor,
5 - indicators (braking and handling systems),
6 - buzzer,
7 - traction control switch,
8 - vehicle control improvement systems relay,
9 - deceleration sensor,
10 - front wheel speed sensors,
11 - diagnostic connector,
12 - lateral displacement sensor,
13 - parking brake switch,
14 - electronic control unit for vehicle handling improvement systems,
15 - rear wheel speed sensors.
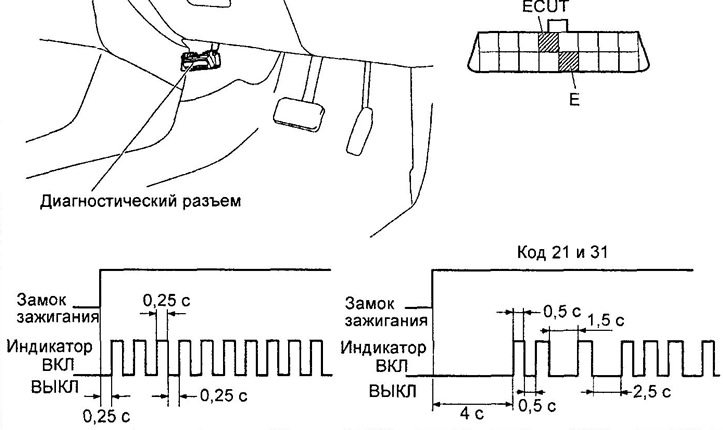


Diagnostics.


d) If there is no fault, the indicator will flash at 0.5 second intervals.
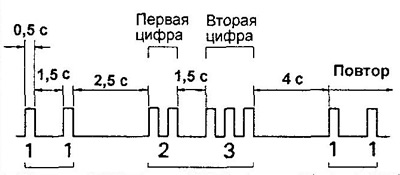


d) Remove the jumper from the diagnostic connector terminals.

e) After troubleshooting, erase the codes stored in the memory of the electronic control unit.

Note: If the battery is disconnected, all fault codes stored in the ECU memory will be erased.


g) Turn on the ignition and make sure that the ABS indicator lights up for three seconds and goes out.

(Using a tester)

a) Turn off the ignition and connect the tester to the diagnostic connector.

b) Turn on the ignition and read the fault codes using the tester manual. Determine the fault using the table "ABS system fault codes".

Note: When troubleshooting, please refer to the relevant electrical diagrams.


[The full article is posted on the website: ToyotaMan.ru]

c) After troubleshooting, clear the codes.
This article is available at: russian, bulgarian, belarusian, ukrainian, serbian, croatian, romanian, polish, slovak, hungarian
The article material has been checked: Kolokoltsev Grigory
Share information:
◀ Previous
Duet: Brake system
Next ▶

Checking the ABS circuit
Rear wheel speed sensors
Removal and installation the deceleration sensor
Front wheel speed sensors
Removal and installation the pressure modulator
Resetting fault codes
Diagnostics of sensors of systems for improving vehicle controllability
Pressure modulator — diagnostics
Control relays — diagnostics
Diagnostics of front wheel speed sensors
Similar articles on other Toyota models

➥ Checking mechanical transmission systems: test on a fully… Toyota Carina T190 (1992-1996)
➥ Vehicle Speed Sensor — Checking and Replacing Toyota Camry XV20 (1996-2001)
➥ Checking the vehicle's ground clearance Toyota Corolla E80 (1983-1990)
➥ Expansion Valve — Checking on Vehicle Toyota Corona T190 (1992-1997)
➥ Diagnostics of faults in vehicle components and systems Toyota Cruiser 100 (1998-2007)
➥ Checking the starter motor without removing it from the… Toyota 4Runner N120 (1989-1995)
Link in different formats to this article
Comments and feedback from visitors
No comments yet


Add two numbers 18 + 20


Duet (1998-2004) 
  • General information
  • User manual
  • Maintenance
  • Power unit
  • Petrol engines 1.0 l
  • Petrol engines 1.3 l
  • Engine overhaul
  • Cooling system
  • Lubrication system
  • Fuel injection system
  • Starting and charging system
  • Transmission
  • Clutch
  • Mechanical gearbox
  • Automatic gearbox
  • Drive shafts and cardan
  • Chassis, running gear
  • Car suspension
  • Steering
  • Brake system
  • Body and interior
  • Body elements
  • Heating and air conditioning
  • SRS security system
  • Electrical equipment
  • Equipment and devices
  • Electrical circuits
Dyna Y50/Y60 (1984-1995) 
  • Petrol engines «Y»
  • Checks and adjustments
  • Overhaul engine
  • Cooling and lubrication system
  • Fuel system
  • Starting and charging system
  • Ignition system
  • Diesel engines «L»
  • Engine repair
  • Cooling and lubrication system
  • Fuel system
  • Starting and charging system
  • Transmission
  • Clutch
  • Manual gearbox
  • Cardan shaft
  • Chassis, running gear
  • Car suspension
  • Brake system
  • Steering
  • Electrical equipment and body
  • Body elements
  • Equipment and devices
  • Electrical diagrams
ToyotaMan.ru © 2018–2026 • Mobile version • Interesting about Toyota • Administration • Sitemap: EN BG BY UA RS HR RO PL SK HU • Search system • Bookmark
Camry Vista-V40 • Camry XV10 • Camry XV20 • Camry XV30 • Corolla Verso-AR10 • Corolla E80 • Corona T190 • Carina T170 • Carina T190 • Land Cruiser J70 (diesel) • Land Cruiser J60 (petrol) • Land Cruiser J100 • Highlander XU20 (petrol) • 4Runner N120 • RAV4 XA10 • RAV4 XA20 • Duet M100 • Dyna Y50 •
We require cookies to enable some interactive features. Is that ok with you?