Company Honda Company Ford Company Skoda Company Kia Company Mazda Company Mercedes Company Renault
English Русский
Български
Беларускі
Український
Српски
Hrvatski
Română
Polski
Slovenský
Magyar
Bookmark Articles Sitemap Contacts
ToyotaMan.ru


Camry Corolla Corona Carina Land Cruiser Highlander 4Runner RAV4 Others
Duet (1998-2004) Dyna Y50/Y60 (1984-1995)

Adjusting the clearances in the valve timing mechanism [Toyota Dyna Y50]

  • Main
  • Toyota
  • Dyna Y50/Y60 (1984-1995)
  • Diesel engines «L»
  • Engine repair
  • Adjusting the clearances in the valve timing mechanism
0
Note: Perform work only on a cold engine.


1. Remove the intake pipe.

2. Remove the cylinder head protective cover (If installed).

3. Remove the cylinder head valve cover.

4. Set the piston of the first cylinder to TDC.

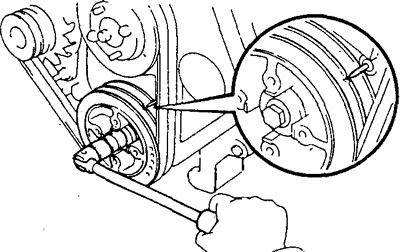
a) Turn the crankshaft pulley clockwise to align its groove with the reference mark.

b) The cams of the first cylinder should be directed upwards, the fourth downwards.

If the specified condition is not met, then rotate the crankshaft one revolution (360°) and align the mark as indicated above.


5. Adjusting the thermal gap.

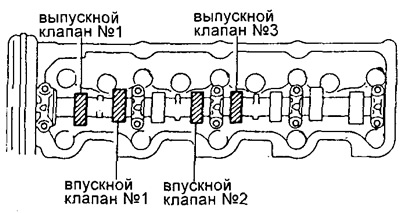
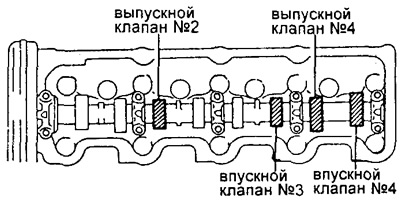
a) Check only the valves marked in the figure.

Measure the clearance between the valve lifter and the camshaft with a flat feeler gauge.

Record any valve clearance measurements that are out of specification. These records will be used to determine shim thickness.

Gaps (cold engine):
  • Inlet valve - 0.20 - 0.30 mm
  • Exhaust valve - 0.40 - 0.50 mm


b) Rotate the crankshaft one revolution (360°) and align the mark as shown above.


c) Measure the clearances of the valves marked in the figure.


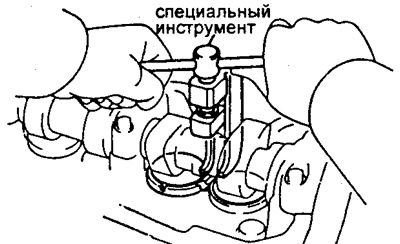
d) Remove the adjusting washer.

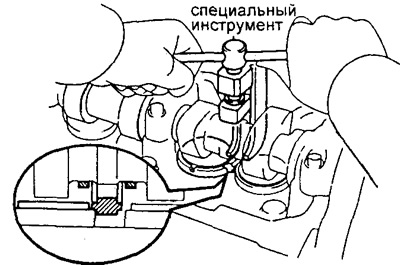
Turn the crankshaft until the cam lobe points upward.

Using the special tool, push the valve lifter down.

Tip: Before pressing the valve lifter, position the groove on the lifter toward the exhaust manifold side.


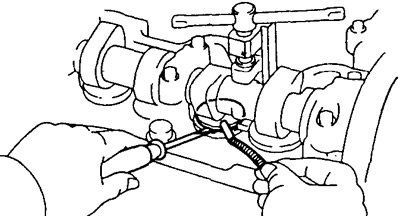
Using a small screwdriver and a magnet, remove the adjusting washer.


d) Determine the size of the replacement adjusting washer using the formula: Measure the thickness of the washer that was removed.


Calculate the thickness of the new washer:
For the inlet valve N=T + (A - 0.25 mm)

For the exhaust valve N=T + (A - 0.45 mm),

where: T is the thickness of the previously used washer,

A - measured valve clearance,

N - thickness of the new washer.

Select a new washer whose thickness comes closest to the calculated values.

Reminder: Washers are available in seventeen sizes in 0.05mm increments ranging from 2.50mm to 3.30mm.


e) Install a new adjusting washer onto the valve tappet. Remove the special tool.


g) Recheck the gap.

6. Reinstall the cylinder head cover (If installed).

7. Install the cylinder head valve cover.
This article is available at: russian, bulgarian, belarusian, ukrainian, serbian, croatian, romanian, polish, slovak, hungarian
The article material has been checked: Evdokimov Evgeniy
Share information:
◀ Previous
Dyna Y50/Y60: Engine repair
Next ▶

Checking the tension of the alternator drive belt
Checking the air filter condition
Preliminary checks when adjusting the engine
Checking and adjusting the injection advance angle
Adjusting idle speed and maximum speed
Adjusting the idle speed with the air conditioner on
Checking the end of compression stroke pressure
Timing Belt — Design Description
Similar articles on other Toyota models

➥ Adjusting valve clearances in the valve timing mechanism Toyota Corolla E80 (1983-1990)
➥ Adjusting the clearances in the valve timing mechanism Toyota Cruiser 70 (1985-1996, diesel)
➥ Checking and adjusting valve clearances Toyota Camry XV20 (1996-2001)
➥ Checking and adjusting valve clearances Toyota Carina T170 (1988-1992)
➥ Checking and adjusting valve clearances (96,000 km or 6… Toyota Highlander 1 (2000-2007, petrol)
➥ Checking and adjusting valve clearances Toyota 4Runner N120 (1989-1995)
Link in different formats to this article
Comments and feedback from visitors
No comments yet


Add two numbers 14 + 37


Duet (1998-2004) 
  • General information
  • User manual
  • Maintenance
  • Power unit
  • Petrol engines 1.0 l
  • Petrol engines 1.3 l
  • Engine overhaul
  • Cooling system
  • Lubrication system
  • Fuel injection system
  • Starting and charging system
  • Transmission
  • Clutch
  • Mechanical gearbox
  • Automatic gearbox
  • Drive shafts and cardan
  • Chassis, running gear
  • Car suspension
  • Steering
  • Brake system
  • Body and interior
  • Body elements
  • Heating and air conditioning
  • SRS security system
  • Electrical equipment
  • Equipment and devices
  • Electrical circuits
Dyna Y50/Y60 (1984-1995) 
  • Petrol engines «Y»
  • Checks and adjustments
  • Overhaul engine
  • Cooling and lubrication system
  • Fuel system
  • Starting and charging system
  • Ignition system
  • Diesel engines «L»
  • Engine repair
  • Cooling and lubrication system
  • Fuel system
  • Starting and charging system
  • Transmission
  • Clutch
  • Manual gearbox
  • Cardan shaft
  • Chassis, running gear
  • Car suspension
  • Brake system
  • Steering
  • Electrical equipment and body
  • Body elements
  • Equipment and devices
  • Electrical diagrams
ToyotaMan.ru © 2018–2026 • Mobile version • Interesting about Toyota • Administration • Sitemap: EN BG BY UA RS HR RO PL SK HU • Search system • Bookmark
Camry Vista-V40 • Camry XV10 • Camry XV20 • Camry XV30 • Corolla Verso-AR10 • Corolla E80 • Corona T190 • Carina T170 • Carina T190 • Land Cruiser J70 (diesel) • Land Cruiser J60 (petrol) • Land Cruiser J100 • Highlander XU20 (petrol) • 4Runner N120 • RAV4 XA10 • RAV4 XA20 • Duet M100 • Dyna Y50 •
We require cookies to enable some interactive features. Is that ok with you?